Hi all,
I was just wondering what was the best way to brace a shell when doing extensive welding, ie replacing floors, inner/outer sills, boot floor etc..
Also I think my shell is slightly bent from an accident years ago, is there any measurements I could take to find out if this is so?
Thanks
Ad

Best way to brace a bodyshell when welding.........?
Started by
adammini
, Apr 27 2007 10:43 AM
8 replies to this topic
#2

AndyR
-
- Members
-

- 453 posts
Speeding Along Now
- Location: Norway
- Local Club: None
Posted 27 April 2007 - 05:49 PM
Hi there
Firstly to check how straight the car is you can do the test at the back of a Haynes manual, this is only to check if the subframes are straight. But by logical thinking if the subframes are straight and you carry out this test it should tell you if the front panel/wings are straight as well. The test involves making squares from the subframes, then bisecting them - corner to corner. Then make a line connecting the centers of the "X's" of the bisected squares. This line should point directly down the centre of the car; from this line you can measure symmetry of the panels. By simply measuring distance from this line to a panel and then comparing with the other side. The only problem with this method is that it relies on the subframes being straight - but it’s a start!! As for the welding, it depends on what you're welding. Triangles are very strong shapes, so weld triangles into door spaces when doing sills to prevent the body bending. It all depends on how extensive the welding is you need to do and if a respray is needed afters! If a respray is needed then the more bracing the better, u can never have too much. Or you could do what a lot of people do and roll the shell on its side, taking gravity out of the equation (if doing sills/floor panels)
Take lots of measurements before you remove panels, then make sure the new ones match these numbers.
Don’t take my word for it but it’s a start, hopefully others can add and correct me if im wrong!
Good luck
#3
Pepys
-

- Noobies
-
- 72 posts
Stage One Kit Fitted
- Local Club: None
Posted 28 April 2007 - 07:35 AM
Yep, I was wondering about the best way to do this. Infact, I got up this morning ready to post a new topic. Lindsay Porter doesn't mention anything about it in the Mini Restoration Guide. 
I noticed on one of the other projects someone had used a big piece of timber wedged horizontally across the door pillars. Is this enough if you're only doing the outer sills? If you're going to weld something in... how and where? Any pics anyone?
I noticed on one of the other projects someone had used a big piece of timber wedged horizontally across the door pillars. Is this enough if you're only doing the outer sills? If you're going to weld something in... how and where? Any pics anyone?
Edited by Pepys, 28 April 2007 - 04:15 PM.
#4
Guess-Works.com
-

- Traders
-
- 19,838 posts
Gearbox Guru
- Local Club: Rugby Classic Mini Owners Club
Posted 28 April 2007 - 07:46 AM
Bits of timber 

Edited by GuessWorks, 28 April 2007 - 07:46 AM.
#5
adammini
-
- Members
-
- 349 posts
Speeding Along Now
Posted 28 April 2007 - 11:46 AM
Thanks AndyR, sounds all very useful! I will defenately give that a go.
Bits of wood, wow does that really work? I suppose it must be good if you dont want to paint too much afterwards.
Guessworks, just out of interest, that wheel in the background what it it? It looks very smart in black with the silver hub cap!
Ad
Bits of wood, wow does that really work? I suppose it must be good if you dont want to paint too much afterwards.
Guessworks, just out of interest, that wheel in the background what it it? It looks very smart in black with the silver hub cap!
Ad
#6
1984mini25
-

- Members
-
- 8,784 posts
Crazy About Mini's
- Location: -
Posted 28 April 2007 - 02:03 PM
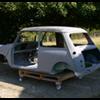
I noticed on one of the other projects someone had used a big piece of timber wedged horizontally across the door pillars. Is this enough if your're only doing the outer sills? If your're going to weld something in... how and where? Any pics anyone?
Works perfectly fine and I chopped out and replaced the inner sill, outer sill. Then once that was done I wedged another bit inside the rear bin so I could replace a few bits that hold the corner of the heal board in place.
[attachment=31708:HPIM6342.jpg][attachment=31709:HPIM6353.JPG][attachment=31710:
PIM6373.jpg]
[attachment=31711:HPIM6315.jpg][attachment=31712:HPIM6320.jpg]
#7
R1mini
-

- Members
-
- 1,387 posts
One Carb Or Two?
Posted 28 April 2007 - 02:34 PM
Don't cut everything out in one go, you shouldn't need much in the way of bracing if you do a bit at a time
Cheers
David
Cheers
David
#8
Pepys
-
- Noobies
-
- 72 posts
Stage One Kit Fitted
- Local Club: None
Posted 30 April 2007 - 04:38 PM
Just one thought, if you use timber this will stop the door gap getting smaller, but how does it prevent it expanding? Is this why u weld a brace in? 
#9
Guess-Works.com
-
- Traders
-
- 19,838 posts
Gearbox Guru
- Local Club: Rugby Classic Mini Owners Club
Posted 30 April 2007 - 05:43 PM
Thanks AndyR, sounds all very useful! I will defenately give that a go.
Bits of wood, wow does that really work? I suppose it must be good if you dont want to paint too much afterwards.
Guessworks, just out of interest, that wheel in the background what it it? It looks very smart in black with the silver hub cap!
Ad
It's a chromed reverse rim painted black on the inside and with the chrome hubcap on.


1 user(s) are reading this topic
0 members, 1 guests, 0 anonymous users


