
Looking good. Keep up the good work. Another mini saved.


Mayfair Rebuild
Started by
davej
, May 26 2008 06:38 PM
307 replies to this topic
#62

Miniowner123
-

- Members
-

- 987 posts
One Carb Or Two?
- Location: Brighton
Posted 28 March 2010 - 08:25 PM
just read all the way through and i gotta say good work and progress
i have an 89 mayfair too and it seems its rotted away in exactly the same places, was the rot all hidden by filler? if so we might of bought them off the same person lol
"Cheer mate. I had some bits hidden by filler but not that much to be fair. How are you getting on with yours?"
well i ended up buying a spit to put it on which makes it so much easier to work on the car, especially in a single garage with lots of rubbish in, but lets just say i wish i worked as quick as you lol. but your projects giving me the enthusiasm to get mine done though

#63
davej
-
- Members
-
- 985 posts
Kelly Jones
- Location: North Wales
Posted 28 March 2010 - 08:42 PM
As quick as me?? Mine is taking a lot longer than I had hoped for but I did loose interest for a long time. Back into the swing of things now, just got to keep it going.
Ah right yeah a spit is always a good way of doing it, saves you being on the floor on your back like I have been this weekend.
I`m just thinking of it being finished and being able to go for a drive on a lovely sunny day.
Ah right yeah a spit is always a good way of doing it, saves you being on the floor on your back like I have been this weekend.
I`m just thinking of it being finished and being able to go for a drive on a lovely sunny day.
#64
Miniowner123
-
- Members
-
- 987 posts
One Carb Or Two?
- Location: Brighton
Posted 28 March 2010 - 09:13 PM
yeah i lose interest very easily, but i do eventually come back to it, hopefully for good now as i gotta get it done before october due to me and my girlfriend having a baby on the way, just wish i never cut the back seat bench out now lol
Edited by pinhead, 28 March 2010 - 09:14 PM.
#65
davej
-
- Members
-
- 985 posts
Kelly Jones
- Location: North Wales
Posted 01 April 2010 - 07:08 PM
Had today off work so I could crack on with the mini, hoping to get quite a bit done over the weekend.
I`ve spot welded some small plates over the holes that come in the outer sills and then put some filler on the outside so the holes are covered

Also tidied up the brackets for the front panel, painted and then put some seam sealer down the sides

I applied some seam sealer to the welds for the inner sill while I had the sealer out

I`ve spot welded some small plates over the holes that come in the outer sills and then put some filler on the outside so the holes are covered
Also tidied up the brackets for the front panel, painted and then put some seam sealer down the sides
I applied some seam sealer to the welds for the inner sill while I had the sealer out
#66
davej
-
- Members
-
- 985 posts
Kelly Jones
- Location: North Wales
Posted 04 April 2010 - 06:55 PM
Well I`ve had a very productive day today, got the drivers side wing and A panel on:


I have welded the edge of the seams on the A panel with the mig but once I`ve ground them back tomorrow I`ll get a spot welder on it as well. Only just remembered I have got some different arms for the spot welder allowing better access
Also had a hole in the doorstep which I have now filled

Tomorrows plan is to grind them welds back and the have a go at fitting the outer sill.
I have welded the edge of the seams on the A panel with the mig but once I`ve ground them back tomorrow I`ll get a spot welder on it as well. Only just remembered I have got some different arms for the spot welder allowing better access
Also had a hole in the doorstep which I have now filled
Tomorrows plan is to grind them welds back and the have a go at fitting the outer sill.
#67
davej
-
- Members
-
- 985 posts
Kelly Jones
- Location: North Wales
Posted 05 April 2010 - 06:20 PM
Another productive day today, got the rear quarter panel in. Need to grind the welds down on the door post and maybe a little bit more welding.


#68
davej
-
- Members
-
- 985 posts
Kelly Jones
- Location: North Wales
Posted 18 April 2010 - 03:53 PM
Right then, the drivers side is pretty much complete, this weekend I welded in the outer sill

I then got some friends round and we picked the shell up took it outside to turn it around so I can now tackle the near side

Horrible oversill

I then started cutting into the sills
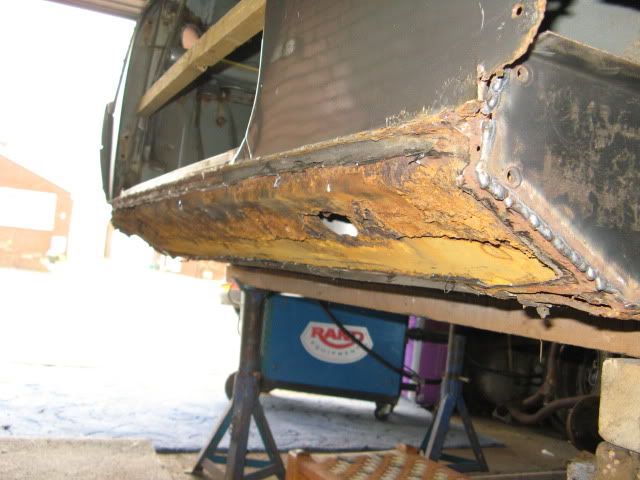

Thanks for looking, any comments welcome
I then got some friends round and we picked the shell up took it outside to turn it around so I can now tackle the near side
Horrible oversill
I then started cutting into the sills
Thanks for looking, any comments welcome
#69
dezshearer
-

- Members
-
- 441 posts
Speeding Along Now
- Location: Belfast
- Local Club: mini-chat.co.uk
Posted 18 April 2010 - 04:01 PM
looks great mate.
In that photo, is there seam sealer between the wing and front panel?
If there is, i'd get the wire brush out and take it out. I did that on mine, but it fell out after driving about because of vibrations.
You'd be better putting some black silicone sealer stuff in there, the stuff body repair places use for bonding panels etc. It's a modern seam sealer.
#70
vaughn1
-

- Members
-
- 194 posts
Mini Mad
Posted 18 April 2010 - 04:44 PM
looking good mate, i am in the same boat with thr rear end on mine, can you tell me where you got your sills, rear arches and rear quarters? what was the fit like?
links would be really helpful
vaughn
links would be really helpful
vaughn
#71
davej
-
- Members
-
- 985 posts
Kelly Jones
- Location: North Wales
Posted 18 April 2010 - 05:43 PM
In that photo, is there seam sealer between the wing and front panel?
No its filler which apparently is what was used when they left the factory, I have put seam sealer on the inside of the join though.
Vaughn,
I used non-genuine rear quarter panels Linky, I cant remember where I got them from but they are Magnum panels and it is exactly the same as the one in the link.
The rear arches I got off one of my dads friend who had them lying around in his garage. They are genuine one`s.
As for the sills I used these for the inners and I also made some pieces myself. For the outers I used genuine heritage panels link.
The fit on the rear quarter wasn`t as bad as expected to be honest, it just needed a bit of work around the door pillar. My thinking was if it didn`t fit then I would just cut what I needed out of it.
Hope this helps
#72
vaughn1
-
- Members
-
- 194 posts
Mini Mad
Posted 18 April 2010 - 08:40 PM
ok cheers mate, i have ordered the panels i require from there so check my project thread in the next few weeks to see how i got on.
vaughn
vaughn
#73
davej
-
- Members
-
- 985 posts
Kelly Jones
- Location: North Wales
Posted 18 April 2010 - 08:45 PM
Will do mate, good luck with it 
#74
davej
-
- Members
-
- 985 posts
Kelly Jones
- Location: North Wales
Posted 21 April 2010 - 04:13 PM
Quick update, I`ve been busy chopping out the old inner sill


Thanks for looking
Thanks for looking
#75
Teapot
-

- Members
-
- 5,010 posts
TMF Legend
- Location: Seaton, East Devon
Posted 21 April 2010 - 04:43 PM
It sure was crusty.
Keep up the good work
Keep up the good work
Edited by Teapot, 21 April 2010 - 04:44 PM.


2 user(s) are reading this topic
0 members, 2 guests, 0 anonymous users


