Hello
I am looking for an electrian. I have just had headlight failure again and have traced it to the switch again which was all hot and as some have guessed the thing has melted itself. A lot of people on here have said you should have a relay on the switch so the current isn't melting it.
Thats a great idea but can someone please give me an idea of how to wire one in. Also what type of relay do I need to buy? Where should I get the feed rom for the relay ect..
All I know at this point is I have 3 wires at the back of the switch. So if you can start at the beginning and give us a diagram that would be great.
Thanks
Lloyd
Oh forgot there are no spot lights all standard 1998 City E


Headlight Switch Relay
Started by
coopersmate
, May 30 2008 12:45 PM
19 replies to this topic
#2

lrostoke
-

- Members
-

- 6,923 posts
Crazy About Mini's
- Location: Maybank, Staffordshire
- Local Club: none
Posted 30 May 2008 - 12:58 PM
Fitting a relay may just mask the problem though ..
The switch shouldn't get that hot that it melts unless something is actually wrong with the exisiting setup. Especially like you say its all standard.
The switch shouldn't get that hot that it melts unless something is actually wrong with the exisiting setup. Especially like you say its all standard.
#3
coopersmate
-
- Members
-
- 408 posts
Speeding Along Now
Posted 30 May 2008 - 01:04 PM
Fitting a relay may just mask the problem though ..
The switch shouldn't get that hot that it melts unless something is actually wrong with the exisiting setup. Especially like you say its all standard.
OK suggestions please?
But still interested in the relay diagram anyway.
#4
lrostoke
-
- Members
-
- 6,923 posts
Crazy About Mini's
- Location: Maybank, Staffordshire
- Local Club: none
Posted 30 May 2008 - 01:13 PM
Haven't got a wiring diagram in front of me for the later models , I do know yours should already have a dipped beam relay..big pink thing near the clocks on the dash
If nobodies got back I'll check out the diagram when I get home.
If nobodies got back I'll check out the diagram when I get home.
#5
lrostoke
-
- Members
-
- 6,923 posts
Crazy About Mini's
- Location: Maybank, Staffordshire
- Local Club: none
Posted 30 May 2008 - 02:35 PM
Just had a look at the wiring diagram and it should be like this
Brown wire into switch is perminant live feed
red wire out goes to sidelight circuit (front sides, rear tail lights) it goes through a fuse first, red wire into fuse red/green out. I suspect thats one of the fuses on the main fuse block...check the condition of the fuse holders, make sure clean and good contact.
If it was a short after that fuse you would expect the fuse to blow, but its possible it may be shorting before.
The other wire out of the switch is a blue one, this goes to the pink dim/dip relay I mentioned. It may be a fault with the relay.
You really need to find out which circuit is causing the overheating. Does it do it with just sidelights on or only when dipped beam is on.
#6
Jammy
-

- Members
-
- 25,397 posts
Moved Into The Garage
Posted 30 May 2008 - 02:37 PM
I agree with lrostoke. If you don't find out whats causing the resistance or extra current through the wires then you'll just be masking the problem, which could potentially still lead to an electrical fire, and at worst, bye bye Mini.
#7
coopersmate
-
- Members
-
- 408 posts
Speeding Along Now
Posted 30 May 2008 - 03:39 PM
Ok Thanks
I will go have a look and see what I find. It will have to wait till Sunday now anyhow.
I will let you know
I will go have a look and see what I find. It will have to wait till Sunday now anyhow.
I will let you know
#8
dklawson
-

- TMF+ Member
-
- 10,923 posts
Moved Into The Garage
- Name: Doug
- Location: Durham, NC - USA
- Local Club: none
Posted 30 May 2008 - 07:22 PM
Let me chime in here and say that traditionally on all the British cars that made it to the U.S. the headlight and horn circuits are two of the weakest links. They both suffer from contact resistance problems that cause the switch to overheat. It's not a problem elsewhere in the circuit, it's a problem with resistance in the switch itself. This was particularly true of the Minis and MGs with plastic rocker switches... less so on cars with toggle switches.
The switches for early cars are expensive new and of questionable condition used. A lot of us with older cars make relay panels to protect the switches (horn and headlights). This reduces the current flowing through the switch to a trivial 100 mA or less as opposed to several amps. It's cheap insurance.
So, what do you need? The general description is an ISO or Bosch 30A relay. These are the little black cubes as shown in this link:
http://www.coolcatco...aqs/relays.html
Some have mounting tabs, some do not.
I don't have a diagram for you but let me say quickly that what you do is you use two relays, one for high-beam, one for low. (Refer to the link above for pin numbers). In the engine compartment, the blue/white and blue/red wires are disconnected from the headlights. (Let's focus on one relay... the other is identical except for the color codes). Take the disconnected blue/white wire from the high-beam and connect it to relay terminal #87. Connect the other end of the blue/white wire (coming from the dimmer switch) to relay terminal #85. Run an earth/ground wire to terminal #86. Run a large gauge wire with an inline fuse between relay terminal #30 and the hot (battery) lug of the starter solenoid.
Here's how it works. Power passes from the starter solenoid terminal through the inline fuse to terminal #30 on the relay. However, the relay is "open" so no current reaches the headlight. When you turn on the high-beams by operating the dimmer switch, power from the dimmer switch travels to relay terminal #85, through the relay coil and out relay terminal #86 to earth. This energizes the relay coil and pulls the contact closed which connects the power to relay output terminal #87... lighting the high beam.
The low-beam will be the blue/red wire and it's relay is wired exactly the same. Your main light switch on the dashboard will still be passing power to turn on the small running lights on the car, but all the high current for the headlamps will pass through the relays which significantly reduces the load on the dashboard switch.
#9
Ethel
-

- TMF Team
-
- 26,022 posts
..is NOT a girl!
- Local Club: none
Posted 30 May 2008 - 07:51 PM
When I worked in a BL dealers we used to replace the light switches of the type used on 1980's Minis by the bucket load on warranty claims. You'll notice it's made out of different plastic to the other rocker switches. Doug has given me an idea - you could use a single cross over relay off the main beam stalk switch - even if the stalk is partly dead.
#10
lrostoke
-
- Members
-
- 6,923 posts
Crazy About Mini's
- Location: Maybank, Staffordshire
- Local Club: none
Posted 30 May 2008 - 09:45 PM
If there is a bit of uncertainty with the switch then I would think on a 1989 car which should have the dim/dip relay already, you would only need to put a relay on the sidelight circuit. The main and high beam are already going through a relay !!!
Should be fairly easy to do get a relay something like this
http://cgi.ebay.co.u...id=p3286.c0.m14
Ignore the Hella part numbers its just the numers on the relay I'm trying to show, just found this diagram through google
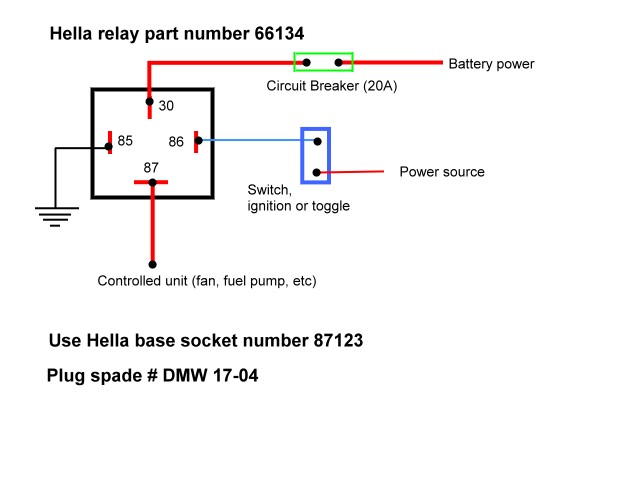
The red wire out of the switch, make a break in it..
the end coming from the switch connect to terminal 86 on the relay
the other end connect to terminal 87
terminal 85 connects to earth, car body is a good source.
terminal 30 connect as shown in the picture, ignore the fact it says fan and the fuse will need to be at same rating as the fuse in the side light circuit, the live side of the solenoid is a good source of a live feed
Should be fairly easy to do get a relay something like this
http://cgi.ebay.co.u...id=p3286.c0.m14
Ignore the Hella part numbers its just the numers on the relay I'm trying to show, just found this diagram through google
The red wire out of the switch, make a break in it..
the end coming from the switch connect to terminal 86 on the relay
the other end connect to terminal 87
terminal 85 connects to earth, car body is a good source.
terminal 30 connect as shown in the picture, ignore the fact it says fan and the fuse will need to be at same rating as the fuse in the side light circuit, the live side of the solenoid is a good source of a live feed
Edited by lrostoke, 30 May 2008 - 09:47 PM.
#11
coopersmate
-
- Members
-
- 408 posts
Speeding Along Now
Posted 31 May 2008 - 09:08 AM
That is excellent
Thank you
Thank you
#12
fikasteve
-

- TMF+ Member
-
- 124 posts
Mini Mad
Posted 03 April 2012 - 10:45 PM
This is proof the search function works! With a bit of patience i've found exactly how to put a relay in my headlight circuit now, this is perfect thanks. There's an awful lot of good knowledge on this forum, even from back in 2008 lol.
#13
dklawson
-
- TMF+ Member
-
- 10,923 posts
Moved Into The Garage
- Name: Doug
- Location: Durham, NC - USA
- Local Club: none
Posted 04 April 2012 - 12:07 PM
I think you are the only person who has ever offered praise for the search feature. Regardless, I'm glad this and other old threads help someone.
#14
jimnali
-

- Members
-
- 260 posts
Mini Mad
Posted 04 April 2012 - 03:44 PM
If there is a bit of uncertainty with the switch then I would think on a 1989 car which should have the dim/dip relay already, you would only need to put a relay on the sidelight circuit. The main and high beam are already going through a relay !!!
I am not familiar with the later wiring but I wonder if this is correct. Surely dim/dip only affects the dip beam?
Does anyone use dim/dip anyway? I would be inclined to remove this and replace with two separate relays as described above.
The sidelight circuit only draws a small current (2 amps?) so it is probably not necessary to add a relay to this circuit.
#15
jimnali
-
- Members
-
- 260 posts
Mini Mad
Posted 04 April 2012 - 03:50 PM
This question comes up so often that it would be worth pinning the answer in FAQs.


1 user(s) are reading this topic
0 members, 1 guests, 0 anonymous users


