ps - front subframe from Pro-Motive:
http://www.pro-motive.co.uk/

Mayfair2
Started by
Alan Carruthers
, Mar 26 2010 01:54 PM
310 replies to this topic
#47

MINI-TURBO
-
- Members
-

- 230 posts
Mini Mad
- Location: newmarket
Posted 14 April 2011 - 10:29 PM
looks realy good mate, im starting my mid engined R1 mini in about 6 months
#48
Alan Carruthers
-
- Members
-
- 226 posts
Mini Mad
Posted 11 September 2011 - 07:54 PM
Many thanks, all the best with your project.
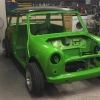
So, a few updates and hopefully more to come with the roll cage fabrication starting soon.
First off, a drawing showing what we're hopeing to achieve.

So, a few updates and hopefully more to come with the roll cage fabrication starting soon.
First off, a drawing showing what we're hopeing to achieve.
#49
Alan Carruthers
-
- Members
-
- 226 posts
Mini Mad
Posted 11 September 2011 - 08:03 PM
Also got hold of a pedal box from a Lotus Elise on ebay which is quite a bit of kit.


#50
Alan Carruthers
-
- Members
-
- 226 posts
Mini Mad
Posted 11 September 2011 - 08:32 PM
Made a template of the proposed seat bracket as well and Matt mocked this up along with the pedal box to try to nail down the seat position.


#51
Alan Carruthers
-
- Members
-
- 226 posts
Mini Mad
Posted 11 September 2011 - 08:40 PM
Matt also mocked up the arches so that I could do the drawings - the plan is to extend them down to the sills to try to get a better fit.


#52
Alan Carruthers
-
- Members
-
- 226 posts
Mini Mad
Posted 11 November 2011 - 01:44 PM
Managed to get hold of an R1 5PW from ebay but in classic style it turned up missing a few crucial parts!
I need to get hold of a complete alternator, chappy at my local bike garage has told me the parts alone would be £950 for a new rotor and stator which seems like crazy money.
Any help would be much appreciated, hope to post some progress pics up soon.
Al
I need to get hold of a complete alternator, chappy at my local bike garage has told me the parts alone would be £950 for a new rotor and stator which seems like crazy money.
Any help would be much appreciated, hope to post some progress pics up soon.
Al
#53
Alan Carruthers
-
- Members
-
- 226 posts
Mini Mad
Posted 18 January 2012 - 01:00 PM
Think I understand and have sorted the modifcations to the water pipes on the top of the engine, can anyone explain and post up pics of what you have to do to the pipes lower down?
Thanks,
Al
Thanks,
Al
#54
2-alex-2
-
- Members
-
- 480 posts
Speeding Along Now
- Location: wales
- Local Club: SouthWalesMini club
Posted 31 January 2012 - 08:27 PM
nice little project you have there looking good
#55
Alan Carruthers
-
- Members
-
- 226 posts
Mini Mad
Posted 22 February 2012 - 02:36 PM
Many thanks, it's coming along.
So I got a 2002 5PW from ebay, no stator or rotor as hinted at earlier but these are now sorted, new plugs and new barnett clutch as well so pretty much ready to go, just missing a few sensors. It also came with a power commander and quickshifter which is basically why I went for it - they finally arrived a few months after the engine but hopefully all good now. I've spent a long time cleaning it, touching up the head and modifying and painting the water pipes, pictures to follow at some stage.


So I got a 2002 5PW from ebay, no stator or rotor as hinted at earlier but these are now sorted, new plugs and new barnett clutch as well so pretty much ready to go, just missing a few sensors. It also came with a power commander and quickshifter which is basically why I went for it - they finally arrived a few months after the engine but hopefully all good now. I've spent a long time cleaning it, touching up the head and modifying and painting the water pipes, pictures to follow at some stage.
#56
Alan Carruthers
-
- Members
-
- 226 posts
Mini Mad
Posted 22 February 2012 - 02:42 PM
Next up was getting some clocks, these are from a 2003 bike but I've been told will work, second hand from DK. Originally wanted some aftermarket clocks but lads at PDQ in Taplow who did the engine work said it would be good to stick with the stock item as they show up the fault codes when/if anything goes wrong - picked these up thinking could wire it to be able to use both but when they arrived I thought they looked quite good and would look even better if put behind a laser cut face plate.
So Mr 'sheet metal' Matt is going to have a go at making a little pod with radiused edges front and back which will end up being body coloured and spaced off the dash rails by 3 tubes.


So Mr 'sheet metal' Matt is going to have a go at making a little pod with radiused edges front and back which will end up being body coloured and spaced off the dash rails by 3 tubes.
#57
Alan Carruthers
-
- Members
-
- 226 posts
Mini Mad
Posted 22 February 2012 - 02:45 PM
Matt has also begun to work wonders with the new cage, feet plates as follow:


#58
Alan Carruthers
-
- Members
-
- 226 posts
Mini Mad
Posted 22 February 2012 - 02:55 PM
And the main event:


#59
Alan Carruthers
-
- Members
-
- 226 posts
Mini Mad
Posted 22 February 2012 - 03:00 PM
All just tacked in at the minute until all the tube is in place but then Matt's going to fishscale weld everything, he's a bit of a legend.
So few pics thinking about the guage pod and doors bars drawing (rip of from the Bill Sollis book but have never seen some I liked more, might be a bit tricky getting in!):


So few pics thinking about the guage pod and doors bars drawing (rip of from the Bill Sollis book but have never seen some I liked more, might be a bit tricky getting in!):
#60
Alan Carruthers
-
- Members
-
- 226 posts
Mini Mad
Posted 22 February 2012 - 03:02 PM
Last update for now, got the seat brackets made, pretty pleased with them:


0 user(s) are reading this topic
0 members, 0 guests, 0 anonymous users


