Nice one. Always good to do stuff yourself
It is indeed

Just waiting on 2 indicator lenses for the dash, then I can cover it in suede and finally fit it

One heck of a member

Posted 28 May 2011 - 09:21 PM
Nice one. Always good to do stuff yourself
Mini Mad
Posted 31 May 2011 - 08:27 AM
 photo.JPG 495.18K
124 downloads
photo.JPG 495.18K
124 downloads
Starting My Mini Up

Posted 31 May 2011 - 09:53 AM
" I AM THE SPECIAL ONE"

Posted 31 May 2011 - 12:16 PM
 gonna get that hole cutter, looks so good!
Learner Driver

Posted 31 May 2011 - 12:55 PM
One heck of a member
Posted 31 May 2011 - 10:16 PM
Hi Ross did you get much more done over the weekend ?
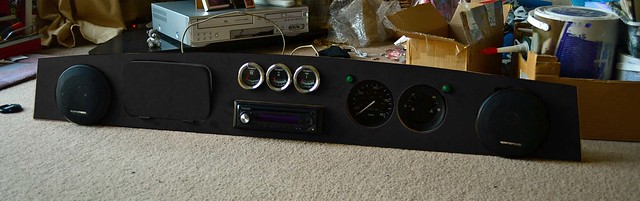
The bits I have been waiting for didnt arrive but here is a pic of my dash so far
Sorry it a poor pic as I had to take it on my phone
Yours looks good by the way Good job 
I'm getting me one of them tools for my drill thanks for link
i done a DIY dash and covered it with a carbon look alike vinyl
 They're pretty nifty
 Very nice, how did you cut the glove box out?
One heck of a member
Posted 02 June 2011 - 05:53 PM


One heck of a member
Posted 02 June 2011 - 11:28 PM
One heck of a member
Posted 03 June 2011 - 04:38 PM
Hi Ross the dash is looking great mate
Mark


Camshaft & Stage Two Head

Posted 04 June 2011 - 03:11 PM
Mini Mad
Posted 04 June 2011 - 04:27 PM
Edited by Pete93, 04 June 2011 - 04:28 PM.
One heck of a member
Posted 04 June 2011 - 10:26 PM
just glovebox nob and catch to go Looking good mate
Looking good, what sort of catch are you going to use for the glovebox door?

One Carb Or Two?

Posted 04 June 2011 - 11:53 PM
Been looking for those indicator lens inserts everywhere! may i ask were you bought them from? sorry for being random :sCamshaft & Stage Two Head
Posted 05 June 2011 - 02:23 AM
Looking good, what sort of catch are you going to use for the glovebox door?


0 members, 0 guests, 0 anonymous users


