


Step By Step Engine Build, No Waffel, Just Building..
Started by
AndyMiniMad.
, Nov 26 2011 12:36 PM
116 replies to this topic
#46

JaseZA
-

- Noobies
-

- 2 posts
Starting My Mini Up
Posted 14 February 2012 - 10:05 AM
Thank you Andy for the great guide! As stated by many, the laptop will be added to the list of 'must have' tools!
#47
AndyMiniMad.
-
- Members
-
- 3,290 posts
Up Into Fourth
- Location: Under The Bonnet.
Posted 20 February 2012 - 08:46 PM
Just thought I would add this wee bit on the end of this thread...I timed my fast road cam in on the 0ther 1380 engine tonight but this engine has a duplex vernier set up...Any way the method of timing the cam is identical to the bit I showed earlier except that once you have the reading at the end of all the malarky with the DTI, it is possible to adjust the timing, My RE 13 OT cam needs to be timed at 104.5 ATDC. but once I set it dot to dot as above it was coming in at 109deg ATDC.
A QUICK UPDATE... PLEASE IGNORE THE 104.5DEG ATDC FIGURES IN THE ABOVE POST...IT SHOULD BE 101.5 - 102 DEG ATDC..104.5 IS IF YOU USE THE DTI ON THE VALVE GEAR AND NOT THE PUSH ROD AS I HAVE SHOWN..
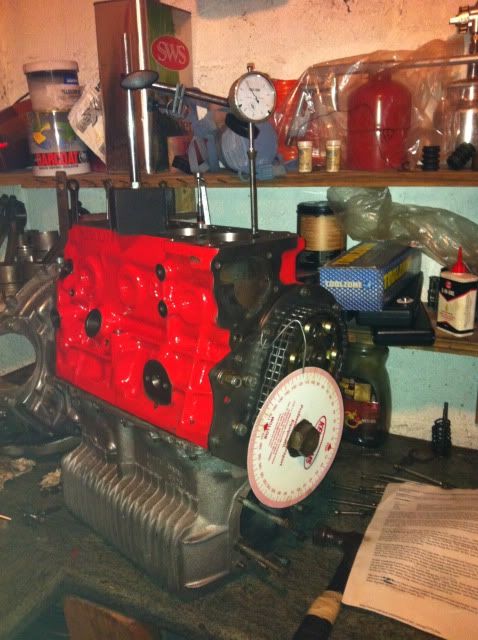
So I loosened the alan keys and gave it a quick tap ant clockwise...Once I checked it again I found it was miles off at 114deg ATDC..So another adjustment, (two taps clockwise)..and then checked again, 105deg ATDC...which is good enough for me..
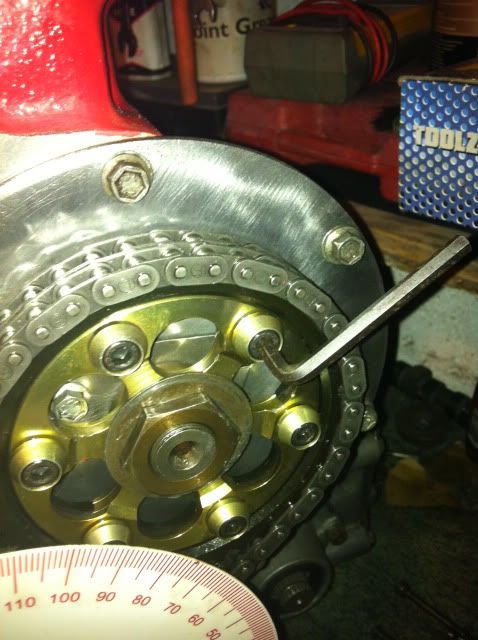
So basicly the timing is exactly the same procedure as the non vernier type gears...but with the abillity to make easy adjustments without removing the timing gears and faffing around with offset woodruf keys..
Thanks for all your nice coments on this thread...Im delighted if my ramblings have helped a few people...
A QUICK UPDATE... PLEASE IGNORE THE 104.5DEG ATDC FIGURES IN THE ABOVE POST...IT SHOULD BE 101.5 - 102 DEG ATDC..104.5 IS IF YOU USE THE DTI ON THE VALVE GEAR AND NOT THE PUSH ROD AS I HAVE SHOWN..
So I loosened the alan keys and gave it a quick tap ant clockwise...Once I checked it again I found it was miles off at 114deg ATDC..So another adjustment, (two taps clockwise)..and then checked again, 105deg ATDC...which is good enough for me..
So basicly the timing is exactly the same procedure as the non vernier type gears...but with the abillity to make easy adjustments without removing the timing gears and faffing around with offset woodruf keys..
Thanks for all your nice coments on this thread...Im delighted if my ramblings have helped a few people...
#48
AndyMiniMad.
-
- Members
-
- 3,290 posts
Up Into Fourth
- Location: Under The Bonnet.
Posted 22 February 2012 - 04:31 PM
A QUICK UPDATE... PLEASE IGNORE THE 104.5DEG ATDC FIGURES IN THE ABOVE POST...IT SHOULD BE 101.5 - 102 DEG ATDC..104.5 IS IF YOU USE THE DTI ON THE VALVE GEAR AND NOT THE PUSH ROD AS I HAVE SHOWN..
I hate that I cant edit my mistake...new forum is great but this not being able to edit your posts is just pants..
I hate that I cant edit my mistake...new forum is great but this not being able to edit your posts is just pants..
Edited by Ethel, 29 September 2012 - 11:14 AM.
- I can :-)
#49
Frank the Tank
-

- TMF+ Member
-
- 530 posts
Super Mini Mad
- Location: Stavanger
- Local Club: Yet to find one local - ish
Posted 07 March 2012 - 10:03 PM
I will most certainly be printing this out (no power in my garage!!) and using this along with my Haynes.
Thank you for taking the time to do this. We'll see how I fare when I strip and rebuild mine for the 1st time ever.
Thank you for taking the time to do this. We'll see how I fare when I strip and rebuild mine for the 1st time ever.
#50
AndyMiniMad.
-
- Members
-
- 3,290 posts
Up Into Fourth
- Location: Under The Bonnet.
Posted 11 April 2012 - 08:08 AM
As promised, here is a very short vidio of this engine's first start...its not great quality (I phone)..It started first time once I had span it over with the plugs out (left on the heater) to get the oil preasure up...and then a few spins with the fuel pump runing...I then replaced the plugs and......

So there it is then..One 1380 engine thas runs as smooth as a babys bottom and has no rattles or clunks...Well chuffed!!
So there it is then..One 1380 engine thas runs as smooth as a babys bottom and has no rattles or clunks...Well chuffed!!
Edited by AndyMiniMad., 11 April 2012 - 08:13 AM.
#51
nev_payne
-

- Members
-
- 2,249 posts
Up Into Fourth
- Location: UK
Posted 04 May 2012 - 02:01 PM
Always a great feeling when it's a first time start. Especially after all that work, you must be chuffed to bits.
#52
najmulhaq01
-

- Noobies
-
- 7 posts
Just On Tickover
- Location: PAKISTAN
Posted 08 May 2012 - 05:34 PM
Andy, I wish this thread would have been avaiable a couple of years ago and I might not had the sleepness nights when my engine was under going an overhaul by a person who has never seen an A- series engine before. In Pakistan we have very few people who can work on these engines. Thank you very much for posting the vivid pics of every important step although it is very difficult to do when you are already engrossed in building up an engine...
#53
Miniman1987
-

- TMF+ Member
-
- 79 posts
Stage One Kit Fitted
- Location: Elgin
- Local Club: IMOG
Posted 12 May 2012 - 01:26 PM
Absolutely fantastic!! 
Such a clear and easily understandable guide, even a complete engine newbie like myself feels like he can attempt an engine rebuild now
Such a clear and easily understandable guide, even a complete engine newbie like myself feels like he can attempt an engine rebuild now
#54
Jake Didsbury
-

- Members
-
- 294 posts
Mini Mad
- Location: Barnsley - South Yorkshire
- Local Club: Barnsley Mini Club
Posted 08 June 2012 - 06:39 PM
Thanks andy, im in the process of rebuilding an engine atm so this guide is going to prove very useful
#55
rich2
-

- Members
-
- 351 posts
Speeding Along Now
Posted 21 June 2012 - 03:02 PM
Wow this is excellent stuff! I'm about to embark on stripping down my first engine, (a long neglected 1100) so this guide is really valuable. Thanks!
#56
96minimig
-

- Members
-
- 169 posts
Mini Mad
- Location: Norfolk
Posted 30 July 2012 - 08:42 PM
I had my last/recent engine built by JonSpeed Racing in Nun Eaton. 1275 spi reconditioned unit. Granted a spot on engine touch wood and has done 17k miles succesfully no glitches.
That said I will be building my own engine next time round. and bigger hopefully.
Brilliant guide!
That said I will be building my own engine next time round. and bigger hopefully.
Brilliant guide!
Edited by 96minimig, 30 July 2012 - 08:43 PM.
#57
HUBBA.HUBBA
-

- TMF+ Member
-
- 2,823 posts
Up Into Fourth
- Location: Sutton Coldfield
- Local Club: Loan wolf
Posted 26 August 2012 - 03:06 PM
Really good info thats helping me at the moment. Thanks
#58

Posted 27 September 2012 - 09:36 AM
Andy,
I, like other posters in this thread, am eternally in your debt for this sequence of how-to-with-pictures.
It has made large parts of my rebuild so much easier (and cheaper!) am I only curse the lack of a computer in my basement workshop as I have to run up and down stairs every time I need to double-check something in your thread.
Thank you for the effort you put into it and if you are ever in New Zealand, look me up. You'll drink for free.
#59
AndyMiniMad.
-
- Members
-
- 3,290 posts
Up Into Fourth
- Location: Under The Bonnet.
Posted 29 September 2012 - 10:22 AM
Andy,
I, like other posters in this thread, am eternally in your debt for this sequence of how-to-with-pictures.
It has made large parts of my rebuild so much easier (and cheaper!) am I only curse the lack of a computer in my basement workshop as I have to run up and down stairs every time I need to double-check something in your thread.
Thank you for the effort you put into it and if you are ever in New Zealand, look me up. You'll drink for free.
Im glad you found it usefull mate!!
Im Scottish....So you may regret the free beer offer!! LOL!!
#60
Noah
-

- Members
-
- 4,136 posts
Up Into Fourth
- Location: NE London/Essex
- Local Club: Essex Mini Club
Posted 20 November 2012 - 11:19 PM
This thread is great, I will have a print out of this and D.Vizards book next to me while I rebuild mine .
Really well explained unlike a lot of guides nowadays.
. Really well explained unlike a lot of guides nowadays.


0 user(s) are reading this topic
0 members, 0 guests, 0 anonymous users


