Jump to content


Photo
- - - - -

A Classic Mini,built Totally Out Of Paper


  • Please log in to reply
128 replies to this topic

#1 MINI FOR EVER

MINI FOR EVER

    Stage One Kit Fitted

  • Noobies
  • PipPipPip
  • 70 posts
  • Location: ATHENS

Posted 13 December 2013 - 05:56 PM

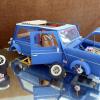
HELLO TO EVERYONE!I'M NEW TO THE FORUM SO EXCUSE ME FOR ANY MISTACES!LAST YEAR,I DECIDED TO BUILT A MINI,AS THE TITLE STATES,OUT OF PAPER!USING ONLY PAPER,PHOTOS FROM THE WEB (MAINLY FROM THIS FORUM) AND A PENCIL,I STARTED THE BUILD,WITHOUT ANY TEMPLATES,EVEN WITHOUT A SPECIFIC (AT THE BEGINNING OF THE BUILD) SCALE!I LET THE PICTURES DO THE TALKING!

Attached File  M1 (3).JPG   28.79K   86 downloads

Attached File  M1 (4).JPG   20.22K   40 downloads

Attached File  M1 (5).JPG   23.62K   41 downloads

Attached File  M1 (10).JPG   23.49K   35 downloads


Edited by MINI FOR EVER, 02 February 2014 - 12:56 PM.


#2 ToM 2012

ToM 2012

    Up Into Fourth

  • Members
  • PipPipPipPipPipPipPipPipPip
  • 4,066 posts
  • Location: halesowen

Posted 13 December 2013 - 05:58 PM

wow that looks wicked! how long as it taken you so far? 


#3 MINI FOR EVER

MINI FOR EVER

    Stage One Kit Fitted

  • Noobies
  • PipPipPip
  • 70 posts
  • Location: ATHENS

Posted 13 December 2013 - 06:05 PM

WICKED?WHAT DO YOU MEAN?IS IT GOOD OR NOT? UP TO THIS STAGE,IT TOOK ABOUT 3 DAYS.


#4 HarrysMini

HarrysMini

    I do not have short legs!!!

  • Members
  • PipPipPipPipPipPipPipPipPip
  • 3,352 posts
  • Location: .

Posted 13 December 2013 - 06:12 PM

Looks very good.


Is your caps lock key broken?


#5 MINI FOR EVER

MINI FOR EVER

    Stage One Kit Fitted

  • Noobies
  • PipPipPip
  • 70 posts
  • Location: ATHENS

Posted 13 December 2013 - 06:18 PM

I'm just used in writing like this!Thanks a lot for your comments!As a handmade paper model it can't be accurate enough,but I'm trying to do it as close as possible to the original.


Edited by MINI FOR EVER, 14 December 2013 - 08:56 AM.


#6 MINI FOR EVER

MINI FOR EVER

    Stage One Kit Fitted

  • Noobies
  • PipPipPip
  • 70 posts
  • Location: ATHENS

Posted 13 December 2013 - 06:20 PM

I forgot to say,any comments welcome!


Edited by MINI FOR EVER, 14 December 2013 - 08:57 AM.


#7 alex-95

alex-95

    I am THE CLAMP MAKER

  • TMF+ Member
  • PipPipPipPipPipPipPipPipPipPip
  • 6,017 posts
  • Location: l

Posted 13 December 2013 - 06:21 PM

Looks excellent :thumbsup:, How are you going to get all the curves?


I think the cross member could do with being a bit bigger and the larger  recessed area on the front floor pan should be at the front :shy: :lol:


#8 andy159

andy159

    Speedy fingers.

  • Members
  • PipPipPipPipPipPipPip
  • 837 posts

Posted 13 December 2013 - 06:22 PM

looks great and it wont rust either :)


#9 MINI FOR EVER

MINI FOR EVER

    Stage One Kit Fitted

  • Noobies
  • PipPipPip
  • 70 posts
  • Location: ATHENS

Posted 13 December 2013 - 06:30 PM

I'll try to get the curves as curved as possible!Andy 159 do you think a kind of wash at the end of the built will help it look more close to the real?I agree about the cross member.I'm going to fix it if possible!Help me to improve it!I don't havemy own real mini yet,so I'm trying to discover it through fotos!


#10 ToM 2012

ToM 2012

    Up Into Fourth

  • Members
  • PipPipPipPipPipPipPipPipPip
  • 4,066 posts
  • Location: halesowen

Posted 13 December 2013 - 06:31 PM

wicked as in great superb fantastic. what color you going to have it? 


#11 JackF

JackF

    Super Mini Mad

  • TMF+ Member
  • PipPipPipPipPipPip
  • 645 posts
  • Location: West Sussex
  • Local Club: NSMOC

Posted 13 December 2013 - 06:40 PM

The real challenge will be making the engine work... :shifty:


#12 MINI FOR EVER

MINI FOR EVER

    Stage One Kit Fitted

  • Noobies
  • PipPipPip
  • 70 posts
  • Location: ATHENS

Posted 13 December 2013 - 06:43 PM

As I stated the build started last year so many of the parts,including the engine,have already been built.I'm going for tahiti blue colour.Anyway some more pictures of the build to follow in a few minutes.I started building the front subframe and the hood.

Attached File  M1 (19).JPG   26.94K   22 downloads

Attached File  M1 (20).JPG   30.23K   38 downloads

Attached File  M1 (22).JPG   21.66K   18 downloads


Edited by MINI FOR EVER, 02 February 2014 - 12:56 PM.


#13 myredmini

myredmini

    My Mummy Says It's OK

  • TMF+ Member
  • PipPipPipPipPipPipPipPipPip
  • 3,211 posts
  • Name: Dan
  • Location: Teesside
  • Local Club: BOG MOG

Posted 13 December 2013 - 08:04 PM

Thats brilliant! Something a bit different.

#14 MINI FOR EVER

MINI FOR EVER

    Stage One Kit Fitted

  • Noobies
  • PipPipPip
  • 70 posts
  • Location: ATHENS

Posted 14 December 2013 - 08:51 AM

After building the floor,inner wings and rear seats,I installed temporarily the front subframe to strengthen the build.I started to build the rear quarter panels,along with some strengthening.I wondered whether to make it deseamed or not.At the last foto you can also see the rear ''tubed'' arches.Anyway some more pictures of the build.

Attached File  M1 (30).JPG   30.8K   39 downloads

Attached File  M1 (36).JPG   29.31K   16 downloads


Edited by MINI FOR EVER, 02 February 2014 - 12:55 PM.


#15 Tamworthbay

Tamworthbay

    Crazy About Mini's

  • Members
  • PipPipPipPipPipPipPipPipPipPip
  • 7,025 posts
  • Name: Clive
  • Location: Tamworth
  • Local Club: A5 minis

Posted 14 December 2013 - 08:54 AM

Quality work there! Do you do this sort of thing for a living or is it just a hobby?


0 user(s) are reading this topic

0 members, 0 guests, 0 anonymous users