Jump to content


Photo
- - - - -

Austin Mini 1981 Hl


  • Please log in to reply
43 replies to this topic

#1 cookie4343

cookie4343

    **Caution: Do Not Feed Alcohol**

  • Traders
  • PipPipPipPipPipPipPipPipPip
  • 2,257 posts
  • Local Club: CV1 Mini's

Posted 28 November 2014 - 10:35 AM

My new project' Austin Mini HL purchased 24/11/2014
So I haven't been that active on the forum in a long time due to family commitments and still not having a mini on the road.
I purchased this mini as I've been missing driving one for a long time and I needed something to try and cheer me up as I've been dealing with bad anxiety the last few months and panic attacks due to stress.
Basically this will be a road going tidy up for now until I find the time money and garage space to give the Mini a full restoration and also finish my other mini.
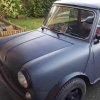
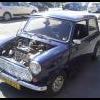
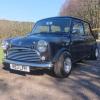
Here's some pics below.


When I got the Mini home.
PTDC0056_zps7983a687.jpg
PTDC0057_zps4ac34382.jpg
PTDC0059_zpsd70d9daa.jpg
PTDC0061_zps1b91ae49.jpg
PTDC0063_zps1582de45.jpg

Edited by cookie4343, 28 November 2014 - 10:36 AM.


#2 cookie4343

cookie4343

    **Caution: Do Not Feed Alcohol**

  • Traders
  • PipPipPipPipPipPipPipPipPip
  • 2,257 posts
  • Local Club: CV1 Mini's

Posted 28 November 2014 - 10:49 AM

Since Monday I've cleaned all the crap out, 2 bin bags full.
PTDC0067_zps76384143.jpg
PTDC0066_zps59adcb23.jpg
PTDC0064_zps5a6b40d8.jpg
As you maybe able to tell the person before me did not take a lot of pride in his little Mini.

Some pics of front floors which were like a mini paddling pools
PTDC0072_zps4f26e31e.jpg
PTDC0076_zpsab1c86fb.jpg

Some pics of front floors with sound deadening removed and dry out the best I could for now.
PTDC0080_zps24bc8c83.jpg
PTDC0079_zps965c5176.jpg
Floors are ok ish will need some work to put right, pics show mostly rusty Dry water.

I bet you can guess the outer sills fitted, yes OVERSILLS.

#3 cookie4343

cookie4343

    **Caution: Do Not Feed Alcohol**

  • Traders
  • PipPipPipPipPipPipPipPipPip
  • 2,257 posts
  • Local Club: CV1 Mini's

Posted 28 November 2014 - 10:52 AM

Fitted a new window seal yesterday as it was nackerd and I think this was letting most water in but the oversills need sorting ASAP, better get the welder out lol.
PTDC0077_zps705822a4.jpg

#4 Mini-Mad-Craig

Mini-Mad-Craig

    Crazy About Metro's

  • Members
  • PipPipPipPipPipPipPipPipPipPip
  • 9,298 posts
  • Location: Travelling in a fried out Kombi

Posted 28 November 2014 - 11:11 AM

Welcome back mate! and an awesome little Mini :D


#5 lyndseyp27

lyndseyp27

    A little bit little

  • Noobies
  • PipPipPipPipPipPip
  • 600 posts
  • Location: Nottingham

Posted 28 November 2014 - 11:13 AM

Was fitting the window seal hard? I have a new one, and the tool, but i have no instructions so its very confusing to me haha


#6 cookie4343

cookie4343

    **Caution: Do Not Feed Alcohol**

  • Traders
  • PipPipPipPipPipPipPipPipPip
  • 2,257 posts
  • Local Club: CV1 Mini's

Posted 28 November 2014 - 11:52 AM

Was fitting the window seal hard? I have a new one, and the tool, but i have no instructions so its very confusing to me haha


It's not the easiest job but with a little patience it's possible, took me about a hour and a half, here is a vid on you tube I've followed before fitting others.
http://m.youtube.com...h?v=wI0x36fJpDw

#7 megamini_jb

megamini_jb

    Crazy About Mini's

  • Members
  • PipPipPipPipPipPipPipPipPipPip
  • 5,491 posts
  • Name: Jamie
  • Location: -

Posted 28 November 2014 - 12:00 PM

Looks a cool project

#8 lyndseyp27

lyndseyp27

    A little bit little

  • Noobies
  • PipPipPipPipPipPip
  • 600 posts
  • Location: Nottingham

Posted 28 November 2014 - 12:59 PM

Thank you :)


#9 matt050990

matt050990

    I have upside down nipples

  • Members
  • PipPipPipPipPipPipPip
  • 1,199 posts
  • Location: Ashford, Kent
  • Local Club: Currently Ridin' Solo :)

Posted 28 November 2014 - 01:25 PM


Was fitting the window seal hard? I have a new one, and the tool, but i have no instructions so its very confusing to me haha


It's not the easiest job but with a little patience it's possible, took me about a hour and a half, here is a vid on you tube I've followed before fitting others.
http://m.youtube.com...h?v=wI0x36fJpDw


Was a pretty easy job to do in my eyes. Done mine when it did headlining.


#10 cookie4343

cookie4343

    **Caution: Do Not Feed Alcohol**

  • Traders
  • PipPipPipPipPipPipPipPipPip
  • 2,257 posts
  • Local Club: CV1 Mini's

Posted 08 December 2014 - 02:25 PM

Update, in the few days I've had spare in the last 2 weeks I've managed to start cleaning up the floor pan to see how far the rot goes, think I payed to much for the car to be honest, brought it with my heart and not my head.
Anyway pics

Front drivers floor pan during cleaning/de rusting

PTDC0082_zps1c16bc8c.jpg
PTDC0085_zpseba28c17.jpg
After some primer to protect until my panels arrive
PTDC0086_zps7cdd3c6f.jpg

Edited by cookie4343, 08 December 2014 - 02:31 PM.


#11 cookie4343

cookie4343

    **Caution: Do Not Feed Alcohol**

  • Traders
  • PipPipPipPipPipPipPipPipPip
  • 2,257 posts
  • Local Club: CV1 Mini's

Posted 08 December 2014 - 02:30 PM

Oversill removal drivers side, oversills should be banned.
Started like below
PTDC0095_zps7a3c5601.jpg
Guess what, yea you guessed it old original sills still in place.
PTDC0096_zps00843061.jpg
PTDC0097_zpsfc64bc99.jpg
Pics of inner sill after original outer sill removed.
PTDC0099_zps0a975f54.jpg
None existent jacking point
PTDC0102_zpsd8876eaf.jpg
Scrap pile so far
PTDC0104_zps07d559c3.jpg

#12 cookie4343

cookie4343

    **Caution: Do Not Feed Alcohol**

  • Traders
  • PipPipPipPipPipPipPipPipPip
  • 2,257 posts
  • Local Club: CV1 Mini's

Posted 08 December 2014 - 05:11 PM

Started patching inner sill, not the best welding but It was this or blowing holes, should have done a overlapped joint really but wanted it to look tidy and not just like it's been patched on top of rust.

PTDC0115_zps650e8bdc.jpg
PTDC0117_zpsd2f38032.jpg
Weld ground down inside, left the outside welds proud as they won't be seen, may even give the inside a light skim of filler once I've patched the rest.
Personally would love to replace the whole floor tub but cannot afford that at the moment and my wife would go mad if she seen it in the garage bare as I promised I wouldn't take it apart.
PTDC0119_zps0513dd08.jpg

#13 Risky

Risky

    Mini Mad

  • Members
  • PipPipPipPip
  • 213 posts
  • Location: Zegge (The Netherlands)

Posted 14 December 2014 - 04:25 PM

Nice, starting to look better. Good luck with the rest!

I've also got a 1981 HL and it has just been repainted after all the panel work!


#14 cookie4343

cookie4343

    **Caution: Do Not Feed Alcohol**

  • Traders
  • PipPipPipPipPipPipPipPipPip
  • 2,257 posts
  • Local Club: CV1 Mini's

Posted 22 December 2014 - 09:42 AM

Update
So I started getting the drivers side more solid so cut a big hole, not my best work but certainly better than before.
PTDC2959_zps52fd3b4b.jpg
New floor pan cut to size and welded in, welds been ground down.
PTDC2963_zpscdda2662.jpg
Underside welded
PTDC2984_zps63f9a4da.jpg
Hole cut in rear inner sill, was straightened out abit before patch welded.
PTDC2967_zps1c15ecf3.jpg
Crossmember cut out for repair.
PTDC2989_zpsd15f09bf.jpg

#15 cookie4343

cookie4343

    **Caution: Do Not Feed Alcohol**

  • Traders
  • PipPipPipPipPipPipPipPipPip
  • 2,257 posts
  • Local Club: CV1 Mini's

Posted 22 December 2014 - 09:43 AM

Crossmember repair patch made up.
PTDC2986_zpse33e996c.jpg
PTDC2987_zps411b5477.jpg
Welded crossmember repair.
PTDC2991_zpsbf28bf27.jpg
Plug welded inside, ground down and primed.
PTDC2996_zps737ac537.jpg
Floor to flitch panel
PTDC3001_zps2c5948ab.jpg
All the inside floor will be sealed and tidied up before more prep primer and paint.


0 user(s) are reading this topic

0 members, 0 guests, 0 anonymous users