

1:- Disconnect battery and alternator.
2:- Remove front and rear seats, and carpet front and rear. Remove the companion bin internals if fitted and the quarter panel card.
3:- Remove the bitumen floor covering. This will chip off with a strong scraper but use a hammer with it.
4:- Jack up the car front and rear and then rest on axle stands. (support the car on the front and rear subframes.)
5:- Now install a section of bracing across the door aperture. Also install a section of bracing across the car over the cross member. When this is in place add a drop down piece from the brace and weld it to the cross member to support it.

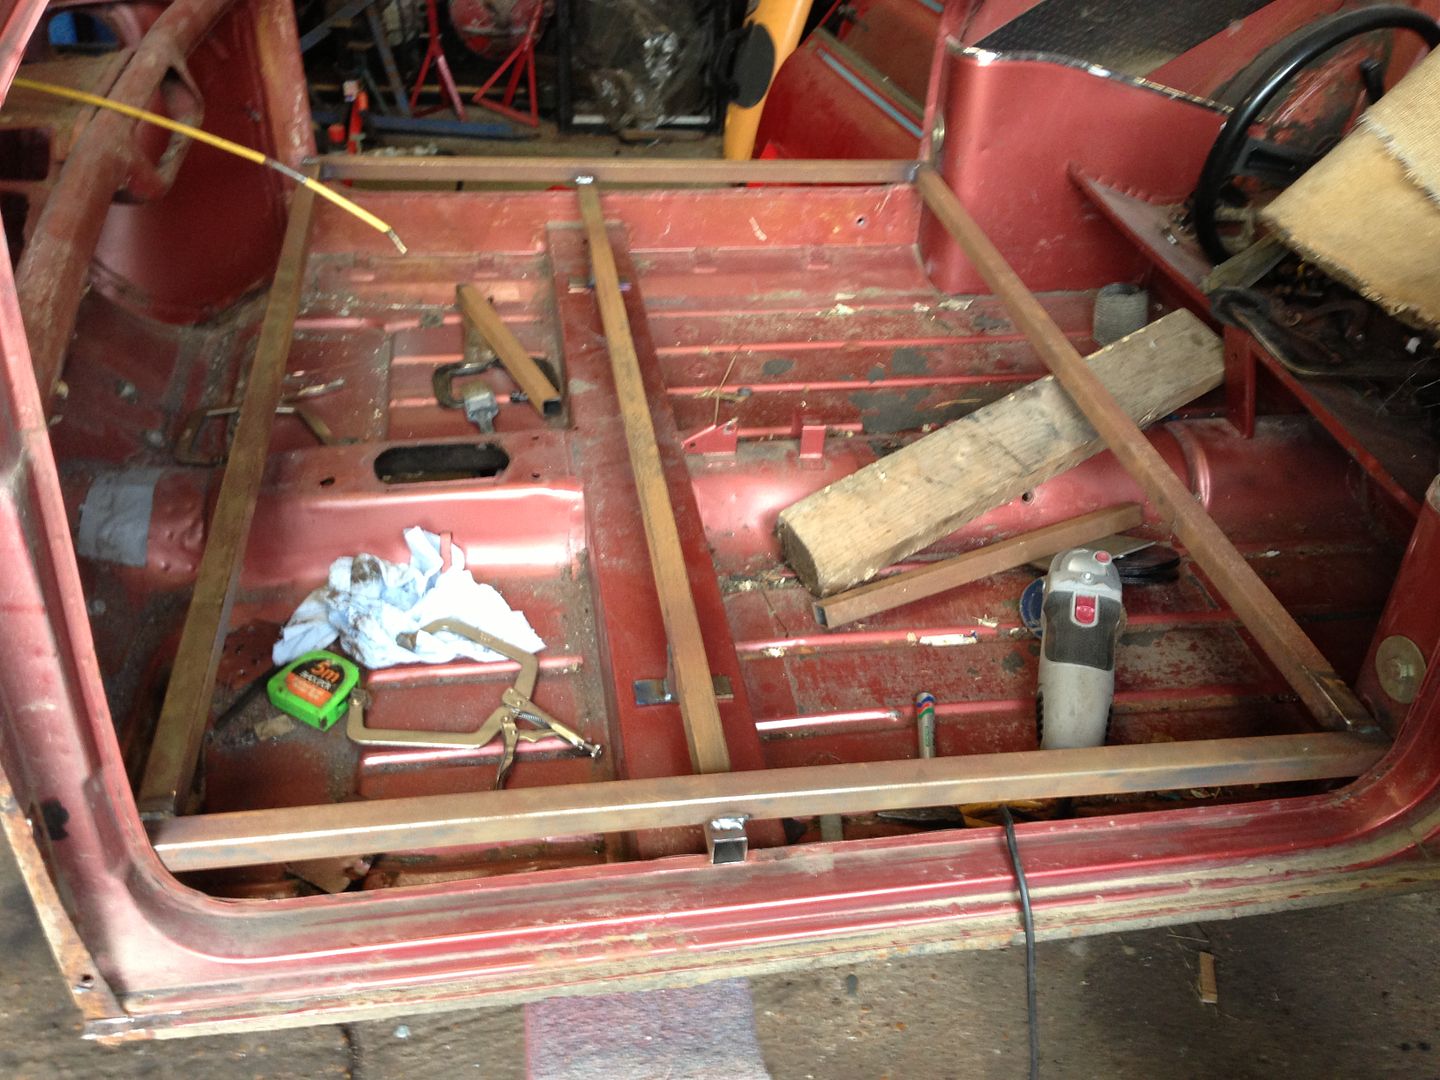
6:- Now you can you remove the outer sill. Carefully drill out all of the spot welds where the sill is attached to the door step and where it’s attached to the rear heelboard and the front lower flitch tang.


7:- With this removed you should now see the jacking point in the middle and at either end the internal slinging point brackets. Personally I would renew the jacking point but delete the internal slinging point brackets. Remove all of the above. Be careful at the back the rear slinging bracket is attached to the rear subframe internal mounting bracket. If however this bracket is damaged this can be replaced once the new inner sill is fitted. (available from M Machine part number 11.32.02.27 L/h 11.32.02.28 R/h)
8:- This is where it gets fiddly, depending on whether you are just replacing the inner sill with an inner sill replacement from M machine like this part number 11.31.04.37/ 38 or the inner sill / outer combination one 14.33.01.17 / 18.
9:- If we go for the first one here the other one will be similar. At each end of the inner sill you will see some return flanges. These will be found at the bottom of the lower flitch at the front and a small return flanges attached to the rear heelboard. (You will see these ones inside the companion bin. This is where it is now advisable to remove the companion bin.) Drill out the spot welds where possible. Now the companion bin will be spot welded to the bottom of the inner sill / floor section. (If you have left it installed) Drill these out. Now if you are using the first part number sill I mentioned this will have a section of floor as part of its build up. Take a rough measure measurement as to where this will be on your old inner sill floor section. Go to the cross member and measure roughly where this is on the underside of the cross member. Drill out the spot welds in this area. Also drill out the spot welds where the upper return flange is on the cross member. ( You may want to do this before fitting the bracing)


10:- You should be nearly ready now to remove the old inner sill. Go along the inner sill to door step flange and remove all of the spot welds there. You will need to remove the spot welds that attach the stiffener to the inner sill. It can be done but you may have to make a few cuts with the angle grinder. If any of the spot welds are difficult to see then either grind them down or cut around them for the moment. The inner sill stiffener goes under the door step right at the back and is sandwiched by the companion bin front mounting flange and the door step. With the companion bin off you will find the spot welds that need to be removed.

11:- You will notice I have not said remove the jacking point. No need as this will come off with the old inner sill. You may get away with leaving on the fwd slinging bracket. The rear heelboard bracket should be spot welded on to the inner sill so drill these out as well. Now make a rough cut line on the floor that is going to be short of the new inner sill. Cut along this with your cutting disc. Be careful of the cross member but don’t worry too much if you cut into this. Now with a bit of luck the old inner sill should come off. If it does not then revisit the areas that still attach it.

12:- Now with the old inner sill off offer up the new inner sill. You will need some c clamps / mole grips and for the floor part a handful of intergrips. (You can but these off Ebay or Frosts.) You may need to trim the old floor back so you are left with roughly a one mm gap (this is to allow you to butt weld the new sill to the old floor using the intergrips ) or you can leave 5 - 10 mm of the old floor so the new sill can rest on it. This way you can seam weld it in place by running a seam on the inside of the floor and one on the underside. You can if you want joggle the old floor so the new sill sits flush internally or the opposite way to get it flush externally. If you are happy with the fit now you can look at welding the new panel in place. This is where I would use skin pins along with the various clamps to hold everything in place. I use 1/8th and 5/32 skin pins. These are available on ebay.


13:- Ok prep all of the welding areas with Zinc rich weld through primer. Now clamp the panel in place everywhere. Does it sit well and look right?? No? Then take it off and see what’s wrong. If you are happy then clamp it back in place. Using the original spot weld positions either plug weld in place or use a spot welder every other hole. If there are no holes then you will need to drill some 3/16th minimum holes roughly one inch apart for plug welding. Tack the floor area in place in one inch intervals. Check everything is still in the right position then fully weld the panel in place. Now you can weld in the new or removed companion bin.


14:- Now I would recommend at this point to take off the old seat belt mount reinforcement bracket and weld it to the new sill (if it does not come with one already installed.) Offer up your new jacking point to the inner sill. You will need your new outer sill to help position this. Once you are happy it’s in the right place weld it on. So by now you should have reattached the new panel to the rear heelboard, flitch panel, cross member, the inner sill stiffener. Now and only now if the rear subframe internal mounting bracket is in good condition weld this in place, I seam weld these on. However if it’s not in good condition remove it. To do this you will need to undo the subframe mounting bolts. Be careful the subframe does not drop down or move up (it will more than likely move up.) I would make a spacer to fit between the boot floor and the top of the subframe to keep it at the right height. Old bolts out and bracket removed then refit the subbie bolts which will clamp the bracket in place. Now weld it on. I would add some extra weld to the captive nuts as well.

15:- All good?? Now you can weld on your outer sill. Done that, remove the bracing clean up any welds then prime and paint. Before you weld on the outer sill apply paint to the inner sill and to the underside of the door step. Only apply weldable primer to all of the welding contact areas. When finished pump waxoyl into the sill cavity.


16:- Once the paint etc is dry refit the interior.
17:- Reconnect battery and alternator.
You should now be looking at the finished article. Drop the car down onto the floor. Refit the door if removed and make sure it’s aligned and fits.
Go to fridge and have a beer. 
I will up date this with more pictures as i do this job on Paddy.


