Jump to content


Photo
- - - - -

K20 Build In Canada


  • Please log in to reply
22 replies to this topic

#1 drmandy

drmandy

    On The Road

  • Noobies
  • PipPip
  • 35 posts
  • Location: British Columbia

Posted 27 December 2018 - 04:22 PM

Attached File  20140922_074537 (Small).jpg   91.46K   8 downloads

This is the frame about 3 years ago. I have done little since. I decided to get the car running and took it to a rolling road to have it tuned as a "rolling frame". I had a long pause and am now trying to figure out how to get a body on the car with firewalls etc. The next picture is of the carbon shell I bought

Attached File  carbon sell side.jpg   82.5K   7 downloads

It weighs only 42 lbs including the doors.


#2 26dtp

26dtp

    On The Road

  • Noobies
  • PipPip
  • 42 posts
  • Location: Victoria, BC

Posted 28 December 2018 - 04:19 AM

Hi Mandy,


I sent you a PM. I am located in Victoria, BC and am also doing a K20 Mini Build (http://www.theminifo...ini-vtec-build/).  Not many Z Cars in this neck of the woods, if you are ever coming to Victoria shoot me a message!


Cheers,

Dan


#3 drmandy

drmandy

    On The Road

  • Noobies
  • PipPip
  • 35 posts
  • Location: British Columbia

Posted 28 December 2018 - 05:18 AM

Hi Dan.

 I sent you a PM. What stage of the build are you at?


#4 ckneller321

ckneller321

    Mini Mad

  • Members
  • PipPipPipPip
  • 224 posts
  • Location: Northampton

Posted 29 December 2018 - 12:41 PM

Any idea why they went to the effort of keeping the 4 corner seams on the shell if it's made of carbon?


#5 drmandy

drmandy

    On The Road

  • Noobies
  • PipPip
  • 35 posts
  • Location: British Columbia

Posted 01 January 2019 - 07:36 AM

The Carbon shell is made in Arizona by Jim at Rogue Se7ens. I believe this was his first all carbon shell. He has made several fibreglass ones. The shell is bonded at the seams. I actually am not a fan of the de-seamed look so I prefer this. I took more pictures this weekend and will post them as soon I get a chance.


#6 drmandy

drmandy

    On The Road

  • Noobies
  • PipPip
  • 35 posts
  • Location: British Columbia

Posted 01 January 2019 - 09:55 PM

This was the car and the van I built for my son getting loaded into the trailer to take to the rolling road for tuning

Attached File  IMG_0465 (Small).JPG   110.63K   3 downloads

Attached File  IMG_0468 (Small).JPG   99.35K   2 downloads

Here is where I am currently

Attached File  IMG_0350 (Small).JPG   96.73K   1 downloadsAttached File  IMG_0346 (Small).JPG   91.08K   1 downloads

The shell is on the frame and I have been trying to isolate the passenger compartment from the elements.

Attached File  IMG_0348 (Small).JPG   96.08K   3 downloads

Front bulkhead

Attached File  IMG_0347 (Small).JPG   76.16K   2 downloads

Rear bulkhead

Attached File  IMG_0353 (Small).JPG   101.24K   8 downloads

Carbon fiber boot lid being fitted. I want it to be removable

Attached File  IMG_0352 (Small).JPG   90.74K   11 downloads

Can anyone provide details on what year/model of ford sierra these rear calipers are from.


#7 mini_in_progress

mini_in_progress

    Super Mini Mad

  • Members
  • PipPipPipPipPipPip
  • 641 posts

Posted 02 January 2019 - 09:34 PM

What a great project. Im with you bud Love the carbon with seams, looks better. The van looks mint too.

#8 Rogue Se7ens

Rogue Se7ens

    Mini Mad

  • Noobies
  • PipPipPipPip
  • 125 posts

Posted 05 January 2019 - 05:04 AM

Looking great Mandy, anxious to see the progress. Really like the van too.


#9 drmandy

drmandy

    On The Road

  • Noobies
  • PipPip
  • 35 posts
  • Location: British Columbia

Posted 05 December 2019 - 07:09 AM

Progress is being made but slowly. Life keeps getting in the way. I was trying not to do too much welding on the frame as I didn't want to damage the powder coat. That didn't work out so I had to strip everything from the frame then scuff the entire frame and sprayed it with a 2 part polyurethane. Nice to be able to put things back for the last time? I will get some pictures up next week. On a brighter note, I recently received the new front bumper/air dam and rear bumper/diffuser from Rogue se7ens and they look fantastic. Can't wait to get the shell back on to start fitting. Jim is currently working on a set of carbon flares for me....anticipation!!!


#10 drmandy

drmandy

    On The Road

  • Noobies
  • PipPip
  • 35 posts
  • Location: British Columbia

Posted 14 March 2020 - 04:47 PM

Attached File  IMG_0361 (Small).JPG   85.4K   0 downloadsAttached File  IMG_0362 (Small).JPG   95.45K   1 downloads

Good morning.

Finally got some time to post updates. I hope I can figure out how to get pictures into this post-not great with PCs.

I had hoped to leave the woderful powder coated frame alone as much as possible but had to do more welding than anticipated so I stripped the frame  prepped it for paint


#11 drmandy

drmandy

    On The Road

  • Noobies
  • PipPip
  • 35 posts
  • Location: British Columbia

Posted 14 March 2020 - 04:53 PM

Attached File  IMG_0364 (Small).JPG   104.39K   1 downloadsAttached File  IMG_0365 (Small).JPG   101.84K   1 downloadsAttached File  IMG_0368 (Small).JPG   115.82K   1 downloadsAttached File  IMG_0370 (Small).JPG   94.01K   3 downloadsAttached File  IMG_0369 (Small).JPG   107.74K   5 downloads

Painted frame with a 2 part polyurethane industrial coating-should be tough>

Started putting things back-hopefully for the last time!


#12 drmandy

drmandy

    On The Road

  • Noobies
  • PipPip
  • 35 posts
  • Location: British Columbia

Posted 14 March 2020 - 04:57 PM

Attached File  IMG_0373 (Small).JPG   101.32K   0 downloadsAttached File  IMG_0374 (Small).JPG   101.06K   0 downloads

Wheel alignment done to get the wheels in the approximate correct spot for the eventual fitting of the flares


#13 drmandy

drmandy

    On The Road

  • Noobies
  • PipPip
  • 35 posts
  • Location: British Columbia

Posted 14 March 2020 - 05:48 PM

Attached File  IMG_0375 (Small).JPG   91.7K   0 downloadsAttached File  IMG_0376 (Small).JPG   62.77K   1 downloadsAttached File  IMG_0380 (Small).JPG   92.13K   1 downloadsAttached File  IMG_0382 (Small).JPG   86.69K   1 downloadsAttached File  IMG_0383 (Small).JPG   98.99K   1 downloadsAttached File  IMG_0385 (Small).JPG   91.58K   0 downloads

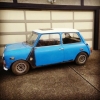
Body back on. Got all the electrical sorted out and now able to put final paint on the interior dash panels and tunnel. Went with Acura integra Andaro red pearl. Wholly smokes that paint is pricey!!. Good thing it is  small car.

Couldn't wait to try the new goodies my friend at Rogue Se7ens made for me! The rear diffuser and front air dam are new products for him-nice work! Jim is now working on a set of flares for this car-carbon fiber. The rear needs to be 5 inches to be road legal.

The doors are quite interesting. I asked Jim to make a roll down window mark 1 door. They turned out great but we both didn't think on how to fit the door handle. Options explored were a cable/pulley set up to clear the glass or a electric door popper. I decided on the latter.

No pictures of the failed first attempt-I bought a small bear claw and trunk latch and decided the trunk latch would fit best in the original door latch position. This worked great till I got the weather stripping i. The carbon door flexes out and there is no way to hold the lower door in and my pet peeve is door that don't fit(which is common and sometimes unaviodable in a mini but I try to get the best fit )

The solution I am currently working on is to place the latch lower-sort of mid-door skin. This way I can put even pressure on the rear edge and maybe get a better close. Also, going to have to use different weather stripping as the factory stuff is too thick!


#14 drmandy

drmandy

    On The Road

  • Noobies
  • PipPip
  • 35 posts
  • Location: British Columbia

Posted 28 August 2020 - 06:38 AM

Ok got distracted on this project but back to it. I took some time away to restore a 1975 ford Bronco for my son-turned out great. I did receive the wheel arches from Rogue sevens and was not what I expected at all! I had to rethink what I was going to do and decided to order a set of Miglia arches from Carbon weasel. The rear ones are a bit (about 1.5 inches) short and don't cover the rear wheel but I knew this before ordering. I must say, they are top notch. I  believe I will fabricate a small "flange" into the rear quarters that will bump the arch out to the desired width. Then I came across the arc angels mega milia arches which are huge. I have an email off to  them for more detail. These would allow a fit directly to the body-much less hassle. Can always use the carbon weasel arches on my next build. I'll get more pictures up once I have made some progress.


#15 drmandy

drmandy

    On The Road

  • Noobies
  • PipPip
  • 35 posts
  • Location: British Columbia

Posted 05 March 2022 - 08:19 PM

Hi everyone. I'm back!

It has been just crazy busy and I have taken quite a bit of time away from this project to enjoy the grandkids.

I did get back recently. I had to try and remember where I was.

I waited for some time to get flares from Rogue se7ens. Jim made my carbon fiber body and bumpers which i love. I was not really crazy about the look of the flares so I had to redesign. I got a set from Carbon Weasel and they are great but did not cover the rear tire enough.

So I added a flange to the shell to bump the flares out around 2.5 inches. Lets see if I can get some pictures into this post.Attached File  IMG_0395 (Small).JPG   72.7K   0 downloadsAttached File  IMG_0397 (Small).JPG   88.55K   0 downloads


0 user(s) are reading this topic

0 members, 0 guests, 0 anonymous users