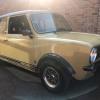
looking good tom
who did you order the paint from and how late is it?

1978 Clubman - C16se
Started by
Purple Tom
, Nov 10 2004 10:22 PM
536 replies to this topic
#31

Dom
-
- TMF+ Member
-

- 10,685 posts
Moved Into The Mazda
- Location: Nürburgring
Posted 03 August 2005 - 08:12 AM
#32
Purple Tom
-
- TMF+ Member
-
- 4,921 posts
Up Into Fourth
- Location: Derbyshire
- Local Club: TMF
Posted 03 August 2005 - 08:24 AM
Its been ordered from 'Vintage Paint' in Wolverhampton. I was promised it would be a week, so should have arrived last monday. Its over 9 days late now. They'll be recieving a letter through the post, and at £42 a litre i'd expect better service than that!!
Thanks for saying it looks good, it'll look a lot better when its the right colour! :tongue:
Thanks for saying it looks good, it'll look a lot better when its the right colour! :tongue:
#33
Purple Tom
-
- TMF+ Member
-
- 4,921 posts
Up Into Fourth
- Location: Derbyshire
- Local Club: TMF
Posted 03 August 2005 - 10:04 PM
wahey! paint arrived today!
the doors, bonnet and bootlid are all in primer now, pretty much ready for topcoat once they have a rub down.
I wanted to keep it quiet but I can't help it! Painted the engine bay in the topcoat! and all the door closures! Which meant I could refit the master cylinders (after painting them) and all the brake pipes!
Just the front subframe to put on now and I have myself a rolling shell....
I'm aiming for an MOT on the 18th August, not long to transform a car from a half painted shell to a road legal car, but, here's hoping!
#34
northern_monkey
-
- Noobies
-
- 68 posts
Stage One Kit Fitted
Posted 04 August 2005 - 09:35 AM
How do/did you know where to cut to remove ther rear bins and seat. I would like to do it to mine but I always think I'll end up cutting too much away or something !! :saywhat:
#35
Purple Tom
-
- TMF+ Member
-
- 4,921 posts
Up Into Fourth
- Location: Derbyshire
- Local Club: TMF
Posted 04 August 2005 - 10:18 AM
how we did it was to cut away the rear bins first. Use a small grinder to cut the steel of the bins slightly above the floor. Then very carefully grind the remainder away until it is flush with the floor.
Cut the seat away in sections, coming in at 45deg to the seat, so you can see where to stop as you come up to the heelboard. Be wary of catching the heelboard with the grinder. Then smooth the edges with the grinder to get a good finish. We also fitted triangulation pieces to the b pillars/sills to retain the rigidity, as the companion bins help to support the seat and b pillars, and floor.
Fitting the roll cage will also help to introduce strength to the area too.
#36
austin68
-

- Members
-
- 403 posts
Speeding Along Now
Posted 04 August 2005 - 05:38 PM
Were the grp2 arches tricky to fit, since some after markets dont look "round".
I really want those, though. What size wheels are you going with.
I really want those, though. What size wheels are you going with.
#37
Purple Tom
-
- TMF+ Member
-
- 4,921 posts
Up Into Fourth
- Location: Derbyshire
- Local Club: TMF
Posted 05 August 2005 - 11:19 AM
they were surprisingly easy to fit.
I used a hand drill to cut the holes in the arches, and then a coping saw and round/square files to get the slits needed where the arches go over the seams.
Then I offered the arch up to the body, and used an automatic centre punch to mark the hole for the front screw on each arch. Having drilled a hole, I then used a steel self tapper to 'cut' the hole in the panel (stainless self tappers aren't strong enough to cut the hole), then fitted one stainless self tapper.
Once one screw was in I just marked each one, took the arch off, drilled it, fitted the screw, marked next one, took arch off, drilled, fitted etc etc until they were all done. It took about 2 hours, and I was lucky as the arches will not require a waft over with any paint as they weren't damaged during the fitting.
Oh, and my quickrack arrived today! That means I can fit the subframe this weekend! Woohoo!!!
(oh yeah sorry, I'm using 10x5" wheels)
Edited by Minis84, 06 August 2005 - 09:55 AM.
#38
Mincento
-

- Members
-
- 443 posts
Speeding Along Now
- Location: Stoke-On-Trent
Posted 06 August 2005 - 09:43 AM
Any more progress pics as this is a really good projcet i think and the brown clubby in your sig keeps reminding me of the clubby i had and stoopidly sold
#39
Purple Tom
-
- TMF+ Member
-
- 4,921 posts
Up Into Fourth
- Location: Derbyshire
- Local Club: TMF
Posted 06 August 2005 - 09:54 AM
well at the moment i'm in the middle of rubbing down the shell with 1200 grit wet and dry, ready to get the top-coat on sometime this afternoon hopefully (i've just come inside for 2 mins to check emails lol).
The engine bay is also painted in the final colour too, but I haven't got any pics of that just yet, i'll try to get some later on.
The engine bay is also painted in the final colour too, but I haven't got any pics of that just yet, i'll try to get some later on.
#40
Mincento
-
- Members
-
- 443 posts
Speeding Along Now
- Location: Stoke-On-Trent
Posted 07 August 2005 - 10:57 AM
lookin good mate and i cant believe how many holes there is in a mini engine bay and thats before it rots 
Good luck finnishing it it will be worth all the trouble when finnished
Good luck finnishing it it will be worth all the trouble when finnished
#41
Purple Tom
-
- TMF+ Member
-
- 4,921 posts
Up Into Fourth
- Location: Derbyshire
- Local Club: TMF
Posted 07 August 2005 - 12:00 PM
well today so far I have fitted the new steering 'quick-rack' (2.2 turns lock to lock).
Then I fitted the front subframe, with its new solid mounts, and then put the Cooper 'S' disc assy's with 4-pots back on. I replaced the CV gaitors and re-greased the CV's too, to make sure.
Then I fitted the braided hoses, and fitted the rest of the new brake pipes, and secured them to the subframe.
And then I had some lunch :tongue:
So now I have a car with a braking system thats ready to bleed! Only thing is, I haven't got an eezibleed, and Dad has gone to get some scaffolding from yorkshire, so I've got no-one to pump the pedal for me! :nugget:
Oh well, I'll go and get the wiring loom and fit that I reckon - and I need to find that new starter solenoid that I have.....
#42
Purple Tom
-
- TMF+ Member
-
- 4,921 posts
Up Into Fourth
- Location: Derbyshire
- Local Club: TMF
Posted 07 August 2005 - 02:03 PM
woohoo! the wiring loom is half in! Got the main parts in, including the wire fed through the roof to the rear, which wasn't as hard as I thought.
I also found the solenoid, which is nice and shiny, and has a push button in the middle, which means I can crank the engine from the engine bay rather than the key providing the ignition is on. All good!
Now I've got to go shopping because i'm cooking dinner tonight.
Quite why I'm giving you a full run down of my weekend I don't know, but never mind eh!
(oh yeah, some photos to follow tonight)
#43
Mincento
-
- Members
-
- 443 posts
Speeding Along Now
- Location: Stoke-On-Trent
Posted 07 August 2005 - 09:57 PM
wheres the pics then
And just wondering have you fed the wiring before youve sprayed the inside and hopeing to mask it or have you sprayed it now
And just wondering have you fed the wiring before youve sprayed the inside and hopeing to mask it or have you sprayed it now
#44
Purple Tom
-
- TMF+ Member
-
- 4,921 posts
Up Into Fourth
- Location: Derbyshire
- Local Club: TMF
Posted 08 August 2005 - 09:35 PM
we've sprayed the engine bay and interior and then done the wiring, a lot easier that way!
pics to follow shortly, I took some tonight, just gotta get them off the digital camera.
pics to follow shortly, I took some tonight, just gotta get them off the digital camera.
#45
mini_sam
-
- Members
-
- 1,381 posts
One Carb Or Two?
Posted 08 August 2005 - 09:48 PM
looking forward to it mate! 


0 user(s) are reading this topic
0 members, 0 guests, 0 anonymous users


