Jump to content


Photo
- - - - -

Black And White Mini 1000


  • Please log in to reply
32 replies to this topic

#16 Stubby83

Stubby83

    Stage One Kit Fitted

  • Noobies
  • PipPipPip
  • 55 posts

Posted 04 April 2010 - 08:36 PM

What happening with the black one then mate?


Its going to the crusher! :thumbsup:

Its going to be sad to see it go, I have had it for over 10 years now, but it's not worth saving.

#17 olds_kool_lews

olds_kool_lews

    Up Into Fourth

  • Traders
  • PipPipPipPipPipPipPipPipPip
  • 3,602 posts

Posted 04 April 2010 - 08:41 PM

is it just the black shell thats going to the scrappy? im sure someone on here would take it off you!

#18 Stubby83

Stubby83

    Stage One Kit Fitted

  • Noobies
  • PipPipPip
  • 55 posts

Posted 04 April 2010 - 08:58 PM

is it just the black shell thats going to the scrappy? im sure someone on here would take it off you!

Yeah it is just the shell going, everything else is going on to the new shell.

I'm sure someone would have it, but I wouldn't be able to sleep at night knowing the condition its in:
Starting from the front.....
Front panel
both wings
inner wheel arch
both A panels
Bulkhead
Windscreen post
Front floor (both sides)
Inner sills
Outer sills
Jacking points
both doors
Both quater panels (under the windows)
all the rear subframe mounts
boot floor
rear valance and closing panels
boot closing panel
and finally in the corners of the roof

Thats just the list of stuff we can see. Every time we removed the paint to weld the holes just got bigger.

#19 olds_kool_lews

olds_kool_lews

    Up Into Fourth

  • Traders
  • PipPipPipPipPipPipPipPipPip
  • 3,602 posts

Posted 04 April 2010 - 09:01 PM

not good! lol maybe someone can use it to make a trailer or something? put it to better use than crushin it! stick it up in the freebies section, bet someone will take it! :thumbsup:

#20 Stubby83

Stubby83

    Stage One Kit Fitted

  • Noobies
  • PipPipPip
  • 55 posts

Posted 04 April 2010 - 09:09 PM

maybe someone can use it to make a trailer or something?

I was thinking of doing that myself, I really want a trailer and a BBQ the shape of the front of a mini, but trailers need to be roadworthy too.
Besides it has already been partially cut up in the rear.

#21 xBR4DLEY

xBR4DLEY

    >>mine's still gay<<

  • Members
  • PipPipPipPipPipPipPipPip
  • 1,618 posts

Posted 04 April 2010 - 10:12 PM

Would it be possible for you to sell it/give to this man
Read this thread and you will understand
Sorry if I come across abit rude

http://www.theminifo...15#entry1786137

#22 Stubby83

Stubby83

    Stage One Kit Fitted

  • Noobies
  • PipPipPip
  • 55 posts

Posted 04 April 2010 - 11:36 PM

Would it be possible for you to sell it/give to this man
Read this thread and you will understand
Sorry if I come across abit rude

http://www.theminifo...15#entry1786137


Sorry, mine's going to the scrapper when the re-shell is all done as it is completely rusted and im cutting out the rear lamp sections to put the new shell back to the later lights. Its going to be a long time before it goes anywhere, as im going skiing round the world for the next year and the shell wont be going until I'm sure all the bits are off.

Anything that can be saved will be going on eBay (restoring a Mini is expensive).

#23 Stubby83

Stubby83

    Stage One Kit Fitted

  • Noobies
  • PipPipPip
  • 55 posts

Posted 20 April 2010 - 11:12 PM

At last the shell is going in to the body shop tomorrow.

Its getting painted in black with a white roof, having all the un-necessary holes filled (extra wiper holes, ariel hole, rear fog light holes and bonnet badge holes), putting the rear lights back to the later type, and fitting the arches.

So I have 6 weeks left to build a mini, including however long it takes the painters to get it done.

29th of May is the deadline!

#24 Stubby83

Stubby83

    Stage One Kit Fitted

  • Noobies
  • PipPipPip
  • 55 posts

Posted 09 May 2010 - 01:01 PM

Ok, so I quit my job a week ago and I have been cracking on with my project. I have been uploading photos to Facebook as I go.

Started last Tuesday by digging the Engine out of the shed and giving it a good clean up.
The Block was stripped down, everything checked and fitted new piston rings. Gave the Cylinder Head a good clean only to find that it'd been polished at some point.
Every part was stripped down, cleaned and painted and re-fitted to the Engine with new gaskets, and has now been attached to the subframe.

Meanwhile the painters have been busy painting the inside, engine bay, inside the boot, and the roof.
Hopefully I should get the car back by Tuesday....

Time and money is running out, with only 3 weeks till I fly out to New Zealand the race is on to see how much I can get done.

#25 Stubby83

Stubby83

    Stage One Kit Fitted

  • Noobies
  • PipPipPip
  • 55 posts

Posted 16 May 2010 - 10:59 AM

Its been a busy busy week with my project.

I got the freshly painted shell back form the painters late on Tuesday evening. The paint job is absolutely fantastic. There are a few small areas that need a touch up, but once the assembly is done they are having the car back to do the touch ups and to polish it some more.

Wednesday morning I hit it hard. First job was to get everything under the body put it, steering rack, fuel lines, brake pipes etc. Putting the wiring loom in was not fun. While I had it out I stripped off the old wrapping and re-wrapped it adding extra wires for a light in the boot and speaker wires for the rear.

As I am building it at my dad's workshop I have to work around his schedule. I can't get the car on the lift until there is space and once it it goes on the lift it need to be able to be moved easily so either on the trolly or it wheels so preparation is everything. Fortunately I hve already prepared the front and rear subframes so they are all ready to go on fully assembled.

I ordered the Supalight Softline 13" x 7" wheels from Huddersfield spares who delivered them in less than 48 hours.

While I was waiting for the lift to become free I cracked on with other jobs. removing the dash from the old shell and any little parts that I could think of. Every part that has been put back on the car I have cleaned, sandblasted, checked and re-painted. I am trying to re-use as much as I can from the original car.

Friday afternoon finally got the car on the lift and the engine in. Then Saturday morning got the rear in and the wheels on so its a rolling car.

Its all coming together now!

ClickHERE for all the photos of my project.

#26 Stubby83

Stubby83

    Stage One Kit Fitted

  • Noobies
  • PipPipPip
  • 55 posts

Posted 19 June 2010 - 04:06 AM

So its been a while since I last updated this.....

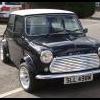
Even as a rolling shell the car has been getting a lot of attention, every time a customer walks in to my dads garage they stop and look and ask questions about it. "Is it going to be a show car?" ....... "No !"

After getting the car on the wheels it was instanly clear that I was going to have problems with wheel clearances, and I hadn't even lowered the suspension or fitted the arches yet. Due to the build schedule I didn't have time to test fit anything, so i was kind of expecting it. The wheels looked too wide for the arches, and on full lock they rubbed the front wings. But I have to have those wheels, so I'll sort that out later (the arches were still at the painters anyway).

At this point I hadnt started the engine yet, as there were still wiring issues to be resolved which I needed help with.
While I was waiting for my dad to become free, I cracked on with anything else that needed doing, which was everything.

Mounted the exhaust, 2" custom centre pipe and 2" back box (loud but not ridiculous), door seals, locks, window meachanisms, door windows.

I also fitted sound deadener on the roof and inside the bulkhead. I used a product called FatMat, its pretty similar to Dynamat, but much cheaper. When you tap on the roof after fitting it the difference is amazing. It takes a long time to get it done right but if you take the time its worth it.
The bulkhead is the hardest part to do. Before I started I made some blanking plates to go over the cold air inlets for the dash. I kept the one for the heater but I am going to have speakers in the dash where the vents go. The sound deadener needs to go EVERYWHERE. the easiest way to do this is to make paper templates of the areas you are going to cover. Keep ever little extra piece that you dont use as you will find little gaps as you go. I used 40sq ft to do the roof and bulkhead with some left over to put some on the inside of the door skins.

I got the arches back from the painters and after putting them on and lowering the suspension the car looked great. The wheels were about 2cm from the bottom of the arches and sticking out 1/2"inch. Perfect.

When it came to fitting the headliner it was a nightmare. The body shell came with one fitted already, so I tried re-fitting that but as it turned out I hadnt been fitted properly and was too short in the back, so I had to buy a new one. I could have fitted it myself, but i wanted it done right so I sent it and the car off to have it done professionally and got it back the next day.

So after the headliner was in I had the windows fitted. I also had it done by a professional as its easy to crack the windows if you dont do it right, he also fitted new seals and added a special sealant that is use in fitting modern windscreens to ensure it won't leak. I used all the glass from the original car, its not in perfect condition, but at this stage in the project it just needs to be watertight.

After sorting out the wiring it was time to start it. It started instantly the first time and ran smoothly. We let it run for a little while, it didnt overheat. Time for a test drive.
My dads garage is on private property so I took it for the first drive, got 10 ft, wheels were rubbing. Raised the suspension by 2 cm, better. It had been a long time since I had driven it, but I could instantly feel the difference in the engine. I wasnt putting my foot down hard as it still need running in but wow. It had a little backfire out the carb but a good first run. The sound of that exhaust is fantastic, loud enough without sounding like a fart in a tin can, and when you take your foot off the throttle you hear that little popping sound like a rally car (timing a little off).
I got to the end of the little alley way slammed on the brakes and it stopped straight away, Fantastic! I'm never driving a Mini with front drum brakes again.
So I had to turn around and go back. Big problem. 3 point turn became a 7 point turn because the wheels were rubbing.

So thats as far as I got. My plan was to get it as close to M.o.T ready as I could before the 29th of May and I easily made it. I could have done more but I ran out of time to get the other parts delivered.

I am now in New Zealand, working and skiing, and while I am away the Mini will be going back tothe painters. They are giving it a few touch ups and a propper polish and are going to adjust the arches for the front wheels.

When I get back hopefully all it will need will be a day or so's work and I will be able to drive it......... I'm just going to have to wait 4 months for it though......

Then part 2 ...... the interior.


#27 trafficface09

trafficface09

    One Carb Or Two?

  • Members
  • PipPipPipPipPipPipPip
  • 757 posts
  • Local Club: not yet but soon

Posted 19 June 2010 - 05:09 AM

hey can you tell me more about your custom exhaust? im thinking of getting a pipe bender soon so i will give this one a go >_<

great mini nice and shiney

#28 Stubby83

Stubby83

    Stage One Kit Fitted

  • Noobies
  • PipPipPip
  • 55 posts

Posted 19 June 2010 - 07:08 AM

hey can you tell me more about your custom exhaust? im thinking of getting a pipe bender soon so i will give this one a go >_<

great mini nice and shiney


Thanks

Its actually quite simple, its a straight pipe that is just slightly larger than the Y pipe, which welded together. It is then mated to a back box that is slightly larger than the the centre pipe. Its a 2" side exit one that I picked up from somewhere. The idea is to keep the gasses flowing smoothly, the fewer bends the better, and no edges on the joins to slow it down. It is probably actually a little too large performance wise for the 998 engine, might do better with a 1 3/4 inch.

Good luck with yours.

#29 trafficface09

trafficface09

    One Carb Or Two?

  • Members
  • PipPipPipPipPipPipPip
  • 757 posts
  • Local Club: not yet but soon

Posted 19 June 2010 - 07:21 AM

yep i have a 2 inch back box mated to my standard exhaust sytem >_< its temporary ha ha, so yours is made of other exhaust systems too?

im going to make one from scratch a twinbox system that uses the cone type exit like a works system, i am just thinking about the branching off point. and i think i will fit it to a cooper freeflow as they are far better then lcbs for 998s

Edited by trafficface09, 19 June 2010 - 07:22 AM.


#30 Stubby83

Stubby83

    Stage One Kit Fitted

  • Noobies
  • PipPipPip
  • 55 posts

Posted 19 June 2010 - 07:37 AM

yep i have a 2 inch back box mated to my standard exhaust sytem >_< its temporary ha ha, so yours is made of other exhaust systems too?

im going to make one from scratch a twinbox system that uses the cone type exit like a works system, i am just thinking about the branching off point. and i think i will fit it to a cooper freeflow as they are far better then lcbs for 998s


No other systems, just a new straight steel tube. the simpler the better.

Im guessing you mean a twin exit? If so then which manifold you use isnt going to make much difference.

Whats a "cone type" exit?


1 user(s) are reading this topic

0 members, 1 guests, 0 anonymous users