
Do MK2 lights fit in standard MK3/4 holes?
Pete


"tidy Up" Project Evelyn... My Second Mini :)
Started by
yorkshirechris
, Jan 25 2008 08:22 PM
208 replies to this topic
#77
: post #77")
yorkshirechris
-
- TMF+ Member
-

- 3,873 posts
11.11.11
- Location: Leeds
- Local Club: www.lcmoc.com
Posted 07 February 2008 - 09:54 PM
Not tried yet but apparently they're about a centimetre smaller all the way around
but fit in the same holes
I hope so anyway!
but fit in the same holes
I hope so anyway!
#78
Nickh_16
-
- Members
-
- 724 posts
One Carb Or Two?
- Local Club: Pembs
Posted 07 February 2008 - 09:55 PM
lookin shmeeeeeeexi!
#79
Se7enS1ns
-

- Members
-
- 472 posts
Speeding Along Now
- Location: Bradford
Posted 08 February 2008 - 07:44 PM
Well mate, im on the drive again for most of tomorow, so if you want a hand with any little bits and pieces i'll be around. Spending the day catching up with work on mine though so not available for any big jobs. Need to set to welding the floor pan in, gotta remove the front section of my cage though. I should maybe start my own project page!!
#80
yorkshirechris
-
- TMF+ Member
-
- 3,873 posts
11.11.11
- Location: Leeds
- Local Club: www.lcmoc.com
Posted 08 February 2008 - 10:36 PM
Going to be busy tomorrow, having a run up to Ilkley.
Today I had Evey tuned and the clutch adjsuted. The loud "POP" coming from the Carb that I experienced Dan on the way back from yours last saturday night was in fact fuel igniting Steve spotted a fuel leak from the float on the carb, so fitted a new float kit for me.
Runs perfect now!
Picked up the roof bars tonight.
Snooping around for some bonnet straps... the safety catch is missing so instead of getting a new bonnet I plan to get some straps for the front of the bonnet..
Today I had Evey tuned and the clutch adjsuted. The loud "POP" coming from the Carb that I experienced Dan on the way back from yours last saturday night was in fact fuel igniting
Steve spotted a fuel leak from the float on the carb, so fitted a new float kit for me.Runs perfect now!
Picked up the roof bars tonight.
Snooping around for some bonnet straps... the safety catch is missing so instead of getting a new bonnet I plan to get some straps for the front of the bonnet..
Edited by yorkshirechris, 08 February 2008 - 10:36 PM.
#81
Se7enS1ns
-
- Members
-
- 472 posts
Speeding Along Now
- Location: Bradford
Posted 08 February 2008 - 10:51 PM
Fuel leak igniting eh? Im not entirely convinced but hey ho, i aint gonna argue with the guy.
Enjoy the run dude, behave yourself!
Enjoy the run dude, behave yourself!
#82
tedmcedd
-

- Traders
-
- 2,751 posts
Up Into Fourth
- Location: Huddersfield
Posted 09 February 2008 - 05:19 PM
hey, sorry i didnt get to your meet on tuesday, me and ryan were following joel, who got lost, and then sped off, leaving us evem more lost... so we went home... im still in need of thos connectors though!
Ed
Ed
#83
yorkshirechris
-
- TMF+ Member
-
- 3,873 posts
11.11.11
- Location: Leeds
- Local Club: www.lcmoc.com
Posted 09 February 2008 - 06:31 PM
Ed: Still got em here with your name on, lol. Paypal me £6 over mate and I will post em to ya? PM me your address, Paypal to my MSN address... 
Some progress from today:
Took up the driver side front and rear carpets, and emptied the boot.
Sanded and got a wire brush to the worst parts, sanded down to shiny bare metal.
Painted over with Hammerite.
Also stuck some Hammerite in the rear door bins.
Replaced the battery earth strap, and cleaned up the battery connections (they're more or less brand new anyway).
Cleaned up the connections on the interior light, it actually works how it should now!
Pics below, Of the before and after painting, also of the posh masking tape used
Sorry about the quality of the "after" pics, as per usual I started too late meaning I finished when it was getting dark

Had inner sills quite recently, which I'm pleased about:


Rear floor

And close-up, not in bad nick - want to keep it that way!


Boot floor - again, not in bad nick, but still some surface rust which has been attacked before it gets worse...


After the battery earth strap and a little tidy up:

Placed an order at Minispares for some bits and pieces - few bulbs; light/brake fluid check/rear heated screeen switches; and some black leather bonnet straps. Should be here on Tuesday along with the stuff ordered from Huddersfield Spares on Thursday
Looks like I'm going to be very busy over the next fewweeks decades...
Comments welcome
Some progress from today:
Took up the driver side front and rear carpets, and emptied the boot.
Sanded and got a wire brush to the worst parts, sanded down to shiny bare metal.
Painted over with Hammerite.
Also stuck some Hammerite in the rear door bins.
Replaced the battery earth strap, and cleaned up the battery connections (they're more or less brand new anyway).
Cleaned up the connections on the interior light, it actually works how it should now!
Pics below, Of the before and after painting, also of the posh masking tape used
Sorry about the quality of the "after" pics, as per usual I started too late meaning I finished when it was getting dark
Had inner sills quite recently, which I'm pleased about:
Rear floor
And close-up, not in bad nick - want to keep it that way!
Boot floor - again, not in bad nick, but still some surface rust which has been attacked before it gets worse...
After the battery earth strap and a little tidy up:
Placed an order at Minispares for some bits and pieces - few bulbs; light/brake fluid check/rear heated screeen switches; and some black leather bonnet straps. Should be here on Tuesday along with the stuff ordered from Huddersfield Spares on Thursday
Looks like I'm going to be very busy over the next few
Comments welcome
#84
stealth05
-

- Members
-
- 625 posts
Super Mini Mad
Posted 09 February 2008 - 07:03 PM
have you got shares in hamerite or something 
#85
yorkshirechris
-
- TMF+ Member
-
- 3,873 posts
11.11.11
- Location: Leeds
- Local Club: www.lcmoc.com
Posted 09 February 2008 - 07:38 PM
No but I have a parent who manages a trade DIY store 
Hence me having most of that litre left and another 2.5 litre of brand new unopened black in the house lol!
Hence me having most of that litre left and another 2.5 litre of brand new unopened black in the house
lol!
#86
Pie
-

- Banned
-
- 7,695 posts
Crazy About Mini's
- Local Club: GoGoAuto
Posted 10 February 2008 - 01:04 AM
Do MK2 lights fit in standard MK3/4 holes?
Pete
MkII Rear lights appear smaller but the light is the same size, the chrome is smaller. On my old mini "RedShed" i converted from mkIV lights to mkII. They do look very period, but some people dont like them as they have no reverse.
#87
yorkshirechris
-
- TMF+ Member
-
- 3,873 posts
11.11.11
- Location: Leeds
- Local Club: www.lcmoc.com
Posted 10 February 2008 - 05:56 PM
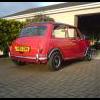
Not much happened today, took her for a run this afternoon to the countryside managed to get talked to by a mad old man and his wife who loved Evelyn
Some pictures below... taken with the camera phone though so not brilliant (forgot my camera AGAIN) think the countryside suits her compared with where she actually lives,


When we got back it was still light, so I decided to do some pre-wiring for when the stereo goes in - run a constant live from the solenoid, an ignition live from bay 1 of the fusebox. Split off the constant live at the fuseholder I placed inside the car, so feeding from it I have the stereo constant and the feed for the boot light. Fused accordingly. Also run two earths into the same place from the engine bay - didn't want to go making holes in the "cockpit" area and the hole I fed the other wires through was right near a good earthing point
Hopefully the stereo should be in soon, can't wait to get my Minispares and Huddersfield spares goodies this week!
managed to get talked to by a mad old man and his wife who loved Evelyn Some pictures below... taken with the camera phone though so not brilliant (forgot my camera AGAIN) think the countryside suits her compared with where she actually lives,
When we got back it was still light, so I decided to do some pre-wiring for when the stereo goes in - run a constant live from the solenoid, an ignition live from bay 1 of the fusebox. Split off the constant live at the fuseholder I placed inside the car, so feeding from it I have the stereo constant and the feed for the boot light. Fused accordingly. Also run two earths into the same place from the engine bay - didn't want to go making holes in the "cockpit" area and the hole I fed the other wires through was right near a good earthing point
Hopefully the stereo should be in soon, can't wait to get my Minispares and Huddersfield spares goodies this week!
#88
sazal
-

- Members
-
- 3,512 posts
Up Into Fourth
- Local Club: DCMOC
Posted 10 February 2008 - 06:01 PM
Shes lovely! Hehe, she does defo suit the countryside, reminds me of Heartbeat!!
#89
yorkshirechris
-
- TMF+ Member
-
- 3,873 posts
11.11.11
- Location: Leeds
- Local Club: www.lcmoc.com
Posted 10 February 2008 - 10:06 PM
It's not a million miles from Heartbeat land very close in fact!
I sold the Mk2 lights I bought at Bingley by the way - bit the bullet and ordered some brand new ones from Huddersfield Spares, should be here tuesday along with about 10 spare clear bulbs, may as well replace them while I'm there.
very close in fact!I sold the Mk2 lights I bought at Bingley by the way - bit the bullet and ordered some brand new ones from Huddersfield Spares, should be here tuesday
along with about 10 spare clear bulbs, may as well replace them while I'm there.
#90
Dazza IOW
-

- Noobies
-
- 62 posts
Stage One Kit Fitted
- Local Club: MINI REBELS GLOS
Posted 10 February 2008 - 10:11 PM
[quote name='yorkshirechris' date='Jan 25 2008, 08:22 PM' post='820597']
Welcome to Evelyn's "tidy up" project page
I bought this little beauty from a fellow forum member yesterday, with a full MOT, bit of Tax and about 25p under the carpets
Apologies for the poor picture quality, better pics will be added soon


More pictures will be added as the work progresses...
I'd like to pay a big thankyou to Dan (Se7ens1ns on here) for his continued support, time, and advice on this project.. he came to look over the car with me originally and has helped me a great deal doing things I couldn't do on my own... and if it wasn't for him I wouldn't have gone to bought Evelyn in the first place
Hope you like so far
Things done so far:
Chrome exterior door window seals replaced
Pool ball gear knob fitted
Indicator and Hazard flasher units replaced
Oil and oil filter changed
Dizzy cap changed, rotor arm cleaned up - condenser, points, leads and plugs all looked brand new when bought
Clutch adjusted, all brakes checked, rear drums adjusted
Timing Chain Cover Gasket replaced
Crank Pulley Seal Replaced
British Isles shaped badge removed
Front and Rear black and silver plates fitted
Passenger side floors sanded and hammerited
Hazard lights fixed - they just randomly started working today!
Replaced the battery for a 600Amp one
Replaced "Mini Cooper"winged badges for Shield type bonnet badge (thanks Lisa ) and Mini 850 boot badge
TMF stickers put in
Installed new bulb in interior light - it now comes on when the door opens!
New Float Valve Kit for the carb fitted
Clutch adjustment screw fitted and clutch adjusted
Engine Crypton Tuned
Drivers floor and boot floor rust sanded and painted with Hammerite
Battery earth strap replaced
[Sounds like you got a lotta work to do good luck any way.She looks good.
Welcome to Evelyn's "tidy up" project page
I bought this little beauty from a fellow forum member yesterday, with a full MOT, bit of Tax and about 25p under the carpets
Apologies for the poor picture quality, better pics will be added soon
More pictures will be added as the work progresses...
I'd like to pay a big thankyou to Dan (Se7ens1ns on here) for his continued support, time, and advice on this project.. he came to look over the car with me originally and has helped me a great deal doing things I couldn't do on my own... and if it wasn't for him I wouldn't have gone to bought Evelyn in the first place
Hope you like so far
Things done so far:
Chrome exterior door window seals replaced
Pool ball gear knob fitted
Indicator and Hazard flasher units replaced
Oil and oil filter changed
Dizzy cap changed, rotor arm cleaned up - condenser, points, leads and plugs all looked brand new when bought
Clutch adjusted, all brakes checked, rear drums adjusted
Timing Chain Cover Gasket replaced
Crank Pulley Seal Replaced
British Isles shaped badge removed
Front and Rear black and silver plates fitted
Passenger side floors sanded and hammerited
Hazard lights fixed - they just randomly started working today!
Replaced the battery for a 600Amp one
Replaced "Mini Cooper"winged badges for Shield type bonnet badge (thanks Lisa
) and Mini 850 boot badge TMF stickers put in
Installed new bulb in interior light - it now comes on when the door opens!
New Float Valve Kit for the carb fitted
Clutch adjustment screw fitted and clutch adjusted
Engine Crypton Tuned
Drivers floor and boot floor rust sanded and painted with Hammerite
Battery earth strap replaced
[Sounds like you got a lotta work to do good luck any way.She looks good.


2 user(s) are reading this topic
0 members, 2 guests, 0 anonymous users


