Jump to content


Photo
- - - - -

Another Electric Mini


  • Please log in to reply
102 replies to this topic

#61 MalcolmB

MalcolmB

    Mini Mad

  • Noobies
  • PipPipPipPip
  • 121 posts
  • Location: Newcastle upon Tyne

Posted 14 July 2012 - 05:40 PM

Right, I'm on me holidays, it's still peeing it down, so time for a long overdue update.

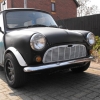
My first attempt at making the stub drive shafts wasn't good enough, so I bought a small lathe and made up some new ones. Also made a chainguard.
Attached File  P1030208.jpg   72.65K   56 downloadsAttached File  P1030210.jpg   67.05K   65 downloadsAttached File  P1030211.jpg   70.2K   56 downloads

I've buit the first couple of battery modules. They're made up of 10 amp-hour 3 volt lithium cells. Each module is 24 volts and 50 amp hours and weighs about 16 kilos. I plan to use three of them to start with, for a pack voltage of 72V, and will add another two later when I upgrade the controller.

Fitted a proximity sensor to each motor. These are hooked up to rpm switches to limit the max rpm and prevent the commutator spinning itself apart.
Attached File  P1030214.jpg   83.42K   72 downloadsAttached File  P1030237.jpg   59.21K   38 downloadsAttached File  P1030244.jpg   68.64K   26 downloads

I made another chainguard for the top half of the subframe. It's not oil tight, as I just plan to grease the chains, but it should keep out most of the road muck. The two blocks behind the motors are the reversing contactors (heavy-duty relays), one for each motor. Forward/reverse will be selected using an old auto selector I found at an auto jumble. I just had to reposition the switches and add the F/R lettering.

The motors will be air-cooled. Spot the repurposed mini vents :)
Attached File  P1030248.jpg   72.11K   119 downloadsAttached File  P1030240.jpg   32.15K   63 downloads

I'm going to use a 72V 450A Alltrax controller just to test things out and get my MOT and will upgrade to a more powerful controller when funds allow. Made a simple frame to support the controller and the blower for cooling the motors. The thing just to the right of the blower is a throttle body from an MG, complete with throttle position sensor. The controller takes its throttle signal directly from this.
Attached File  P1030245.jpg   77.7K   182 downloadsAttached File  P1030247.jpg   77.38K   111 downloads

Still a lot of small jobs to do, but I'm really getting excited about refitting the subframe. Will try to update more often from now on.

Cheers, Malcolm

#62 MiniLandy

MiniLandy

    One Carb Or Two?

  • Members
  • PipPipPipPipPipPipPip
  • 796 posts
  • Location: Ramsey, Cambs.
  • Local Club: HAMOC

Posted 14 July 2012 - 06:38 PM

Glad to see an update on this, great thread!

#63 TopCatCustom

TopCatCustom

    Previously known as C4NN0N.

  • Members
  • PipPipPipPipPipPipPip
  • 1,134 posts

Posted 16 July 2012 - 09:40 AM

Likewise, love it.

2 questions though- how are you going to get the vacuum for the brake servo, or will you ditch it? And how will you heat the cabin with no hot coolant, electrical heaters draw so much energy! Also how will you get a steady 12-14v for the car electrics?

#64 MalcolmB

MalcolmB

    Mini Mad

  • Noobies
  • PipPipPipPip
  • 121 posts
  • Location: Newcastle upon Tyne

Posted 16 July 2012 - 10:37 AM

Thanks lads
I'm keeping the servo and using an electric vacuum pump from an Audi. This will be plumbed via a check valve and vacuum switch to the servo, so it automatically maintains vacuum at the level set by the switch. I'm going to try using it without an air reservoir to start with, but might end up fitting a reservoir to avoid cycling the pump too often.
Attached File  P1030252.jpg   99.02K   11 downloads

The 12V supply comes from four of the same lithium cells that are used in the main pack, plus four fully isolated DC to DC converters, one for each cell. The pack supply will be connected to the DC-DC converters when the ignition is switched on. These convert the pack voltage to 3.45V, which keeps each cell nicely charged. The cells are wired in series to supply a nominal voltage of 12.8V, which feeds the usual auxiliary circuits, plus vacuum pump, electric demister/heater and the contactor coils. The complete 12V supply and aluminium box weighs just over 3 kilos and will be mounted on the front bulkhead. I'm working on that today, in between rain showers.
Attached File  P1030243.jpg   46.1K   66 downloads

For the time being I'm just going to use a 110V electric hairdryer for demisting/heating. This will be connected direct to the main pack, via another heavy duty relay, and plumbed into the demister vents. When I get round to it I'll have a go at installing an electric heater element (probably from a VW) in the original mini heater.

Edited by MalcolmB, 16 July 2012 - 10:47 AM.


#65 tiger99

tiger99

    Crazy About Mini's

  • Members
  • PipPipPipPipPipPipPipPipPipPip
  • 8,584 posts
  • Location: Hemel Hempstead

Posted 04 August 2012 - 07:26 PM

Hi Malcolm,

I have just noticed your thread and must say that it is an extremely interesting project. You seem to have good solutions for most of the problems which are going to occur. I particularly like the way you are driving on to the pot joints. I see that a lot of hard work has gone into it, and really hope that it works well in the end. Batteries, as always, will be the ultimate limitation. Even Ford and GM are stuck with what they can get....

I would point out that motors in series are bad when wheelspin is considered, as the spinning wheel will accelerate to full rpm, dropping most of the voltage across itself, and cutting back the current, so the motor on the wheel which is gripping will have very little torque, so a slippery patch under one wheel can leave you stuck. Parallel motors tend to self-correct if one spins, plus despite what others have said, they provide most of the benefits of a limited slip diff with few of the disadvantages. I believe that your original idea of parallel connection is completely correct.

Beware of extrapolations from radio controlled models. Not everything scales in the same ratio, and models NEVER behave anything like real cars. For a start, the mass of a model is always larger than simple scaling would suggest, because you can't effectively scale down a shell thickness of 0.9mm. The natural frequencies of the suspension are very different. Also, the efficiencies and other characteristics of the motors are nowhere near similar. Models usually use permanent magnet motors, and I am sure you would like to, if they were available, and affordable, in large sizes. Shunt or series wound motors, not generally available in small sizes for models, are very different animals, although a shunt wound motor can approximate to a permanent magnet motor, but I expect you know that already, although maybe some here do not.

I am looking forward to seeing further developments.

#66 MalcolmB

MalcolmB

    Mini Mad

  • Noobies
  • PipPipPipPip
  • 121 posts
  • Location: Newcastle upon Tyne

Posted 04 August 2012 - 08:27 PM

Hi tiger

Many thanks for your comments! Sounds like you're an electrical engineer with some experience of drive systems?
It's good to hear another vote in favour of wiring the motors in parallel as I've already gone back to that plan, for exactly the reasons you describe. I believe the characteristics of series-wound motors are well suited to this approach, though it probably wouldn't work so well with permanent magnet motors, since rpm is directly proportional to voltage in their case, as you know. The biggest question mark for me is how the mini will handle in low-speed manouvering under heavy load, such as tight parking on a hill, or taking a hairpin uphill. There will be some tendency for the motors to resist steering input, but there's only one way to find out how this affects the steering in real life... I plan to take things easy at the start and do some slow speed manouvering tests. Otherwise there should be several advantages to driving the motors in parallel, particularly in slippery conditions.

Yes, I'd love to get hold of one of the new YASA permanent magnet motors. 150kW and 400 Nm of torque from a motor weighing less than 20 kilos would go nicely in a mini: http://www.yasamotor...oducts/yasa-400
Still a bit pricey though...

Your comment on the difficulty of scaling up from models also makes good sense to me. I don't have an electrical engineering background, but this electric drive thing has become a bit of an obsession and I've been reading everything I can for a few years now. Any other pointers or criticism you have are very welcome.

Cheers, Malcolm

#67 tiger99

tiger99

    Crazy About Mini's

  • Members
  • PipPipPipPipPipPipPipPipPipPip
  • 8,584 posts
  • Location: Hemel Hempstead

Posted 06 August 2012 - 06:53 PM

Malcolm,

I don't expect that there will be much of a problem at low speed, where the motor back emf is small and hardly influences the current per motor, most of the voltage is just being dropped in the armature resistance.

At high speed the effective "differential" will be stiffer, but still not sufficient to make the handling difficult. It should be much smoother than a mechanical LSD.

That YASA motor does seem very nice!

#68 MalcolmB

MalcolmB

    Mini Mad

  • Noobies
  • PipPipPipPip
  • 121 posts
  • Location: Newcastle upon Tyne

Posted 16 September 2012 - 02:54 PM

Motors are in, finally! The mini has been on blocks on my drive for too long.
It's bit crowded in the engine bay, but everything fits, just. I need to cut a couple of small holes in the inner wings to make sure the motor shafts don't rub.

Attached File  P1030276.jpg   91.58K   72 downloadsAttached File  P1030277.jpg   92.5K   138 downloadsAttached File  P1030278.jpg   86.87K   76 downloads

Edited by MalcolmB, 16 September 2012 - 03:04 PM.


#69 MalcolmB

MalcolmB

    Mini Mad

  • Noobies
  • PipPipPipPip
  • 121 posts
  • Location: Newcastle upon Tyne

Posted 16 September 2012 - 02:54 PM

I've just finished balancing the pack. Each 24V/50Ah module has its own cell-log voltage monitor and relay board to provide low-voltage cutoff to the throttle input and high-voltage cutoff to the charger. This is important with lithium cells as they're easily damaged if you overcharge them or over-discharge them. The relay outputs are wired in parallel.

The fourth module is only partly filled with cells at the moment as I need to stay under the voltage limit of the Alltrax controller (90V). The battery pack will sit in a rack in the back seat of the mini, and will have a polycarbonate cover and insulators between each module.

I'm using a pair of 30A 36V Curtis chargers in series. The chargers are each adjusted to finish charging at around 45.5V.

Just got to install the pack and finish wiring now...

Attached File  P1030279.jpg   73.23K   63 downloadsAttached File  P1030280.jpg   45.57K   25 downloadsAttached File  P1030282.jpg   58.9K   47 downloads

Edited by MalcolmB, 16 September 2012 - 03:03 PM.


#70 TopCatCustom

TopCatCustom

    Previously known as C4NN0N.

  • Members
  • PipPipPipPipPipPipPip
  • 1,134 posts

Posted 16 September 2012 - 05:17 PM

Love it, look forward to hearing about your test drive!!

#71 jbk

jbk

    Starting My Mini Up

  • Noobies
  • Pip
  • 1 posts
  • Local Club: none

Posted 17 September 2012 - 08:10 AM

Most delicate work I 've ever seen!!
Keep up the good work!

#72 SamMayfair1996

SamMayfair1996

    Mini Mad

  • Members
  • PipPipPipPip
  • 193 posts
  • Location: Near Tunbridge Wells, Kent, UK

Posted 17 September 2012 - 09:13 AM

Only due to what I can see from the pictures, but due to the size and sheer amount of parts in this build isn't it going to make it very heavy, therefore making it difficult for the electrics to keep up to speed with regular traffic? Or is this more of a potter around country lanes type car rather than motorways?

#73 MalcolmB

MalcolmB

    Mini Mad

  • Noobies
  • PipPipPipPip
  • 121 posts
  • Location: Newcastle upon Tyne

Posted 17 September 2012 - 10:47 AM

C4ANNON and jbk: Thanks!

Sam: It's not as heavy as it might look. The motors weigh 80 kg, the additional steel, bearings, drive sprockets and controller about 20 kg, battery pack about 90 kg, so total added is roughly 190 kg. But I've also lost the engine, gearbox, exhaust, auxiliary battery, fuel tank and fuel. Not sure what they add up to, but I reckon I've only added 40 kg at most. I'll take it to the local weighbridge once I've got it on the road.

You're right though, it's just going to be a local runabout for the moment at least. It's more proof-of-concept than anything. The motors are easily capable of motorway speeds, but the battery isn't big enough for motorway range. Lithium batteries are getting lighter and cheaper all the time, so it makes sense to use the smallest pack I can get away with at the moment, then upgrade when I can afford it. Most of the journeys I make are 30 miles or less, so electric should work well for these.

#74 MalcolmB

MalcolmB

    Mini Mad

  • Noobies
  • PipPipPipPip
  • 121 posts
  • Location: Newcastle upon Tyne

Posted 22 October 2012 - 05:52 PM

She works!! Posted Image

I've just had my first drive in an electric car Posted Image Drove up and down the street this morning in the Mini. I've got to say after all the time and thought I've put into this project and all the imagined problems, it was almost an anti-climax. No fireworks, no clouds of smoke, no wild surges of power. She just glides along serenely accompanied by the sound of an old milk float and the odd thump from the suspension Posted Image

My main worry was torque steer, since the motors are wired in a parallel to a single controller. I did a couple of full-lock turns and the steering feels just the same as it did with the original engine. Obviously I'll have to do more testing, but it looks encouraging so far.

The performance isn't anything to shout about at the moment as I'm using a low-voltage battery pack and golf-cart controller for testing, but it feels fine for town driving.

I did find one small problem though. I installed a forward/reverse gear shifter in the tunnel just in front of the handbrake. The handbrake was on when I did the installation, and I never thought to check clearance with the handbrake off. Now I can only select reverse when the handbrake is on... I guess that's one way of making sure I've come to a complete stop before I go into reverse Posted Image

Still lots of little jobs to do, minor details you know, such as wiring the instruments and chargers, fitting the dash, interior carpet, exterior paint...

I'll get some more pics and try to do a video soon.

Attached Files


#75 MiniLandy

MiniLandy

    One Carb Or Two?

  • Members
  • PipPipPipPipPipPipPip
  • 796 posts
  • Location: Ramsey, Cambs.
  • Local Club: HAMOC

Posted 22 October 2012 - 06:42 PM

Quite possibly, one of the coolest builds on the forum.


0 user(s) are reading this topic

0 members, 0 guests, 0 anonymous users