Jump to content


Photo
- - - - -

Daughter Zoe's Mini - Yeah Right!


  • Please log in to reply
723 replies to this topic

#256 rick.spi

rick.spi

    Camshaft & Stage Two Head

  • Members
  • PipPipPipPipPipPipPipPip
  • 1,686 posts
  • Local Club: "WOT NO BRAKES"

Posted 14 May 2010 - 10:05 PM

im loving the colour very much... :lol:

also the little smiths clock is awesome, i love looking for vintage bits like that at autojumbles. :D

had a read from the start after seeing the mini in another thread. and its come a long way. nice work :thumbsup:

#257 carboy001

carboy001

    One Carb Or Two?

  • TMF+ Member
  • PipPipPipPipPipPipPip
  • 1,065 posts

Posted 14 May 2010 - 10:17 PM

Looking good Steve :lol:

Mk2 lights look spot on, you going to mount a reverse light underneath the bumper?

If you dont find a place for the clock in your project, i'll find one in mine :D haha

#258 stevede

stevede

    As seen on TV

  • Members
  • PipPipPipPipPipPipPip
  • 1,164 posts
  • Local Club: None

Posted 17 May 2010 - 08:26 PM

Thanks once again for the kind comments. They are appreciated.

Shifty: Yes I was at Himley. I did visit the stand and saw what must have been your van but everyone was engaged in deep conversation with other visitors / members so I just had a look around and moved on. I'll make a point next time of asking.

Rick SPI: Love the clock just hope I can find a suitable spot for it (positve earth as well so will have to be careful)

carboy001: Chris, I'm sure I'll find a place for it - don't you worry!

On with this weeks update....


Bit of bling from Smiffy's around the doors.

Posted Image

And then finally on with the doors.

It was a bit I had been dreading as I had done loads of work trying to get them right before paint and I was just hoping that they fitted okay.

Posted Image

I'm pleased to say that all that messing I did with them paid off and I'm more than happy with the fit.

Posted Image

Even got the glass in and some chrome trim. New outside, original cleaned up on the inside.

Posted Image

Posted Image

I now know the difference between the left & right window winders (anyone need a spare r/h give me a shout.. I have 3)!

And did you know that the way to tell tinted door glass (other than looking at it) is that the green tint has a G by the kite mark symbols? I do now after putting a clear piece in by mistake.

Never mind, done now.

On to a bit of wire tidying in the boot and laying some cables for the intended mods.

Posted Image

Posted Image

Finally getting the rear window in (not happy with the tinting but now on 3rd attempt) and the boot lid fitted. Had to use the old seal as the lid wouldn't shut with the new one.

Oh, one final addition............


Posted Image

Well, I just had to didn't I? (Zo' bought it at IMM last year)


That's about all for today, more soon.

Thanks for looking

Cheers

Steve

#259 carboy001

carboy001

    One Carb Or Two?

  • TMF+ Member
  • PipPipPipPipPipPipPip
  • 1,065 posts

Posted 17 May 2010 - 09:04 PM

Very nice work Steve, loving the light on the bootlid, guessing its a fog light? What intended mods have you got instore for it that requires the extra wiring?

#260 chappy

chappy

    One Carb Or Two?

  • Members
  • PipPipPipPipPipPipPip
  • 1,253 posts

Posted 18 May 2010 - 01:18 PM

if my mini turns out as nice as this, i'll be happy...


somehow, i don't think it will :/


Edit: also what tints did you put on? (ie. light percentage) i've been looking for some light tints, but wasn't sure what'd look good, those seem to suit the mini well.

Edited by chappy, 18 May 2010 - 02:26 PM.


#261 Bean

Bean

    Queen of 'shoppin, Voted Miss TMF 2011

  • Members
  • PipPipPipPipPipPipPipPipPipPip
  • 8,054 posts
  • Name: Jean
  • Location: Malvern

Posted 18 May 2010 - 01:20 PM

Lol, you have a different 'modern car' looking at the Mini in every single photo! :)

Looking absolutely stunning as ever, Steve. (Er - The mini that is, though I'm sure you're lovely too!)


Really liking the custom indicators & fog light - It's the attention to detail that I love in this thread.

Can't wait to see it on the road! :-

#262 callumatkinson

callumatkinson

    Stage One Kit Fitted

  • Noobies
  • PipPipPip
  • 53 posts

Posted 18 May 2010 - 01:43 PM

what did you do with the original steering wheel buddy?

your mini looks mint, hope mine re-spray looks that mint!!

#263 shellspeed

shellspeed

    Mini Mad

  • Members
  • PipPipPipPip
  • 233 posts
  • Local Club: none

Posted 18 May 2010 - 03:39 PM

:- :) :) :) :) ;) :wub: :wub:

#264 vincieshile

vincieshile

    On The Road

  • Noobies
  • PipPip
  • 42 posts
  • Local Club: not yet

Posted 18 May 2010 - 08:08 PM

I am totally new to this and don't really know how to add comments but here's a try.

I am another 'mini maniac' attempting a total restoration. Just now my mini shell is 'as good as new' all rusty bits removed, many panels replaced etc. She (her name is Maggie) has been resprayed, undersealed etc and now awaits the mechanics. At present I am cleaning all bits 'n pieces that can be re-used and replacing the bits that are beyond use. Next week I hope to fit fuel pipe, brake pipe, steering rack and two subframes. In the mean time I am enjoying and really appreciating your (Steve) diary and photos. I've searched the net for something like this and finally found this site.
Bye, and Steve, keep keep up the good work. Vincie

#265 Mini Basher

Mini Basher

    Speeding Along Now

  • TMF+ Member
  • PipPipPipPipPip
  • 424 posts
  • Location: Forest of Dean
  • Local Club: Mini Foresters

Posted 20 May 2010 - 06:34 PM

Steve

Sorry I havn't commented on your thread lately, been a bit busy trying to get mine finished for the wedding which I've managed to do, Just. She is looking bootiful mate and is a real credit to you, keep up the good work

Andy

#266 sonikk4

sonikk4

    Twisted Paint Polisher!!!

  • Admin
  • PipPipPipPipPipPipPipPipPipPipPip
  • 16,035 posts
  • Name: Neil
  • Location: Oxfordshire

Posted 20 May 2010 - 07:00 PM

That has come up really well, its been a while since i visited this build, those door gaps are really good (me jealous), the welding filler rods you used what are they exactly?? and next silly question where did you get them from. Also did you use Heritage door skins or pattern.

I hope my sons car comes out this well.

Neil

#267 stevede

stevede

    As seen on TV

  • Members
  • PipPipPipPipPipPipPip
  • 1,164 posts
  • Local Club: None

Posted 23 May 2010 - 07:54 PM

Hi folks,

Time for this weeks update.

Thanks for the comments again:

Chris: The light in the boot is indeed the fog light. The extra wiring is for a potential boot lid mounted reverse light, the fuel pump and a couple of feeds ready for when some ICE goes in.

Chappy: The tints were bought form my local spares shop. The brand is "defender" www.trilogyltd.com and it is "light smoke"

Thanks Bean: You had me blushing for a mo' & then I read the rest of the sentence! LOL.

Calumatkinson: Thanks for the comments, I have the steering wheel that came with the car but it is not the original Rover one.

Vincieshile: Thanks for your comments. I have found this site invaluable during my rebuild, I'm sure you will find all the help you need on here.

Minibasher: Thanks Andy, hope the wedding went okay.

Sonikk4: Neil, thanks for the comments. I used pattern door panels (bought them very early on, before I knew better). The welding filler rods are what would be used for gas or TIG welding. They are mild steel. I got them from my pal but they are easily available via welding supplies & engineers merchants.

On with the update

Bit of a clean up on the petrol tank prior to refitting.

Posted Image

Posted Image

I needed to get the seam strips on before I could do the arches.

I had been waiting for some heretige ones but they seem rarer that rocking horse droppings at the moment.

I bought some pattern (magnum) ones from MOSS, the guy warned me they weren't a great fit. He was right and I took them back for a refund.

I was then up at Mini Sport for something else and asked what they used. A sample later and I bought a couple of fronts (Hadrian) to try.

They seemed to fit okay (after a bit of fetling) and believe it or not, I cleaned up the original rears and re-used them.

Painting them was interesting!

Posted Image

Posted Image


I also re painted the top of the bulkhead as it had got marked where the spit had been post re-spray.

Posted Image

I let them dry for a day or so and then after filling them with Dinitrol (with a small syringe) popped them in place.

Posted Image

Posted Image

I could now get on with the task of bolting some more bits back on.

Parts eagerly waiting to be fitted

Posted Image

Pedal box in

Posted Image

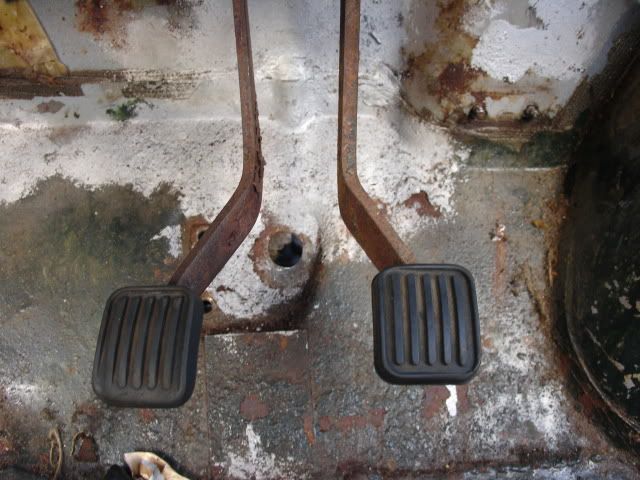
I'm sure the clutch pedal is bent - Any comments?

Before

Posted Image

Servo & brake cylinder

Posted Image

Bit more bling from camp Smiffy

Clutch cylinder

Posted Image

& yes, even without the heater & steering column the pin was a pig! Twice !! (I forgot the gasket under the cyinder)

I put the chassis plate back on as well and cleaned up this one that was on the slam panel

Posted Image

Anyone know its significance as the numbers dont match either the engine or chasis. (It was welded to the original panel)

As always, I'm a little further on than this but I have to keep a bit in reserve in case I get a quiet week.

That's all for today

Thanks for stopping by

Regards

Steve
#268 Bean

Bean

    Queen of 'shoppin, Voted Miss TMF 2011

  • Members
  • PipPipPipPipPipPipPipPipPipPip
  • 8,054 posts
  • Name: Jean
  • Location: Malvern

Posted 24 May 2010 - 06:19 PM

Hmm, without knowing what format the numbers are on the plate, it's hard to tell - Could be the body number though. Not sure where they put that on a 1991 car?

Will take a look at our '92 and get back to you :P


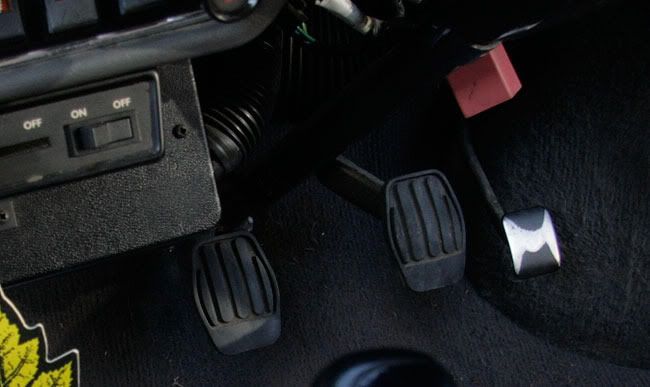
As for the clutch pedal - It could be the angle of the photo - But it does look bent to me, too ... it's kicking out towards the passenger - It's normally at the same angle as the brake pedal? :

Posted Image


Not sure though - I'd wait for someone more qualified to come along! :thumbsup:

#269 GreaseMonkey

GreaseMonkey

    Has Ratchet, Will Make Noises

  • Members
  • PipPipPipPipPipPipPipPipPip
  • 3,663 posts

Posted 24 May 2010 - 07:04 PM

I don't know but the clutch pedal always looks off to me in a mini? Yours looks oddly bent though!! Could be the angle as Bean said.

My Mk2

Posted Image

Looks off to me :)

#270 stevede

stevede

    As seen on TV

  • Members
  • PipPipPipPipPipPipPip
  • 1,164 posts
  • Local Club: None

Posted 24 May 2010 - 07:23 PM

Thanks for the replies.

The picture of the pedal is not the best but it is definately not in line like on your 2 photo's. It's as if it needs twisting slightly clockwise if that makes sense.

I never noticed when I took it off so it could have been like that before or could have got a bit bent in storage. I'm sure it will pull back easily without any lasting damage.

As for the plate, looking back at the picture it wasn't that great, although I did deliberately cover some of the numbers as I didn't want to post it clearly on the internet in case it was a chassis number of sorts.

The makers plate with Rover Motors etc and the chassis number corresponding to the log book (and on the number stamped into the scuttle), is on a plate on the drivers side inner wing. This one was welded to the front slam panel, is about 3 inches long with just 2 sets of numbers & letters reversed stamped on.

Don't have any more info than that.

Cheers

Steve


2 user(s) are reading this topic

0 members, 2 guests, 0 anonymous users