Jump to content


Photo
- - - - -

Mike's X18xe1 Powered Mini


  • Please log in to reply
79 replies to this topic

#1 M J W J

M J W J

    One Carb Or Two?

  • Members
  • PipPipPipPipPipPipPip
  • 976 posts
  • Location: Midlands
  • Local Club: not yet

Posted 31 January 2010 - 09:13 PM

I have been lurking around on the forum and have been working on this project for almost two years (and haven't got far) so I thought it was about time to start my project thread. Have bought myself bits and pieces over the last two years and have been slowly working on getting the shell to a point where you can't see daylight through the floor. Being a student money is tight so will be doing as much of the work as I can. Luckily I have access to uni's workshop and some fancy equipment plus their metal stores.

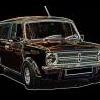
The car is an 87 city e. Unfortunately I didn't take a particullarly good photo of the car when I first bought it but here is the only one of it complete.

Posted Image

My plans for the car is to build it as a fast road car and try to keep it from looking heavily modified so no body kits or graphics on the outside. It will have full adjustable suspension, coil overs all round, 6 point roll cage, good old 4 pot metro callipers and will be having the red hot interior put into it that I got with the car. As I have all the cooper chrome work I am going to try and make it look like an early 90's cooper on the outside (I know what you are thinking this will look modified). The car will have an x18xe1 engine in the front and may be adding a turbo to it (aiming for 200bhp). Progress is going to be slow as I am away at uni at the minuet and my car is in my Gran's garage (thanks Gran).

Posted Image

Posted Image

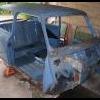
So far the car has been completely stripped down to a shell, sand blasted, both passenger and drives side sills replaced, boot floor replaced and the rear sub frame mounts repaired. The flitch panels and rear arches have been repaired. I still have the front scuttle and boot lid to repair and the a panels and flip front to fit. I'm not bothering to put up all the pictures of the body work repairs as I'm sure everyone has seen a rusting body shell. I spent this weekend just gone swapping the gearbox on my engine. I have built part of my sub frame and have fitted it to the car. I have unfortunately found that my engine has a broken starter motor, broken starter motor mounts and a cracked sump so these are a few problems that I will have to address. Hopefully I will be posting an update in a few weeks when I get my engine in the sub frame.

Posted Image

Posted Image

Posted Image

Posted Image

sorry for the poor quality photos they were taken on my phone

Thats all for now folks

#2 M J W J

M J W J

    One Carb Or Two?

  • Members
  • PipPipPipPipPipPipPip
  • 976 posts
  • Location: Midlands
  • Local Club: not yet

Posted 21 February 2010 - 04:06 PM

Just a small update

Seem to spend yesterday taking one step forward and two steps back
It turns out that there is a different number of splines on the out put shaft of the older f18 gearbox that I bought than the newer one I removed from my engine. Unfortunately the casing for the diff on the newer one has a huge crack in it and also it doesn't have a mechanical speedo drive so I am now having to remove the gear cluster from the newer of the gear boxes and put it into the older one. It will be cheaper to replace a set of seals than buy another one that is correct.

#3 M J W J

M J W J

    One Carb Or Two?

  • Members
  • PipPipPipPipPipPipPip
  • 976 posts
  • Location: Midlands
  • Local Club: not yet

Posted 18 April 2010 - 07:21 PM

Hi all again. I have been back from uni now for 2 weeks and have been making some progress on the mini. Funds are tight so have decided to do some work on the mini with the parts I have. Have been trying to get the roll cage I bought to fit in. I can't see how the previous guy got it into a mini. I have had to cut 6 inches from the centre of the main hoop just to get it between the door pillars.

Posted Image

Posted Image

Anyway I have also started to make some door bars up for it and will be making a bar that joins the roll cage to front sub frame floor mounts to try and stiffen the body work. That's all for now.

#4 NudgerSS

NudgerSS

    Stage One Kit Fitted

  • Noobies
  • PipPipPip
  • 92 posts

Posted 19 April 2010 - 05:20 PM

Shouldn't those front bars go all the way up the A-post and then join with the cage at the top of the B-post? Look like they intrude into the cabin quite a lot. Lots of padding and a helmet required!

Cheers - John

#5 jayare

jayare

    Up Into Fourth

  • TMF+ Member
  • PipPipPipPipPipPipPipPipPip
  • 2,093 posts

Posted 19 April 2010 - 09:16 PM

I think the front bars are upside-down. Either way the rear cage also looks to be sitting a long way from the shell and way too close to occupants!

JR

#6 M J W J

M J W J

    One Carb Or Two?

  • Members
  • PipPipPipPipPipPipPip
  • 976 posts
  • Location: Midlands
  • Local Club: not yet

Posted 20 April 2010 - 09:49 PM

Have been thinking that the front bars did not seem to follow the pillars particularly well. They have the floor mounts welded to them already by the person who built it. I have not altered the cage much but have just tweaked a bit where needed to get it to fit. I will flip the front bars and see if they fit better. If needs be I will cut the floor mounts off and weld them back on the other end.

I think the cage has been built to fit in over the top of a minis interior so it may explain the big gap. With the roof liner in place I can just get my little finger between the cage and it. Also the gap between the cage and the b pillars is about the same when you take it out.

With the rear legs in that position it is possible to get the rear seats in and sit on them all be it with a 38 mm tube in your view. As I won't be in the back I'm not bothered.

Cheers fro the criticism. It has made me start to think a bit more. Ummm

#7 M J W J

M J W J

    One Carb Or Two?

  • Members
  • PipPipPipPipPipPipPip
  • 976 posts
  • Location: Midlands
  • Local Club: not yet

Posted 29 June 2010 - 07:25 PM

Hi all. Back now from university so hopefully the car can progress a bit. Over the last two weeks I have finished grinding down and smoothing the welds out on my roll cage and have painted the rear half. I have welded in the closing arch panel that I stupidly forgot to do before. I have had to put the car on it's side again so have just got that in and seam sealed up.

Posted Image

While the car was on its side I have cleaned up and fitted the battery cable.

Now where did I put it...

Posted Image

Today I have seam sealed up the the sills and painted them. With the help of my mate Josh I have got it the right way up so its now ready for the process of reassembling and fitting of engine etc. Also while I was busy coating the underneath of my car in red oxide my mate Josh was stripping apart my rear sub frame. He had to destroy the brackets that hold the radius arm pins in place but never mind. I am going to put adjustable toe and track ones in anyway. Cheers Josh

Posted Image

#8 M J W J

M J W J

    One Carb Or Two?

  • Members
  • PipPipPipPipPipPipPip
  • 976 posts
  • Location: Midlands
  • Local Club: not yet

Posted 07 August 2010 - 12:01 AM

Right. I haven't updated anything on my build diary for a while so thought I better had. Due to being a student and also having to pay car insurance I don't have a lot of money. I ended up having to do 3 weeks of night shifts at work to pay for my car insurance, so not much got done over that period. I do now at least have a little money to spend on the car and now have some time free.

Over the last week I first of all finished stripping the old paint off the front half of my roll cage, have then repainted them in glorious red oxide and I have made the foot well reinforcements that bolt the front sub frame to the roll cage. I have replaced the bolts that are usually used to bolt the sub frame lower mounts to the floor pans with some M10 studs that are welded to a piece of 1/8th steel. This allows them to be held in place temporarily so the sub frame can be bolted to the car, then the reinforcing plate can be bolted in afterwards. I will take so photos to try and explain what I mean better when I take the floor reinforcement out to fit the steering rack.

Posted Image

Next I spent almost 2 and a half hours searching for my steering rack U bolts, seat mount bolts, front shock absorber mounts bolts and all of the seat mounts. Again where did I put them?!

Posted Image

I managed to find them all and also found my front sub frame bolts so that was a bonus.

On Thursday I spent the morning in the scrappy trying to find a set of suitable runners to mount my bucket seats on. Finally found some in a corsa (though I would keep with the vauxhall theme >_<). My sister has agreed to reupholster my seats in return for checking out her punto. Clare if you are reading this I have checked your punto over so hurry up with my seats.

Posted Image

I then spent the afternoon cleaning and dismantling my steering rack and cleaning up my front coil over shock absorber mounts.

And finally today (Friday daytime) I have painted my steering rack the and shock absorbed mounts. I just had time before work to bolt on the shock absorber mounts and tack the first piece of my seat frames together. Will get some photos of them up next week when I have made them.

Posted Image

Again sorry for the poor quality of the photos. Forgot to take my camera so ended up using my phone again.

Mike

#9 M J W J

M J W J

    One Carb Or Two?

  • Members
  • PipPipPipPipPipPipPip
  • 976 posts
  • Location: Midlands
  • Local Club: not yet

Posted 10 August 2010 - 11:52 PM

Small (ish) update. I have painted my steering rack and fitted the new gaiters to it. I have also fitted the steering rack to the car.

Posted Image

I have painted up various other parts including sub frame mounts and the parts that bolt the roll cage to the sub frame.

Posted Image

Posted Image

After the paint had dried I refitted the rest of the cage and floor reinforcement.

Posted Image

Will spend tomorrow making up the seat mountings. Once this is done I can finish making the door bars for the roll cage and the final piece that bolts in at the top of the windscreen.

While waiting for the paint to dry today I have stripped one of my radius arms. I have looked at buying the built up back plates for the rear brakes but at about £130 :P for the pair and delivered to my door I think I will be refurbishing my original ones.

#10 Mad Max

Mad Max

    Speeding Along Now

  • Members
  • PipPipPipPipPip
  • 306 posts
  • Location: On a driveway under a car

Posted 11 August 2010 - 08:23 AM

Nice project mate, looks like you got a pretty good shell to start with. I'm a fellow budget builder although i didn't attempt a conversion, the a series cost enought for me, although am looking to do one in the future :P .

#11 lindy119

lindy119

    Super Mini Mad

  • Noobies
  • PipPipPipPipPipPip
  • 514 posts
  • Local Club: looking for one!!

Posted 11 August 2010 - 08:28 AM

That front cage looks much better!

#12 M J W J

M J W J

    One Carb Or Two?

  • Members
  • PipPipPipPipPipPipPip
  • 976 posts
  • Location: Midlands
  • Local Club: not yet

Posted 11 August 2010 - 10:31 PM

Mad Max.

The shell was not in great condition when I first got it although I have seen worse that people have saved. It has only rusted through in the usual places but annoyingly had rusted in them all. My dad and I manage to rip the front panel away from the drivers side wing by hand. I still have a bit or work to do on the shell. I need to sort out a bit by the bottom of the wind screen, sort out the rear bumper sill, fit the a panels and sort out the boot lid.

Lindy119

Cheers. I have spent ages getting that cage to fit properly. It drove me nuts. I still haven't finished it either but atleast the main 6 point cage is in. If I buy another roll cage for another project I will avoid buying a second hand one. I will spend a bit more money on one that will fit first time. If it doesn't at least I can return it.

#13 M J W J

M J W J

    One Carb Or Two?

  • Members
  • PipPipPipPipPipPipPip
  • 976 posts
  • Location: Midlands
  • Local Club: not yet

Posted 18 August 2010 - 11:25 PM

I have spent the last week making up one of the seat sub frames. It bolts into a normal set of mini front seat mounts so I could put the red hot seats I have in if I wanted. The seats slide back and forth and even tilt forward like a normal set of mini seats so I can get to the back seats if needs be. Anyway here are a few photos.

Posted Image

Posted Image
here is the seat sub frame

Posted Image
and a small video of it showing the various features of it (it's a seat frame, there aren't that many so don't be disappointed)

Posted Image

Posted Image
bucket seat with out fabric on it mounted in car

Posted Image
Everyone has done it but here's me sitting in the car pretending to drive. I will admit I was making engine sounds too.:wub:

Before anyone says it I am a bit low in that seat in the picture but the foam cushion at the bottom isn't attached at the minuet. When finished I will be sitting about 4 inches higher. Tomorrow will involve getting the door bar made on the drivers side. There is a good 2 and a half inches between the side of the seat and the door so should be easy enough to do. Then it will be onto the passenger side. At least I have worked out how to mount the seats. The other side should be a bit quicker to make. It will just be a mirror image to the driver's side.

One last thing. Why do we always sound different on video than we think? I sound like a child at the beginning of mine.

#14 lindy119

lindy119

    Super Mini Mad

  • Noobies
  • PipPipPipPipPipPip
  • 514 posts
  • Local Club: looking for one!!

Posted 19 August 2010 - 07:37 AM

liking the lightweight seat!!

#15 M J W J

M J W J

    One Carb Or Two?

  • Members
  • PipPipPipPipPipPipPip
  • 976 posts
  • Location: Midlands
  • Local Club: not yet

Posted 19 August 2010 - 10:50 AM

It's actually a cobra clubman seat. The fabric on it was ripped in a few places. The guy I bought the car from included them in the deal with a stack of other parts which included some black fabric to recover the seats. As mentioned in a previous post my sister is recovering them for me in return for sorting something on her punto. It is scary to think that is all there is to a bucket seat. A metal frame and a bit of foam.


1 user(s) are reading this topic

0 members, 1 guests, 0 anonymous users