
nice build looking forwrd to seeing more.

Mike's X18xe1 Powered Mini
Started by
M J W J
, Jan 31 2010 09:13 PM
79 replies to this topic
#32

M J W J
-
- Members
-

- 976 posts
One Carb Or Two?
- Location: Midlands
- Local Club: not yet
Posted 05 August 2011 - 11:16 PM
A little more done this week.
Have started making the N/S brace bar, have machined and welded in place, pieces where the bolts go through the box section to prevent the bolts from crushing it, retimed my engine, cut down the old O/s engine mount so the engine will fit in my frame, welded in rear lower arm suspension mounts and started to strip down the upper arms ready to be painted and have new bearings fitted. Also have fitted the frame to the mini and machined a set of bushes for the lower suspension arms due to the change in the way they are mounted.
Here's a few pics.

bush welded in place

engine retimed and refitted with modified engine mount and cover

stripped upper suspension arm

frame fitted to car
Have started making the N/S brace bar, have machined and welded in place, pieces where the bolts go through the box section to prevent the bolts from crushing it, retimed my engine, cut down the old O/s engine mount so the engine will fit in my frame, welded in rear lower arm suspension mounts and started to strip down the upper arms ready to be painted and have new bearings fitted. Also have fitted the frame to the mini and machined a set of bushes for the lower suspension arms due to the change in the way they are mounted.
Here's a few pics.
bush welded in place
engine retimed and refitted with modified engine mount and cover
stripped upper suspension arm
frame fitted to car
#33
M J W J
-
- Members
-
- 976 posts
One Carb Or Two?
- Location: Midlands
- Local Club: not yet
Posted 22 August 2011 - 10:21 PM
Got back to the mini after loosing two weeks due to working during the day and getting ill after eating at chain pub (often referred to as an item of cutlery).
Anyway back to it.

Welded the last two bushes into place in the brace bar

Welded up the crack in the starter ring on my engine. Cast metal is a b**** to weld. Thank god the crack didn't go any further.


Welded in reinforcements where the brace bars bolt to the body work
I have also filled in a few holes in my sub frame and repaired a small part of my N/S inner wing
All I need to do is seam seal up the joins of the reinforcements, paint them, drill a couple of holes and shuffle everything around in my garage so I can lift the engine into place. Will do it Thursday as I am back in work during the next couple of days :mad:. At least the overtime is paying for the mini.
Anyway back to it.
Welded the last two bushes into place in the brace bar
Welded up the crack in the starter ring on my engine. Cast metal is a b**** to weld. Thank god the crack didn't go any further.
Welded in reinforcements where the brace bars bolt to the body work
I have also filled in a few holes in my sub frame and repaired a small part of my N/S inner wing
All I need to do is seam seal up the joins of the reinforcements, paint them, drill a couple of holes and shuffle everything around in my garage so I can lift the engine into place. Will do it Thursday as I am back in work during the next couple of days :mad:. At least the overtime is paying for the mini.
Edited by M J W J, 26 August 2011 - 09:24 AM.
#34
M J W J
-
- Members
-
- 976 posts
One Carb Or Two?
- Location: Midlands
- Local Club: not yet
Posted 24 August 2011 - 10:46 PM
Managed to get the layout changes I was supposed to do at work today, done Tuesday night so had today off. Time was therefore well spent working on the mini.

I drilled the 2 holes I needed in the reinforcements I welded in place, seam sealed them up and painted them. Emptied the garage and swept up a ridiculous amount of grinding dust.

Reassembled my engine crane and moved the engine out of the garage spilling oil over the floor (need to get a new sump as the one I have has a crack in it just below the starter motor mount)

Put the mini in the garage the other way round and remounted the frame.
Fitted the lower suspension arms and the top arm pins

And finally trial fitted the engine in place. I don't think that my patented concrete engine mount is going to catch on . Think I better replace it with steel ones. My frame design seems to have good clearance round the engine. Not loads of room but a good half inch around it.
I drilled the 2 holes I needed in the reinforcements I welded in place, seam sealed them up and painted them. Emptied the garage and swept up a ridiculous amount of grinding dust.
Reassembled my engine crane and moved the engine out of the garage spilling oil over the floor (need to get a new sump as the one I have has a crack in it just below the starter motor mount)
Put the mini in the garage the other way round and remounted the frame.
Fitted the lower suspension arms and the top arm pins
And finally trial fitted the engine in place. I don't think that my patented concrete engine mount is going to catch on
. Think I better replace it with steel ones. My frame design seems to have good clearance round the engine. Not loads of room but a good half inch around it.
Edited by M J W J, 24 August 2011 - 10:51 PM.
#35
jinjrich
-
- Members
-
- 543 posts
Super Mini Mad
- Location: York
- Local Club: YMMOC
Posted 26 August 2011 - 01:18 PM
Great stuff mate. Following this one closely..
#36
M J W J
-
- Members
-
- 976 posts
One Carb Or Two?
- Location: Midlands
- Local Club: not yet
Posted 26 August 2011 - 10:14 PM
Doesn't look like I have done a lot but as Philster said somewhere in a post on 16vminiclub it takes ages to make engine mounts.
I spent most of yesterday trying to get the engine in position. I thought I had loads of room then realised that the gearbox that is attached to my engine (the one in the photos) didn't have the gear cluster in in it or end cover. Therefore the gearbox was about 2 1/2" short. I have now fitted the correct gearbox. I have the engine about 1/16" off the upper arm pin however the 1/16" clearance is from a tab that is cast into the gearbox. Next time I take the engine and gearbox out I will cut this tab off (can't see why it is there) which will gain me the needed 1/2" clearance. I can always shorten the upper arm pin as well by about 1/8".
Spent today making engine mounts. I have realised that the range rover gearbox mounts aren't in their ideal position but they should be OK as the Vauxhall engine and gearbox are lighter. It is the steel parts that will be stressed more. They are made from 1/4" plate and have had gussets added so I think they will be strong enough.

Rubber mounts in place for the front engine mounts.
Sorry I didn't take a picture of the bits that bolt to the engine. Will do Next time I am working on the car
I spent most of yesterday trying to get the engine in position. I thought I had loads of room then realised that the gearbox that is attached to my engine (the one in the photos) didn't have the gear cluster in in it or end cover. Therefore the gearbox was about 2 1/2" short. I have now fitted the correct gearbox. I have the engine about 1/16" off the upper arm pin however the 1/16" clearance is from a tab that is cast into the gearbox. Next time I take the engine and gearbox out I will cut this tab off (can't see why it is there) which will gain me the needed 1/2" clearance. I can always shorten the upper arm pin as well by about 1/8".
Spent today making engine mounts. I have realised that the range rover gearbox mounts aren't in their ideal position but they should be OK as the Vauxhall engine and gearbox are lighter. It is the steel parts that will be stressed more. They are made from 1/4" plate and have had gussets added so I think they will be strong enough.
Rubber mounts in place for the front engine mounts.
Sorry I didn't take a picture of the bits that bolt to the engine. Will do Next time I am working on the car
#37
M J W J
-
- Members
-
- 976 posts
One Carb Or Two?
- Location: Midlands
- Local Club: not yet
Posted 07 September 2011 - 10:41 PM
Still plodding along with this.
Only spent a few day on the mini last week due to rebuilding a model plane ready for competitions on the weekend. I should have fixed it almost 11 months ago when my house mate stood on it (cheers paddy!). I did go to Uttoxeter minifest though and buy some goodies for the mini so it can progress once the engine is fitted.
I spent a day with my mate Chris going through the wiring loom. Chris has been bugging me for ages to let him help me with the mini and as he is better at electrics than me I put him to good use. A bit early to be doing wiring but still progress. All I can say is good luck with this lot Chris

I have finished both of the front mounts


And I have started the rear mount unfortunately I need to remove the frame and engine so I can weld it in place so that is tomorrow's job.
I am really starting to get to the dregs of the 3/16" and 1/4" steel I have. I might have to do the unthinkable and buy some. My granddad would kill me for buying materials. He may have kept loads of junk in his garage but some of the stuff he kept is useful. I found a set of wiper blades as well last week. Cheers Granddad
Have got my welder set just right I think. Only problem is being a stick welder it leaves that horrible white rubbish all over your work making everything you weld look really untidy until you clean it properly. It will be done when it gets painted I just can't be bother at the minute.

I have also decided for the time being as this project is taking way too long and I am skint to forget the turbo and just get the engine running as is. The turbo can always come later. 114 bhp to begin with is going to be a massive increase in power from the original 39bhp automatic that the car had. I will also look at buying another engine to rebuild completely and lower the compression ration properly on it as well.
Hopefully someone can help me with this. I have been looking through other builds and a lot from what I have seen that use the small block engine only use 3 engine mounts. People who are using a large block have 4 engine mounts. Although my engine is a small block it is a 1.8 (doesn't seem to be a common engine to use and there is probably a reason why) so I have decided that building a fourth engine mount like the big block frames is probably a good idea. I think everybody will agree with me here. I have seen on some of the allspeed frames that the mount is almost directly above the lower rear engine mount that bolts to the gearbox. Either that or it is over towards the left hand side when facing the car. My question is (finally) where does the other half of the engine mount bolt to on the engine? I have found two holes that are tapped out on the water pump but that is about it. Cheers for your help in advance.
Only spent a few day on the mini last week due to rebuilding a model plane ready for competitions on the weekend. I should have fixed it almost 11 months ago when my house mate stood on it (cheers paddy!). I did go to Uttoxeter minifest though and buy some goodies for the mini so it can progress once the engine is fitted.
I spent a day with my mate Chris going through the wiring loom. Chris has been bugging me for ages to let him help me with the mini and as he is better at electrics than me I put him to good use. A bit early to be doing wiring but still progress. All I can say is good luck with this lot Chris
I have finished both of the front mounts
And I have started the rear mount unfortunately I need to remove the frame and engine so I can weld it in place so that is tomorrow's job.
I am really starting to get to the dregs of the 3/16" and 1/4" steel I have. I might have to do the unthinkable and buy some. My granddad would kill me for buying materials. He may have kept loads of junk in his garage but some of the stuff he kept is useful. I found a set of wiper blades as well last week. Cheers Granddad
Have got my welder set just right I think. Only problem is being a stick welder it leaves that horrible white rubbish all over your work making everything you weld look really untidy until you clean it properly. It will be done when it gets painted I just can't be bother at the minute.
I have also decided for the time being as this project is taking way too long and I am skint to forget the turbo and just get the engine running as is. The turbo can always come later. 114 bhp to begin with is going to be a massive increase in power from the original 39bhp automatic that the car had. I will also look at buying another engine to rebuild completely and lower the compression ration properly on it as well.
Hopefully someone can help me with this. I have been looking through other builds and a lot from what I have seen that use the small block engine only use 3 engine mounts. People who are using a large block have 4 engine mounts. Although my engine is a small block it is a 1.8 (doesn't seem to be a common engine to use and there is probably a reason why) so I have decided that building a fourth engine mount like the big block frames is probably a good idea. I think everybody will agree with me here. I have seen on some of the allspeed frames that the mount is almost directly above the lower rear engine mount that bolts to the gearbox. Either that or it is over towards the left hand side when facing the car. My question is (finally) where does the other half of the engine mount bolt to on the engine? I have found two holes that are tapped out on the water pump but that is about it. Cheers for your help in advance.
#38
M J W J
-
- Members
-
- 976 posts
One Carb Or Two?
- Location: Midlands
- Local Club: not yet
Posted 14 September 2011 - 11:21 PM
Update time
Have finished the third engine mount and now have the engine sitting on its own mounts instead of bits of wood in the frame. Kind of nerve wracking putting the engine down on its own mounts.


I received a small parcel in the post on Monday which was a replacement seal for my clutch mechanism. The seal has been fitted allowing me to fit the hydraulic clutch mechanism to my gearbox (this is my f17 gearbox with mechanical speedo drive). I cut off a tab that I can't see any use for on it and then swapped it with the broken one fitted to the engine.
I have also started stripping my hubs ready for paint and refitting. Anoyingly I have found I have to remove my engine to get the upper arms in and just when I have got my engine sitting right .
.
Have finished the third engine mount and now have the engine sitting on its own mounts instead of bits of wood in the frame. Kind of nerve wracking putting the engine down on its own mounts.
I received a small parcel in the post on Monday which was a replacement seal for my clutch mechanism. The seal has been fitted allowing me to fit the hydraulic clutch mechanism to my gearbox (this is my f17 gearbox with mechanical speedo drive). I cut off a tab that I can't see any use for on it and then swapped it with the broken one fitted to the engine.
I have also started stripping my hubs ready for paint and refitting. Anoyingly I have found I have to remove my engine to get the upper arms in and just when I have got my engine sitting right
.
#39
M J W J
-
- Members
-
- 976 posts
One Carb Or Two?
- Location: Midlands
- Local Club: not yet
Posted 17 September 2011 - 02:27 PM
Little bit more done.
The car was originally an auto so I bought a clutch pedal at the Uttoxeter mini show. I have cleaned up all the pedal box components and gave them a new coat of black paint. I then reassembled them yesterday and fitted them in. Annoyingly I can't find the piece that the steering colum bracket bolt to so I couldn't fit the steering column and wheel.

I have also stripped most of my front suspension components, given them a coat of rust treatment and then red oxide. Once everything is painted black it will time to reassemble them. Just need new front bearings now.

see how many parts you can spot
The car was originally an auto so I bought a clutch pedal at the Uttoxeter mini show. I have cleaned up all the pedal box components and gave them a new coat of black paint. I then reassembled them yesterday and fitted them in. Annoyingly I can't find the piece that the steering colum bracket bolt to so I couldn't fit the steering column and wheel.
I have also stripped most of my front suspension components, given them a coat of rust treatment and then red oxide. Once everything is painted black it will time to reassemble them. Just need new front bearings now.
see how many parts you can spot
#40
M J W J
-
- Members
-
- 976 posts
One Carb Or Two?
- Location: Midlands
- Local Club: not yet
Posted 25 September 2011 - 06:03 PM
Spent the last day on the mini for a while until christmas as I have had to go to university. At least when I get back at christmas I will have a nice set of parts ready to assemble
I have now finished painting all my parts in wonderful cheap Wilkos spray paint.
Here are the pictures. Can anyone find which part I am missing from my front suspension.


I have now finished painting all my parts in wonderful cheap Wilkos spray paint.
Here are the pictures. Can anyone find which part I am missing from my front suspension.
#41
M J W J
-
- Members
-
- 976 posts
One Carb Or Two?
- Location: Midlands
- Local Club: not yet
Posted 30 December 2011 - 09:47 PM
I'm back. Well actually I've been back for almost a fortnight but have been doing other things.
Spent the week running up to christmas making a set of hanging basket brackets for my Gran's christmas present. Ow my hands ache after cutting out all those metal petals with tin snips.


Since my last update I have re-assembled one of my hubs (new ball joints, steering arm lock tab and new bearing), bought a set of grooved and vented discs for my 4 pot callipers, separated my old discs and drive flanges to get the bolts out, fitted new needle bearings to both upper suspension arms (had to mill out one of the old ones as it broke up when I tried to remove it), fitted both upper arms the wrong way round to my sub frame, then the right way round, fitted new poly bump stops, fitted the hub to my suspension and started to disassemble my drive shafts ready to cut and shut them them together.
I need to order the rest of the parts to assemble my other hub (got a mini spares voucher for my birthday that was enough to buy the parts for one side, was hoping for more for christmas but didn't get any:() and build my drive shafts. Then I can put the wheels back on for the first time in 4 years!
Engine had to come back out again to get the upper suspension arm pins in.
Anyway here are a few photos.


My lower arms miss my sump by about 1/4". It was a gamble to mount my engine without the suspension fitted but it looks as though it has paid off.
Spent the week running up to christmas making a set of hanging basket brackets for my Gran's christmas present. Ow my hands ache after cutting out all those metal petals with tin snips.
Since my last update I have re-assembled one of my hubs (new ball joints, steering arm lock tab and new bearing), bought a set of grooved and vented discs for my 4 pot callipers, separated my old discs and drive flanges to get the bolts out, fitted new needle bearings to both upper suspension arms (had to mill out one of the old ones as it broke up when I tried to remove it), fitted both upper arms the wrong way round to my sub frame, then the right way round, fitted new poly bump stops, fitted the hub to my suspension and started to disassemble my drive shafts ready to cut and shut them them together.
I need to order the rest of the parts to assemble my other hub (got a mini spares voucher for my birthday that was enough to buy the parts for one side, was hoping for more for christmas but didn't get any:() and build my drive shafts. Then I can put the wheels back on for the first time in 4 years!
Engine had to come back out again to get the upper suspension arm pins in.
Anyway here are a few photos.
My lower arms miss my sump by about 1/4". It was a gamble to mount my engine without the suspension fitted but it looks as though it has paid off.
#42
evansisgreat
-

- TMF+ Member
-
- 1,129 posts
One Carb Or Two?
- Local Club: Not yet
Posted 01 January 2012 - 06:03 PM
Just had a read through your build, all coming along nicely. Though, the last batch of pics won't work for me. That wiring loom is scary!
#43
M J W J
-
- Members
-
- 976 posts
One Carb Or Two?
- Location: Midlands
- Local Club: not yet
Posted 01 January 2012 - 09:07 PM
Don't know why the pictures don't work for you. All photos are uploaded from photobucket.
The picture of the loom is actually 3 looms together. One is the engine harness, one is the original mini loom and the other is the engine bay loom from the Bertone coupe I took the engine from.
The Vauxhall loom has everything from air con to headlights so most of that has been labelled up ready to cut out. I will continue with the wiring once I have everything in that needs to be connected.
I will continue with the shafts tomorrow.

#45
M J W J
-
- Members
-
- 976 posts
One Carb Or Two?
- Location: Midlands
- Local Club: not yet
Posted 07 January 2012 - 10:35 PM
Update time
Spent yesterday trying to fit my rear sub frame. I got annoyed with trying to get my mini cv joints off the shafts so gave up and tuned my attention else where.
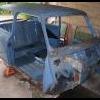
I spent Tuesday to Thursday finishing off some welding work on the boot.

Friday morning was spent making the special tool needed to keep the pins on the sub frame from spinning when trying to do up the nuts.

I then started to mount the frame. Got all of the bolts in for three of the mounts in no problem. The forth mount (rear O/s) wouldn't line up. I realised that I needed to tightne up the nut to compress the rubber mount (in my case poly) to move the mount over a little. Next thing SNAP! The stud I repaired sheared. Looks like I will have to re think how to fix that stud.

Worse still I had to borrow a trolley jack to get the sub frame in place. Looks like I will have to borrow it again to get the frame back out and then a third time to put the frame back in. Either that or try and fix mine.
I am either going to cut the stud out completely and weld in a new one or drill it out with a larger diameter drill and deeper and screw in a piece of threaded bar.
Spent yesterday trying to fit my rear sub frame. I got annoyed with trying to get my mini cv joints off the shafts so gave up and tuned my attention else where.
I spent Tuesday to Thursday finishing off some welding work on the boot.
Friday morning was spent making the special tool needed to keep the pins on the sub frame from spinning when trying to do up the nuts.
I then started to mount the frame. Got all of the bolts in for three of the mounts in no problem. The forth mount (rear O/s) wouldn't line up. I realised that I needed to tightne up the nut to compress the rubber mount (in my case poly) to move the mount over a little. Next thing SNAP! The stud I repaired sheared. Looks like I will have to re think how to fix that stud.
Worse still I had to borrow a trolley jack to get the sub frame in place. Looks like I will have to borrow it again to get the frame back out and then a third time to put the frame back in. Either that or try and fix mine.
I am either going to cut the stud out completely and weld in a new one or drill it out with a larger diameter drill and deeper and screw in a piece of threaded bar.


0 user(s) are reading this topic
0 members, 0 guests, 0 anonymous users


