Ok, lets get up to date - wish it was the finished item up and running on the road - but that will take a while yet - anything from here on in will be in real time so a bit slower coming.
Having got the subframe back in, I moved to the next most obvious part that needed attention - the sills. Actually the rear 2/3rds were not too bad, but you can't really replace just the front bit, can you? First of all replaced the front half of the inner sills both sides, the left one had been patched previously. Both outer sills had been patched at the front. I chopped them off and replaced them using the slightly wider than stock 4-1/2" sills. My welding seemed to be getting better and I was quite pleased with my efforts.
No pictures of the sills before removal, or during repair, but here's one side done:

And one of the inner sills:

While the left side was pretty good, the drivers side had some rot around the toe board area and the flitch to bulkhead area..
Toeboard:

And flitch:

I chopped out both areas back to good metal and first made up a little patch to do the complicated bit on the toeboard..

I was glad I did it in 2 pieces because I could get in with clamps and hold it in place for welding.
From the other side:

I welded it both sides to try and prevent moisture getting between the seams.
I then capped the other part from the outside - it's a sound repair but doesn't look great - I'm on a bit of a learning curve here - If I had to do it again I'd do both parts from the outside. Luckily the other side is ok though so once is enough.

I welded a little patch in the other hole too:

In the meantime I had been looking out for some tyres for the 10" steels. I didn't want to buy new ones because even though relatively cheap at £128 fitted for 4, I wasn't sure I'd be keeping the steels. I basically wanted something I could just put on that was legal and safe. Anyhoo I saw and ad on this forum for a set of minilights with tyres - at a bargain price (I thought) of £65 - and relatively local - so I bought 'em.
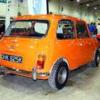
And had to trial fit to check the appearance:

I quite like the look - I didn't want to have to fit wider arches, and these fit inside the stock wheelwells. I have made a 5mm spacer for the rear, just stops the tyre rubbing the arm, but allows me to keep the stock studs.
That's the end of the historic stuff:
Here's todays:
Made the (probably disastrous) decision not to replace the front panels, but to locally repair the rust. I just couldn't see me getting as good alignment and fit with replacement panels.. so this will be an experiment.
I started today with the right hand headlamp area. I have bought new reinforcement rings so I removed the remnant of the old rings, leaving the outer skin.

I cut out the bad bits (sorry didn't have the camera in the garage while I was working) and made up a couple of patch pieces - one at the bottom and one in the sort of 9 oclock to 11 oclock position.
these were welded in, ground smooth and given a generous coat of finnegans no1.

I also welded up a little hole just above the sidelight housing.
My master plan is to leave the strengthening ring as a separate piece, allowing the inside of the wing and the ring top be heavily painted and protected with waxoyl and held to gether by the headlamp screws. I'm hoping this will be less rust prone than normal.
I ground the area around the aerial as it was surface rusted and gave it a good daub of paint - notb great pictures, but it shows progress.. and another little pinhole that needs welding..
Before:

After:

.
And other than writing up this post, that is it for today.
Things to look forward to:
The other headlamp - worse than the first - this will stretch my skills:

The wing to front panel on the right:

And the left.. again slightly worse than the left:

A little hole in the door step:

Not to mention these little bu99ers:

And I'm sure plenty more fun stuff.
Don't forget to tune in for the next thrilling installment of: Pokey's Progress!
Mart.
Edited by 82hle, 28 March 2010 - 12:46 AM.