Jump to content


Photo
- - - - -

Rear Radius Arm Shims / Bracket Hole Alignment

suspension

  • Please log in to reply
9 replies to this topic

#1 YankWithAMini

YankWithAMini

    Learner Driver

  • Noobies
  • PipPip
  • 20 posts
  • Location: Colorado
  • Local Club: Minis of the Rockies

Posted 08 May 2025 - 09:46 PM

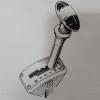
I recently got the car aligned, and the rear toe was very uneven. One side was at 1.8 mm (0.07 inches) toe in, the other was 5.8  mm (.22 inches) toe in. I thought I would fix it by ordering the adjustable toe/camber brackets from MS, but after fitting, the best I could get the toe settings to is 1 mm toe in and 5 mm toe in (I think the target value is around 1.5 mm on each side, toe in, correct?).


My next thought was to center the bracket adjustment and add shims, then use the brackets to fine tune. I started on the less-bad side and added a few shims, but the thickness of the shims caused the bracket holes to not align well. I ended up forcing it and stripping one of the captive nuts on the bottom of the subframe, so now have to fix that.


The advice I am looking for is: 1) do I continue on this path and file out the holes in the radius arm brackets to account for the shims? 2) Just slot the inner subframe? Given the number of shims I will probably need on the side that is >5mm toe in, it will probably require a decent amount of grinding on the bracket holes.


#2 68+86auto

68+86auto

    One Carb Or Two?

  • TMF+ Member
  • PipPipPipPipPipPipPip
  • 951 posts
  • Location: Brisbane, Australia
  • Local Club: Queensland Mini Car Club

Posted 09 May 2025 - 02:52 AM

If you need much (any) adjustment, something is bent/worn or installed incorrectly.

#3 DeadSquare

DeadSquare

    Up Into Fourth

  • Members
  • PipPipPipPipPipPipPipPipPip
  • 3,140 posts
  • Location: Herefordshire
  • Local Club: Unipower GT Owners Club

Posted 09 May 2025 - 07:21 AM

You are meant to have 1/8" toe in.


#4 Spider

Spider

    Moved Into The Garage

  • Admin
  • PipPipPipPipPipPipPipPipPipPipPip
  • 14,980 posts
  • Location: NSW
  • Local Club: South Australian Moke Club

Posted 09 May 2025 - 08:43 AM

Let me guess here - the kerb side arm was the worst one ?

The arms bend from being knocked and also just mileage over time on bumpy / rough roads. The Kerb side arm cops it worse for obvious reasons and also that just tends to be the rougher part of the road.

The arms are made from a particular grade of cast iron, it is amazing flexible and elastic. They most certainly can be bent back (off car !), with safety to their correct alignment fairly easily in a press, the only issue being here knowing how much to bend them. I have made a precision jig for doing them, however if you are patient enough, you can bend a little, loosely (within reason) refit it to the car just by the pin and bracket and literately look from above to get them close. When I do them, I actually over bend them, giving lots of toe IN (about 5 - 6 mm on each side) and then they can be shimmed back. As they were from the factory, they were 'correct' and adding in shims would make them toe OUT so effectively, you had no adjustment.

I'd suggest 3/32" to 3/16"  (2 - 4 mm) total Toe IN on the rear is fine for the street. Factory figure is 1/8" (3.2 mm) total.


#5 Cooperman

Cooperman

    Uncle Cooperman, Voted Mr TMF 2011

  • TMF+ Member
  • PipPipPipPipPipPipPipPipPipPipPip
  • 23,309 posts
  • Location: Cambs.
  • Local Club: MCR, HAMOC, Chelmsford M.C.

Posted 09 May 2025 - 09:25 AM

I am still 'old school'. I file the holes in the brackets forwards or backwards, (or up or down to get the camber to zero to 0.5 neg), then weld large washers on the brackets to maintain the settings. It always seems to work fine, is not expensive and relatively easy to measure when doing it.


#6 YankWithAMini

YankWithAMini

    Learner Driver

  • Noobies
  • PipPip
  • 20 posts
  • Location: Colorado
  • Local Club: Minis of the Rockies

Posted 09 May 2025 - 04:17 PM

Should have anticipated the bent arm suggestion and included the following: The radius arms were refurbished/checked maybe 200 miles ago by a shop specializing in Minis. It is the non-curb side that is way out ("proper" right hand drive car, but in the US). I suppose it is possible it got bent since refurb or wasn't correctly checked.


Looking back at my records, the alignment prior (which was after refurb) showed both sides were in the high 6 mm toe in. Since then, the car was trailered 1500 miles (tight straps could have bent the frame?) and I've had the radius arms off tracing something else down (possible assembly issue?).


I guess ya'll have confirmed what I probably knew and didn't want to face, which is I need to dig deeper into the car (check assembly, maybe send arm out to get checked again).


Thanks...


#7 Spider

Spider

    Moved Into The Garage

  • Admin
  • PipPipPipPipPipPipPipPipPipPipPip
  • 14,980 posts
  • Location: NSW
  • Local Club: South Australian Moke Club

Posted 09 May 2025 - 07:39 PM

Another cause of toe out I've found is if the Pins aren't done up tight, or they seize in the arm, the inboard end in particular (as this is the side of the arm that has the pressure from the rubber cone on it) will elongate the hole in the subframe on that side.


#8 YankWithAMini

YankWithAMini

    Learner Driver

  • Noobies
  • PipPip
  • 20 posts
  • Location: Colorado
  • Local Club: Minis of the Rockies

Posted 14 May 2025 - 11:11 PM

The inner holes for the pin both looked like a tight fit. I couldn't see any gaps, and pushing and pulling on the end of the arm didn't generate any movement of the pin in the hole. My thinking is that the pressure from the cone would cause any hole elongation to be towards the front, which would cause toe-out (as the inner pin can move forward). Correct me it that's wrong....


I found this, might just give it a try: https://www.7ent.com...iling-arms.html


If it isn't the holes, and the arm isn't bent, and all looks correctly assembled, that seems to leave a bent subframe as the most likely culprit? Worst case, if I can't find a definitive cause, is it crazy to just go ahead and shim it up?


Edited by YankWithAMini, 14 May 2025 - 11:14 PM.


#9 Spider

Spider

    Moved Into The Garage

  • Admin
  • PipPipPipPipPipPipPipPipPipPipPip
  • 14,980 posts
  • Location: NSW
  • Local Club: South Australian Moke Club

Posted 15 May 2025 - 07:21 PM

Your thinking here on the holes in the subframe 'slotting' is correct, that's why it comes about.

I express some caution with the suggested method of checking from Seven Mini. Ideally, to use that method, you want a long checking pin to be able to go end to end from one arm outer to the other arm outer. There is always clearance (and some acceptable wear) in the bushes and that will lead to some error there, certainly enough to think the arms are OK. Also the rear suspension angles (toe and camber) are machined in to the arms, so if you did do this check, then the stubs should not be perpendicular but 'lean in' toward each other where they meet. Certainly, this method will show an error between arms, so long as you are mindful and careful regarding clearance in the bush.

You can check the subframe quite easily, though to do it on-car, you may need to move the rear brake regulator valve out of the way. Get yourself a 5' length of 1/2" rod (I use 12 mm as it's close enough but slides easily) and be sure it's straight. Remove the arms from the car, bolt the outer brackets back on and slide the rod through all 4 holes, they should all be perfectly in line. If the subrame is bent, you'll get it through 2 or 3 of them. If you only get it through 2, that's the side that's bent, if you get it through 3, it's the other side that's bent, This is actually the same check that was done in the factory, though I don't know if it was done to every one of them.


#10 YankWithAMini

YankWithAMini

    Learner Driver

  • Noobies
  • PipPip
  • 20 posts
  • Location: Colorado
  • Local Club: Minis of the Rockies

Posted Yesterday, 10:48 PM

Finally got some time in the garage!


I tried the Seven Mini method to check the radius arms. As Spider said, there was some slight play in the bushes. I don't know enough to know if slight is still too much for this purpose. The arms were refurbished very recently, so maybe I have that going for me. Here is what I did and my theories: I ran one of the pins through both arms and then used a bubble level to compare the angles at the brake drum face. The first check was with the arms running horizontal, so that would maybe indicate a bend affecting camber. I then stood the arms up and used the level again, theory being this would indicate a bend affecting toe. In both cases the level seemed to indicate the angle was the same on both arms. I left the drum on rather than take the arms down to the stub axle; not sure if this makes a difference. In all the pictures, the pin is installed through both arms.


The 1/2 inch rod I bought proved to not be 1/2 inch, so once I get back to the store I will update on the subframe check.


Attached Files

  • Attached File  2.jpg   55.58K   0 downloads
  • Attached File  3.jpg   40.96K   0 downloads
  • Attached File  4.jpg   43.8K   0 downloads
  • Attached File  5.jpg   54.05K   0 downloads
  • Attached File  6.jpg   64.65K   0 downloads
  • Attached File  7.jpg   59.9K   0 downloads
  • Attached File  8.jpg   54.4K   0 downloads

Edited by YankWithAMini, Yesterday, 10:54 PM.


Also tagged with one or more of these keywords: suspension

2 user(s) are reading this topic

0 members, 2 guests, 0 anonymous users