Jump to content


Photo
- - - - -

1981 Mini Hl 998Cc Restoration


  • Please log in to reply
61 replies to this topic

#1 Marc_mcq

Marc_mcq

    Speeding Along Now

  • Members
  • PipPipPipPipPip
  • 353 posts

Posted 23 September 2011 - 10:11 PM

Hi Guys & Girls!

Well here it goes, my first Mini Restoration!

I recently bought a nice little 1981 Mini HL from my girlfriends cousin.

It seems really quite sound...

It has rust to the a-panel which will need cutting out and replacing with a new one, but apart from that its pretty sound. All of the usual problem areas seem pretty good like the subframes, boot floor, sills, inner wings, scuttle etc. It also seems mechanically sound as it drives OK although it does not have tax and MOT.

Some little toe-rags rolled it on its side causing damage to the drivers door and wing mirror but that should be easily sorted. He was caught and given community service so there was some justice!

My plans are quite simple really...

Exterior:
Replace O/S a-panel.
Replace/ repair drivers door.
Strip ghastly paint.
Re-spray.
10x6" wheels
Nice arches.

Interior:
Generally smarten it up basically.


So here it goes...

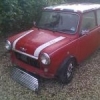
How it looked when I picked it up :

Posted Image

Posted Image

Posted Image

Then i spent a couple of weeks sorting my Nannas garage out which now looks like this:

Posted Image

And then the Mini in its new home:

Posted Image

Posted Image

Tonight I made the first move and took a wire wheel to the a panel to see how much of it would come off to see if I could see behind it. It seems that the panel behind the a-panel may need a very small repair where it meets the door.

I also had a little go at the scuttle panel as I saw a very small patch of surface rust forming and wanted to make sure that it wasn't held together with filler! I was relived to find that it was all sound metal with no bodge jobs to be seen!

Posted Image

Also here is a photo showing the damage to the door:

Posted Image

And another photo just for good measure:

Posted Image


Thanks for looking and i will try to keep this updated!

Regards, Marc.

Edited by Marc_mcq, 24 August 2012 - 07:48 AM.


#2 BusheyTrader

BusheyTrader

    Speeding Along Now

  • TMF+ Member
  • PipPipPipPipPip
  • 481 posts
  • Location: Bushey
  • Local Club: Nope

Posted 24 September 2011 - 07:26 AM

Hi,

Has your car had much work done on it in the past? I ask since mine looked rotten on the outside but that was nothing to the explosion of rust on the inside in places you can't see until you start taking it apart. Eg, underneath the scuttle panel, behind the windscreen seals, the inner flitch panels above the fresh air vents, inside the sills and the A posts. It is everywhere.

Replacing that A panel may be the top of a rusty iceberg. A pal of mine thought he bought a very tidy Mini a few years ago as a runaround. 18 months later rust was lifting underneath the paint almost everywhere. I hope yours is more solid than his.

£580 is a pretty good price these days. £1,000 is often the price for basket cases near me.

Sorry, don't mean to be scary but these cars are full of rot spots that you have to go looking for or they come back to bite you.

Good Luck....

#3 MaxAndPaddy

MaxAndPaddy

    Spamela Anderson

  • TMF+ Member
  • PipPipPipPipPipPipPipPipPip
  • 4,700 posts
  • Name: Elvis
  • Location: North Yorkshire
  • Local Club: TMF

Posted 24 September 2011 - 07:46 AM

Hi Marc, she looks very tidy, what colour will you be re-spraying her in?

#4 Marc_mcq

Marc_mcq

    Speeding Along Now

  • Members
  • PipPipPipPipPip
  • 353 posts

Posted 24 September 2011 - 08:25 AM

Thanks for the replies!

Im not sure if its been previously restored but i think it might have. i say this because of the condition and also the colour does not seem original. although where i have stripped the paint there is no sign of previous paint colours, just bare metal, primer and ghastly yellow.

I am hoping it doesnt turn out to be a rot box but we just never know!

I'm not planning on taking off panels that i dont need to so i will not be investigatin under the scuttle etc, but i removed the dash liner last night to see how the inner flitch panel (i think that is what it's called... behind the dash, where the air vents are mounted to... still getting to grips with the correct terminology!) and it all looked very solid.

And for the colour, I have been thinking either old english white, red or i have seen some very nice minis in a light/dark grey. I definately know that i want a black roof and black arches though.

#5 Zeemax Adventure

Zeemax Adventure

    Speeding Along Now

  • TMF+ Member
  • PipPipPipPipPip
  • 301 posts
  • Location: Llandudno

Posted 24 September 2011 - 09:09 AM

Bargain for what you paid. Looks like a solid car. If theres no filler in the scuttle chances are it is. I just had holes in my scuttle lol. Happy Mini'ing :)

#6 Marc_mcq

Marc_mcq

    Speeding Along Now

  • Members
  • PipPipPipPipPip
  • 353 posts

Posted 24 September 2011 - 09:37 AM

I thought it would be a pretty good indication too.

The only part of the project that is phasing me really is the removal of the engine. I know pretty much the very basics but I'm worried that I will make some dreadful mistake that will end up costing me a lot of money.

Have you guys got any advice on the removal of an engine? Also, once removed, I was wanting to paint the car so I would also need to remove all other components attatched to the engine bay. Any advice on this too?

Thanks, Marc.

#7 bcjames

bcjames

    Up Into Fourth

  • Members
  • PipPipPipPipPipPipPipPipPip
  • 2,728 posts
  • Location: Leicestershire

Posted 24 September 2011 - 09:51 AM

Hi Marc

Pulling the engine is really quite simple, once you've done it once you'll see how straight forward it was. Drain all your fluids first. The only awkward bits are likely to be knocking the pin out the selector and the driveshafts. If you select 4th or reverse the positions the selector rods at a good angle to knock out the one nearest the diff, stick a bit of wood behind it so your whacks actually do something and drift it out. For the driveshafts, its up to you if you want to leave the pot joints connected or not, these are the big black cylinders sticking out the diff. You can knock them off the diff, or you can leave them in place and remove the drive shaft from them. Then you can either split the top ball joint, or wiggle the engine as it comes out to free it. Aside that its just inlet/exhaust, cooling system, and the three engine mounts. Removing the alternator and starter can buy you a little more room if you need it. With no brake servo thats one less hassle involved! Once the engine is out you'll find there really isn't much left in the engine bay. It may be easier to mask and paint round the master cylinders if they are in good condition, or if they are old and you'd be doing a fluid renewal anyway taking them off isnt too had, and its a good time to replace the pedal clevis pins with R clips! The wiper assembly is straight forward to remove, and the fresh air duct pulls off. The only other thing then I think would be the loom, which is easy enough to bag up and work around if you don't want to remove it.

This looks a good project. It's nice to see some HL bits, bumper and grille, have survived on the car and not been replaced with chrome items :) I think the original paint code will be on the inner wing on an '81, could be wrong though!

#8 Marc_mcq

Marc_mcq

    Speeding Along Now

  • Members
  • PipPipPipPipPip
  • 353 posts

Posted 24 September 2011 - 10:00 AM

Thanks for the advice mate.

Without actually starting on it, its hard for me to fully understand what you are saying, but I'm sure that once I get going it will all fall into place.

I was unaware that these were HL bits, I thought they were just 'different' haha.

My plan was to go with the chrome bumper and grille but that was before I knew this! The plans may be revised to keep some original HL bits!

Thanks for that mate!

#9 bcjames

bcjames

    Up Into Fourth

  • Members
  • PipPipPipPipPipPipPipPipPip
  • 2,728 posts
  • Location: Leicestershire

Posted 24 September 2011 - 10:06 AM

Hey, no problem. Sorry, I've sort of written it straight from my head as if I was doing it myself, rather than someone new to it. Do you have a Haynes manual? They cover removing the engine in nice easy steps, and it would at least mean you wouldn't miss anything.

I really like standard HLs, the first Mini I looked at was a HL but the sale dropped through. I think yellow was a factory colour too. Shame it's missing the interior too, they had my favourite seat pattern!

#10 Marc_mcq

Marc_mcq

    Speeding Along Now

  • Members
  • PipPipPipPipPip
  • 353 posts

Posted 24 September 2011 - 10:11 AM

No bother mate. Yes, I have both the standard haynes manual and the haynes mini restoration manual.

So you suspect that the interior is not standard? Cream cloth seats and brown carpet?

Thanks again.

#11 bcjames

bcjames

    Up Into Fourth

  • Members
  • PipPipPipPipPipPipPipPipPip
  • 2,728 posts
  • Location: Leicestershire

Posted 24 September 2011 - 10:14 AM

I think the originals would have been low back seats, while yours look to have a slightly later headrest type. Have a look here

http://www.historics...ustin-mini.aspx

For a standard one.

Both those books should see you well through most jobs you'll encounter, coupled with TMF you'll be alright :thumbsup:

#12 Marc_mcq

Marc_mcq

    Speeding Along Now

  • Members
  • PipPipPipPipPip
  • 353 posts

Posted 24 September 2011 - 01:41 PM

Thanks for that link mate, its nice to see a standard one! I love those seats too! Might see if I can source some of them!

#13 Risky

Risky

    Mini Mad

  • Members
  • PipPipPipPip
  • 213 posts
  • Location: Zegge (The Netherlands)

Posted 24 September 2011 - 04:23 PM

Looks like a nice car you got there, I got a 1981 HL as well which has had a rebuild in '91-'92, looks nothing like the original anymore, but I quite like it!
The original Beige colour of my car can still be found in the engine bay and under the carpets :teehee:

#14 mini-luke

mini-luke

    Postman Pat

  • Traders
  • PipPipPipPipPipPipPipPipPip
  • 2,362 posts
  • Location: Hereford

Posted 24 September 2011 - 04:31 PM

Very tidy for the money :)

Have you had the carpets up? There's usually some rust to be found there.

#15 Marc_mcq

Marc_mcq

    Speeding Along Now

  • Members
  • PipPipPipPipPip
  • 353 posts

Posted 25 September 2011 - 03:58 PM

Risky: do you have Any photos of yours?

And yeah, I've had the carpets up and she looks solid xx


1 user(s) are reading this topic

0 members, 1 guests, 0 anonymous users