
loving the workmanship mate, you got some skill with that mig and some speed!.


Smurf Mayfair Resto
Started by
GlynC
, Oct 10 2011 04:06 PM
25 replies to this topic
#17

GlynC
-
- Noobies
-

- 99 posts
Stage One Kit Fitted
- Location: Ashby
Posted 20 June 2012 - 03:07 PM
Update on progress on our Smurf resto. It’s been a while and I have been lazy in uploading pictures. Also lots of time spent on the Mini has been fitted in between gardening decorating and generally keeping Swimbo happy!
Last time I had got as far as ripping off the valance and uncovering the holes in the wheel arches which had been filled by the bodgers! I have moved the project on a fair bit now and have the underside done finished in primer, but I’ll bring the thread up to date first.
So I bit the bullet and got to work with the spot weld drill followed by the air chisel and grinder ! Oh and got the credit card out for some new repair sections!
So I’ll start with a few shots of the bits of grot I found and where mr bodger had already had a play at some stage of the old girls life!
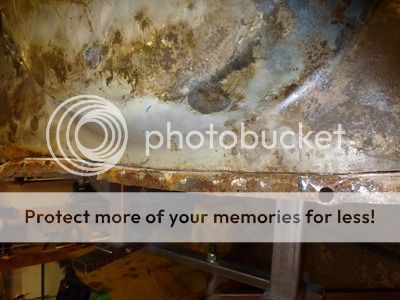
This is what the rear boot floor closing sections looked like!
Heel Board subframe mounting section o/s
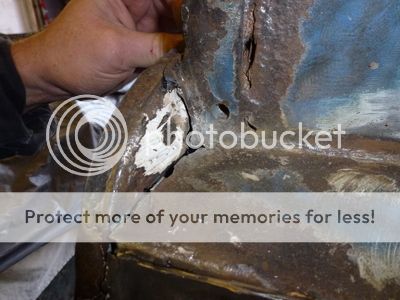
The bracket wasn’t too clever either and the tin worm had been munching
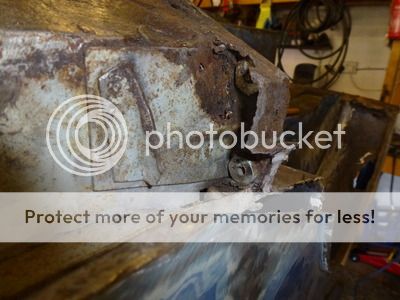
The rest of the heel board was A1 so the damaged localised.
The N/S heel board sub-frame mounting was in good condition and cleaned up well with no rust on the bracket. But the closing section and where it joins with the wheel/wing arch bottom was rust damaged. So I set about making a repair section as the rust damage didn’t warrant removal of the section I had also cut the section that overlaps the sill of as this was welded to bits by the bodgers, Ill make a section to repair that later.
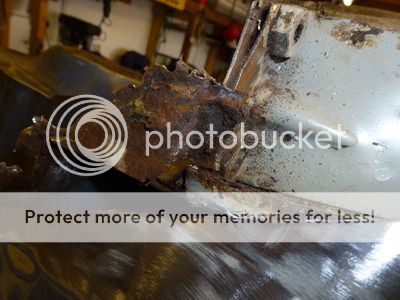
Bottoms of both rear wings /wheel arch were very similar mr Bodger had been out with a bit of steel and the filler! So I cut them off for good measure the rest of the wing was fine.
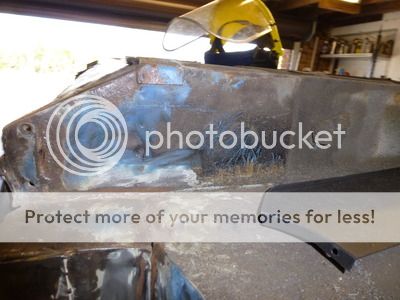
The main part of the boot floor was ok but I decided to have the very end section off and make sure the joint between the back panel and the floor is clean and good so I set about cutting this off very near to the joint with the back panel as this would allow me to construct an almost invisible repair once completed, but have new metal in the joint. Here’s what I started with anyway
Out came the wheel arch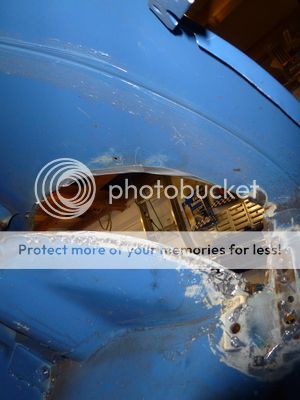
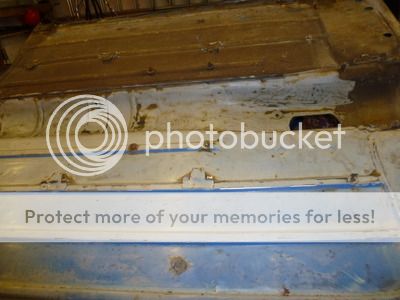
At least the floors are good though after cleaning one side off this is what it looked like!
I’ll add some more in a few minutes need a brew now, having a few days off with some lurgy my daughter gave me for fathers day!!.
Cheers Glyn
Last time I had got as far as ripping off the valance and uncovering the holes in the wheel arches which had been filled by the bodgers! I have moved the project on a fair bit now and have the underside done finished in primer, but I’ll bring the thread up to date first.
So I bit the bullet and got to work with the spot weld drill followed by the air chisel and grinder ! Oh and got the credit card out for some new repair sections!
So I’ll start with a few shots of the bits of grot I found and where mr bodger had already had a play at some stage of the old girls life!
This is what the rear boot floor closing sections looked like!
Heel Board subframe mounting section o/s
The bracket wasn’t too clever either and the tin worm had been munching
The rest of the heel board was A1 so the damaged localised.
The N/S heel board sub-frame mounting was in good condition and cleaned up well with no rust on the bracket. But the closing section and where it joins with the wheel/wing arch bottom was rust damaged. So I set about making a repair section as the rust damage didn’t warrant removal of the section I had also cut the section that overlaps the sill of as this was welded to bits by the bodgers, Ill make a section to repair that later.
Bottoms of both rear wings /wheel arch were very similar mr Bodger had been out with a bit of steel and the filler! So I cut them off for good measure the rest of the wing was fine.
The main part of the boot floor was ok but I decided to have the very end section off and make sure the joint between the back panel and the floor is clean and good so I set about cutting this off very near to the joint with the back panel as this would allow me to construct an almost invisible repair once completed, but have new metal in the joint. Here’s what I started with anyway
Out came the wheel arch
At least the floors are good though after cleaning one side off this is what it looked like!
I’ll add some more in a few minutes need a brew now, having a few days off with some lurgy my daughter gave me for fathers day!!.
Cheers Glyn
#18
GlynC
-
- Noobies
-
- 99 posts
Stage One Kit Fitted
- Location: Ashby
Posted 20 June 2012 - 03:17 PM
So to bring it up to around May. I will upload some more shots tonight so I can get it right up to date!
Right then apologies if I get the odd bit of this out of sequence but some of it was a few months back and I have been trying to get the pictures sorted to make some sense. I started by getting the near side heel board end and closing section sorted. This was in reasonable nick but the closing section which joins the lower wheel arch was beyond help. Now I did consider getting the heritage replacement section but decided to make my own. As it was only the section by the wing which was rotten the closing section was A1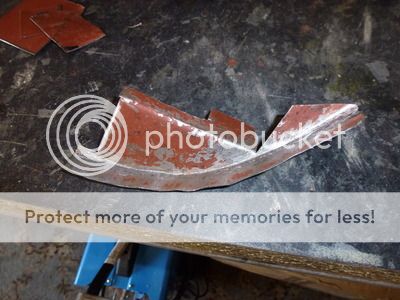
Here it is clamped in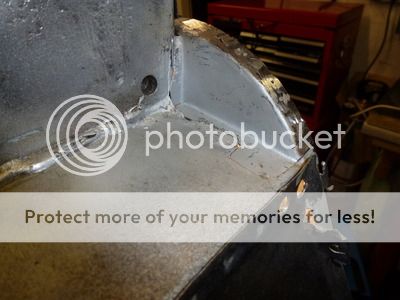
I then clamped in the lower section cut from a lower wing replacement section I had picked up for both sides.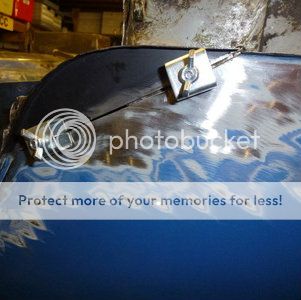
All welded in and just primed to keep the rust at bay for now pleased with the end result I need to finish off the top section of the heel board as I cut this away to check for rust and it was tatty from the bodgers attempts to weld the sill on
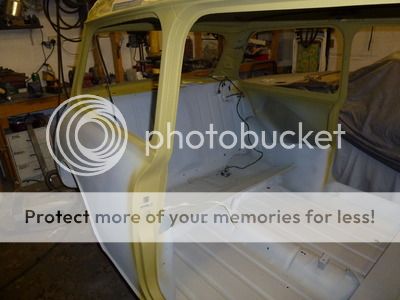
Then on to the other side which is in a bad way
So I cut the mess out as well as the wheel arch section.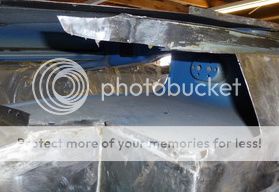
As the replacement heel board section I bought was a pattern part it didn’t come with the bracket which attaches to the inner sill, I bit another expensive bullet and ordered the half heel board heritage part.
So I set about making a repair section to the inner sill then cut down the heel board section as the rest of the mini’s heel board is A1.. Also repaired the sill strengthening section as this attaches to the back of the closing panel. Then I tacked things in place to make sure I had good all my measurements right I wacked on the subframe to be certain everything was straight and true and lining up!!!
With that lot sorted I welded in my repair section on the inner sill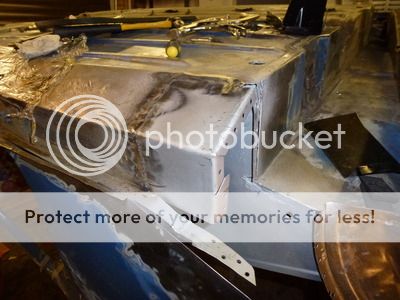
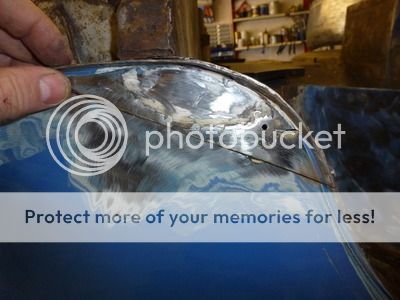
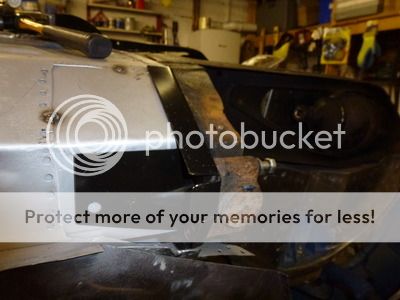
Then before getting stuck into the heel board and the closing panel I took the opportunity to repair the lower wing. The other side I had butt welded the new and old together but on this side I had decided to have a go at joggling the repair joint and “spot/plug welding” with the mig , I then tried everything up for size. Here’s a shot of this clamped in which shows the joint of the repair which I am pleased with and it came out well with a neat joint on the outside face too

Then I welded on the heel board end and again checked everything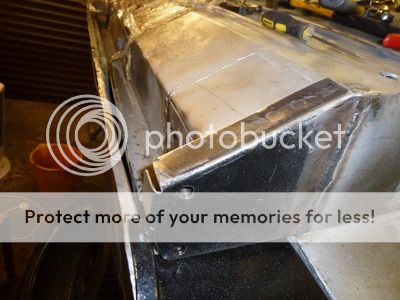
When I got to this stage I decided to fit the wheel arch now as I could still get the clamps in. So I left the closing panel till last This shot shows the wheel arch fitted and the closing panel prepared for fitting and welding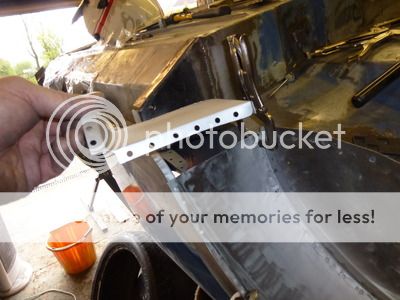
Here’s the wheel arch fitted in very pleased with the outcome as I had my doubts about this at times but bit by bit it came together.

So to bring things to a close (get it !!) the closing panel was welded in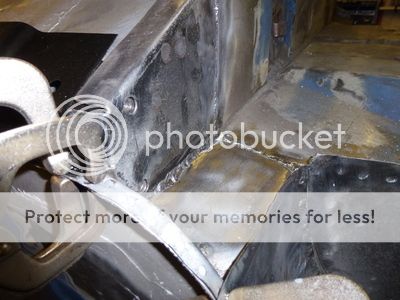
All done breathes a sigh of relief too as it was a fair amount of work to get this all to fit well and the pattern parts (wheel arch) took some fettling but I got there in the end.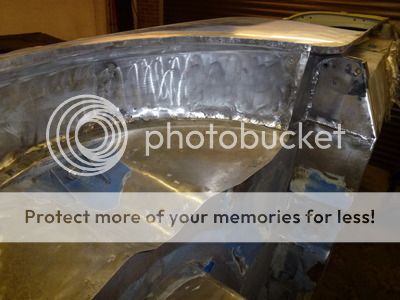
So on to the boot floor and the rear sections. I decided to repair each corner with new metal and cut the length of the floor along the rear panel joint and replace with new metal as the joint which goes behind the bumper looked rusty so off it all came and in went some new metal. Here’s the driver side
Then the near side again new metal.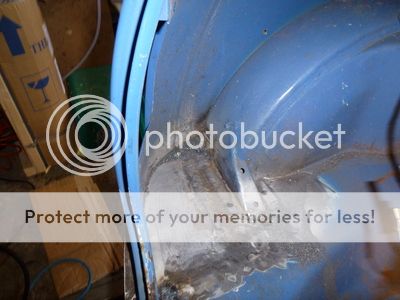 I have now done the whole rear section but haven’t uploaded any shots of that at the mo last job is to replace the valance again fun with pattern parts. I’ll also post up some shots of the sills which are now finished and the underside. I have replaced the joint on the floor to the rear section completely so feel a lot better about that now. I have re-fitted the strengthening bracket to the wheel arch within the boot. I managed to take this off without trashing it. Had to spend a bit of time getting the Stag back on the road for the “summer” had to change the alternator which is a pain in the backside as you need to remove the steering pumps to gain access but she is now back on the road running sweet with a new battery and alternator.
Couldn’t resist this though. I had a couple of old tyres from my Audi in the garage which I used to stand the shell on at one stage, but thought this looked funny a mini off roader. Hope BMW don’t get any ideas as they seem to have a mini everything else now !!
Any comments, questions always welcome
Cheers Glyn
Right then apologies if I get the odd bit of this out of sequence but some of it was a few months back and I have been trying to get the pictures sorted to make some sense. I started by getting the near side heel board end and closing section sorted. This was in reasonable nick but the closing section which joins the lower wheel arch was beyond help. Now I did consider getting the heritage replacement section but decided to make my own. As it was only the section by the wing which was rotten the closing section was A1
Here it is clamped in
I then clamped in the lower section cut from a lower wing replacement section I had picked up for both sides.
All welded in and just primed to keep the rust at bay for now pleased with the end result I need to finish off the top section of the heel board as I cut this away to check for rust and it was tatty from the bodgers attempts to weld the sill on
Then on to the other side which is in a bad way
So I cut the mess out as well as the wheel arch section.
As the replacement heel board section I bought was a pattern part it didn’t come with the bracket which attaches to the inner sill, I bit another expensive bullet and ordered the half heel board heritage part.
So I set about making a repair section to the inner sill then cut down the heel board section as the rest of the mini’s heel board is A1.. Also repaired the sill strengthening section as this attaches to the back of the closing panel. Then I tacked things in place to make sure I had good all my measurements right I wacked on the subframe to be certain everything was straight and true and lining up!!!
With that lot sorted I welded in my repair section on the inner sill
Then before getting stuck into the heel board and the closing panel I took the opportunity to repair the lower wing. The other side I had butt welded the new and old together but on this side I had decided to have a go at joggling the repair joint and “spot/plug welding” with the mig , I then tried everything up for size. Here’s a shot of this clamped in which shows the joint of the repair which I am pleased with and it came out well with a neat joint on the outside face too
Then I welded on the heel board end and again checked everything
When I got to this stage I decided to fit the wheel arch now as I could still get the clamps in. So I left the closing panel till last This shot shows the wheel arch fitted and the closing panel prepared for fitting and welding
Here’s the wheel arch fitted in very pleased with the outcome as I had my doubts about this at times but bit by bit it came together.
So to bring things to a close (get it !!) the closing panel was welded in
All done breathes a sigh of relief too as it was a fair amount of work to get this all to fit well and the pattern parts (wheel arch) took some fettling but I got there in the end.
So on to the boot floor and the rear sections. I decided to repair each corner with new metal and cut the length of the floor along the rear panel joint and replace with new metal as the joint which goes behind the bumper looked rusty so off it all came and in went some new metal. Here’s the driver side
Then the near side again new metal.
I have now done the whole rear section but haven’t uploaded any shots of that at the mo last job is to replace the valance again fun with pattern parts. I’ll also post up some shots of the sills which are now finished and the underside. I have replaced the joint on the floor to the rear section completely so feel a lot better about that now. I have re-fitted the strengthening bracket to the wheel arch within the boot. I managed to take this off without trashing it. Had to spend a bit of time getting the Stag back on the road for the “summer” had to change the alternator which is a pain in the backside as you need to remove the steering pumps to gain access but she is now back on the road running sweet with a new battery and alternator.Couldn’t resist this though. I had a couple of old tyres from my Audi in the garage which I used to stand the shell on at one stage, but thought this looked funny a mini off roader. Hope BMW don’t get any ideas as they seem to have a mini everything else now !!
Any comments, questions always welcome
Cheers Glyn
Edited by GlynC, 23 September 2012 - 09:28 AM.
#19
scotty_1987
-

- Members
-
- 874 posts
One Carb Or Two?
- Location: Dublin, Ireland
- Local Club: MiniBallers
Posted 20 June 2012 - 05:18 PM
Again awesome work gone into the mini...your son is very lucky to have a dad like you!!lol good work!!!lol
#20
GlynC
-
- Noobies
-
- 99 posts
Stage One Kit Fitted
- Location: Ashby
Posted 20 June 2012 - 11:35 PM
Thanks mate
We picked up a tidy little one lady owner corsa for him to learn in but he keeps hankering after the mini.
Think it may be a while till its finished though as I can only do stuff during the odd weekend now
Should be in paint for the end of the summer if all goes to plan
Cheers Glyn
We picked up a tidy little one lady owner corsa for him to learn in but he keeps hankering after the mini.
Think it may be a while till its finished though as I can only do stuff during the odd weekend now
Should be in paint for the end of the summer if all goes to plan
Cheers Glyn
#21
GlynC
-
- Noobies
-
- 99 posts
Stage One Kit Fitted
- Location: Ashby
Posted 22 June 2012 - 01:56 PM
So to bring things more up to date
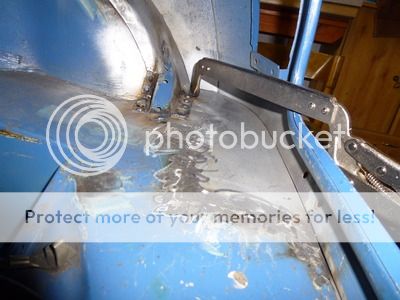
I have now welded on the sills, these were Heritage parts and went on well with a few adjustments I painted the inside of the inner sill and insode of the outside sill with a number of coats of paint to keep the worm at bay as much as possible.These will be filled with wax after paintings finished too!
I repaired the end of the heel board where it overlaps the sill. This had been mangled when they had fitted the over-sills so I cut it off cleaned it up and repaired it.
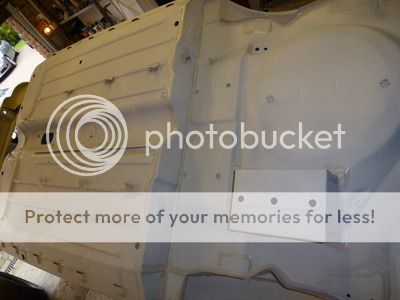
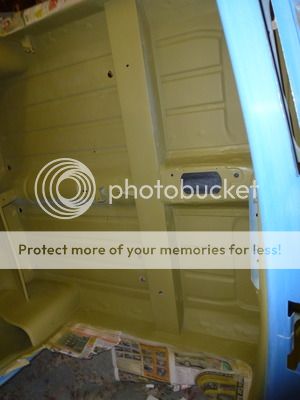
Once all this was done I cleaned up the remainder of the floor
I was really pleased as this had been protected with a wax layer which had saved it and I only had to deal with the odd patch of surface rust so a couple of sessions with the wire brush in the drill sorted it. I took care to shift every bit of rust especially around the pipe clips and cable routes although in fairness she was in good nick so I am confident once the primer stone chip and paint is on there the old girl will last well!

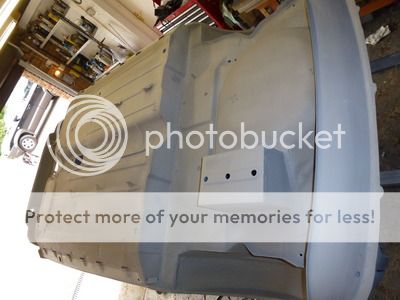
All of this was rubbed down to key in the primer , I treated all the bare metal with hydrate 80 then etch primed. Followed by a few more coats of upol filler primer. This will all be protected with stone chip followed by more primer then top coat to finish off.
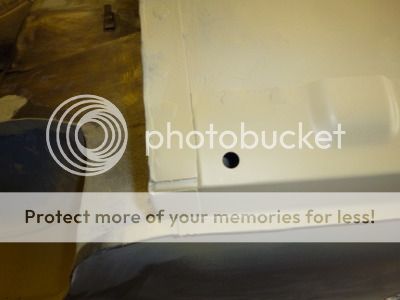
Here is my nice new seam sealed primered underside, its great when you can see it starting to come together after months of welding grinder and cursing!
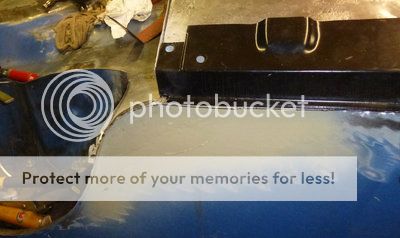
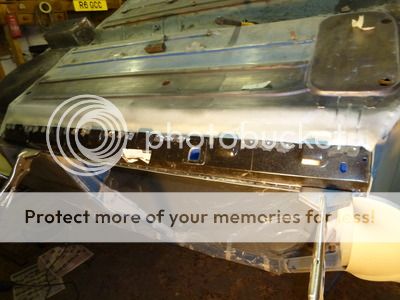
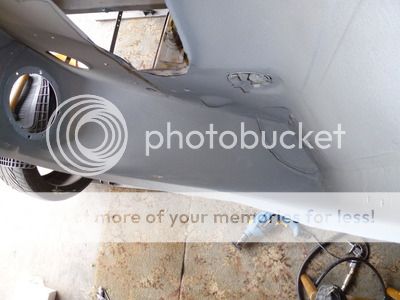
Next job is fitting the valance. I bought a pattern part which is taking a bit of fitting, I have welded up the spare holes and fittings I assume these are for left hand drive fog light fittings?
Here it is on a trial fit. That will be welded on this weekend and I am then close to finishing the underside which is a great step forward
Cheers Glyn
I have now welded on the sills, these were Heritage parts and went on well with a few adjustments I painted the inside of the inner sill and insode of the outside sill with a number of coats of paint to keep the worm at bay as much as possible.These will be filled with wax after paintings finished too!
I repaired the end of the heel board where it overlaps the sill. This had been mangled when they had fitted the over-sills so I cut it off cleaned it up and repaired it.
Once all this was done I cleaned up the remainder of the floor
I was really pleased as this had been protected with a wax layer which had saved it and I only had to deal with the odd patch of surface rust so a couple of sessions with the wire brush in the drill sorted it. I took care to shift every bit of rust especially around the pipe clips and cable routes although in fairness she was in good nick so I am confident once the primer stone chip and paint is on there the old girl will last well!
All of this was rubbed down to key in the primer , I treated all the bare metal with hydrate 80 then etch primed. Followed by a few more coats of upol filler primer. This will all be protected with stone chip followed by more primer then top coat to finish off.
Here is my nice new seam sealed primered underside, its great when you can see it starting to come together after months of welding grinder and cursing!
Next job is fitting the valance. I bought a pattern part which is taking a bit of fitting, I have welded up the spare holes and fittings I assume these are for left hand drive fog light fittings?
Here it is on a trial fit. That will be welded on this weekend and I am then close to finishing the underside which is a great step forward
Cheers Glyn
#22
scotty_1987
-
- Members
-
- 874 posts
One Carb Or Two?
- Location: Dublin, Ireland
- Local Club: MiniBallers
Posted 22 June 2012 - 08:23 PM
Good stuff man yeah I'm only 18 myself going to be driving this summer had been very busy with my final year of school but I'm finished for good now so I will be getting the mini on the road!!
#23
GlynC
-
- Noobies
-
- 99 posts
Stage One Kit Fitted
- Location: Ashby
Posted 23 June 2012 - 08:32 AM
Hi scotty
My lads 17 just finished his AS,s so he has the final year to come. His presence in the garage has become rare shall we say recently but he did operate the rust removal section for a while!
I will be glad to get the mini done as its taking up a lot of time and space as I have another car needs finishing. I have enjoyed doing it though and I know it's going to look good when we've finished.
Good luck with getting yours on the road mate
Cheers Glyn
#24
scotty_1987
-
- Members
-
- 874 posts
One Carb Or Two?
- Location: Dublin, Ireland
- Local Club: MiniBallers
Posted 23 June 2012 - 11:08 AM
Yeah well I'm sure it'll be real nice when it's done my man good luck with the rebuild dude!!
And cheers I need to do a fair bit of mechanical work not too much bodywork for once but!!lol
And cheers I need to do a fair bit of mechanical work not too much bodywork for once but!!lol
#25
GlynC
-
- Noobies
-
- 99 posts
Stage One Kit Fitted
- Location: Ashby
Posted 22 September 2012 - 08:48 PM
Blimey it’s been a few months since I updated the rebuild thread.
I was trying my hardest to get the Mini ready for paintwork for the summer but as we all know the summer was delayed then cancelled!!
I prefer to paint in the warm weather as heating the garage is virtually impossible and damned expensive. And working things around work and home life ain’t easy!
Anyway eventually I had done the welding and finished off the underside. This I then primed and seam sealed.
What is did discover was that the original paint reacts when painted over with anything. This didn’t seem to be a problem where it had been covered with lacquer on the body but on the underside it wasn’t and even a wipe with a rag soaked in thinners would bring this stuff off or leave a sticky mess which didn’t seem to want to dry.
So back to the drawing board and all of this was removed where possible. Now taking a car to bare metal a car by hand (i.e. not sand blasting or acid dipping) is a real pain on the Ar*se. Where there are creases in the metal or corners it’s almost impossible to remove properly. So I took the decision to use Barcoat where I couldn’t be sure of removing the original paint.
I did the whole of the interior floor with this for good measure then Upol Stone chip (gravelex) which can be sprayed on with a gravity gun and the finish is excellent. This went on both side of the floor wheel arches boot floor again inside and out, as well as the front and rear valances and sills etc. Really like this stuff if your stone chipping use this. I did experiment with another make but it went on very thick and messy and wasn’t the look and finish I wanted.

Again round the door frames where there are many areas where removing the original paint is difficult I used barcoat.
I spent weeks trying to get the body right for final painting. Dings in the sides which I hadn’t taken much notice of where a right pain. I found that the Upol P88 primer didn’t want to go on too thick and cracked. I took the new (second hand doors down too bare metal) I repaired the rivnuts for the mirrors has someone had drilled a couple out. I finished off using a guide coat to check for further imperfection and flatted and blocked the panels back. I think I now had more dust on the floor than primer on the car! To make matters worse we just didn’t have any nice dry warm weather which really helps when you’re doing this at home in the garage.
But I booked of some long weekends and early in Sept painting began!!
More to come need to upload more pictures!
Cheers
Glyn
I was trying my hardest to get the Mini ready for paintwork for the summer but as we all know the summer was delayed then cancelled!!
I prefer to paint in the warm weather as heating the garage is virtually impossible and damned expensive. And working things around work and home life ain’t easy!
Anyway eventually I had done the welding and finished off the underside. This I then primed and seam sealed.
What is did discover was that the original paint reacts when painted over with anything. This didn’t seem to be a problem where it had been covered with lacquer on the body but on the underside it wasn’t and even a wipe with a rag soaked in thinners would bring this stuff off or leave a sticky mess which didn’t seem to want to dry.
So back to the drawing board and all of this was removed where possible. Now taking a car to bare metal a car by hand (i.e. not sand blasting or acid dipping) is a real pain on the Ar*se. Where there are creases in the metal or corners it’s almost impossible to remove properly. So I took the decision to use Barcoat where I couldn’t be sure of removing the original paint.
I did the whole of the interior floor with this for good measure then Upol Stone chip (gravelex) which can be sprayed on with a gravity gun and the finish is excellent. This went on both side of the floor wheel arches boot floor again inside and out, as well as the front and rear valances and sills etc. Really like this stuff if your stone chipping use this. I did experiment with another make but it went on very thick and messy and wasn’t the look and finish I wanted.
Again round the door frames where there are many areas where removing the original paint is difficult I used barcoat.
I spent weeks trying to get the body right for final painting. Dings in the sides which I hadn’t taken much notice of where a right pain. I found that the Upol P88 primer didn’t want to go on too thick and cracked. I took the new (second hand doors down too bare metal) I repaired the rivnuts for the mirrors has someone had drilled a couple out. I finished off using a guide coat to check for further imperfection and flatted and blocked the panels back. I think I now had more dust on the floor than primer on the car! To make matters worse we just didn’t have any nice dry warm weather which really helps when you’re doing this at home in the garage.
But I booked of some long weekends and early in Sept painting began!!
More to come need to upload more pictures!
Cheers
Glyn
#26
GlynC
-
- Noobies
-
- 99 posts
Stage One Kit Fitted
- Location: Ashby
Posted 06 September 2014 - 04:21 PM
Afternoon all
I have been very lax and haven't really kept this thread up to date although I have thousands of pictures of every step and repair I made!
But after three years a lot of bruised knuckles money spent and cold nights weekends in the garage in between work family the garden and all the other stuff I have finished my mini adventure
Took for MOT Thursday and she flew through no issues! She is now on the road
Started off as a car for my son who hankered after one for ages but ended up as a full restoration!
She has done 47,000 miles from new with two elderly lady owners from new who were actually sister originally purchased from a dealer on the South Coast then spent the rest of her life with the first owners sister on the East coast.
I have every MOT and service record invoice etc for history so I felt the restoration worthwhile. We haven't modified her too much and she could easily be returned to standard. I have tried to improve on things like the seats and dash door cards, Hi Lows and many other bits and bobs etc.
The shell is now properly rust proofed and cavity waxed, I took her back to a bare shell, stuck her on a jig replaced all the front end, sills, boot floor, wheel arches, steps, and various other bit so the welder got well used +++
The colour is a "brighter" shade of Henley Blue which my paint supplier mixed, this was the original colour and the roof is Old English White. The body is now fully seam sealed stone chip protected underneath and fully cavity waxed, probably weighs a fair bit more than when it was new Engine is the 998 which I stripped and re-built in an attempt to eradicate the standard oil leaks time will tell if I have managed to achieve that I guess.
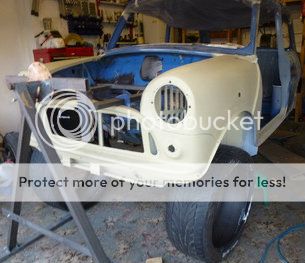
Anyway here was the scene a few years ago when I had refitted the front and stuck her on a jog to repair everything else
I will try and shorten the last three years down to five or six pictures
Engine done

The underside and subframe going in so much easier whilst it's upside down!
I even painted the majority of the shell whilst it was on the jig which was the best bit of kit I have ever bought, sold it for nearly what I paid for it too so great value!
Then I refitted the inside with custom made dash etc.
Then after months of the final build up we get to this week when she flew through her MOT first time so chuffed.

I hope you like it
Cheers Glyn


1 user(s) are reading this topic
0 members, 1 guests, 0 anonymous users


