Thanks guys.
So far, i havnt had much help at all, i use alot of stuff i have learnt from watching Dad in the garage and going to work. The only help i have had on this mini so far is driving it in the garage and lifting the engine out. But from this stage on, i will get stuck as i cannot weld and i am guessing the shell needs to be braced up when re doing the sills etc.
mike :)


14Yr Old 1989 Mini Flame Project
Started by
brum,brum,mike
, Nov 23 2011 11:57 AM
30 replies to this topic
#16

brum,brum,mike
-
- Just Joined
-

- 554 posts
Super Mini Mad
- Location: Gloucestershire
Posted 13 March 2012 - 09:01 PM
#17
grahama
-

- Members
-
- 2,442 posts
Up Into Fourth
- Location: Warrington
- Local Club: None in my area !!
Posted 13 March 2012 - 09:19 PM
Yea, brace the openings like this
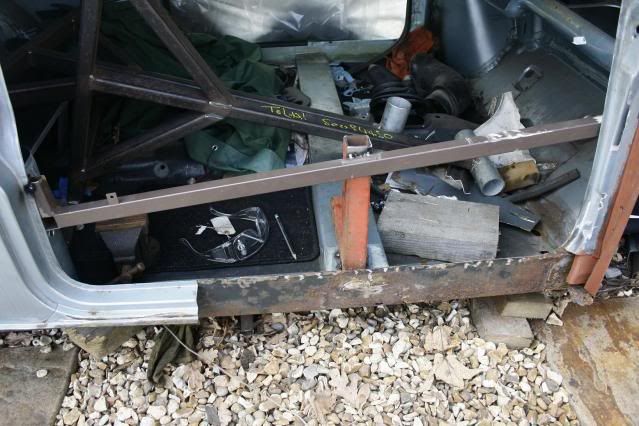
Just tack some scrap bar across the gap and tack it on.
Have you got a welder?? If yes then practice first, then practice some more before you go ruining some new panels. It is surprising how quickly you pick it up. Definately a skil worth learning !! I really hated it to begin with, splattering all over the place, blowing through, but you do get the hang of it and if you mess up there is always the mini builder's best tool, the grinder !!!
Also, if no to having a welder then get one from ebay, half the price and as long as you see it working then off you go !!
Graham
ps, what are the engine plans??
#18
brum,brum,mike
-
- Just Joined
-
- 554 posts
Super Mini Mad
- Location: Gloucestershire
Posted 14 March 2012 - 07:26 AM
Thanks for the picture, is there any chance of a couple more please? :)
We have got a mig welder, a fairly basic one but i have asked around work and have been told me it will be be fine for the job. I hopefully will be doing alot of practice, with scraps of metal before doing it on the car! Dad has also been questioning buying a spot welder, but i think it was project erm that said the spot welds weren't as good as plug welding.
Engine plans - i don't know. The metro engine it has at the moment, we havnt had any problems with, but i really dont know what the engine plans are. I might do a few simple mods before it goes back in. I have got my eye on one of my freinds parents have that needs a rebuild, as then i will also learn about how an enigne works and goes together in more detail. :)
#19
grahama
-
- Members
-
- 2,442 posts
Up Into Fourth
- Location: Warrington
- Local Club: None in my area !!
Posted 14 March 2012 - 07:46 AM
a couple more for you
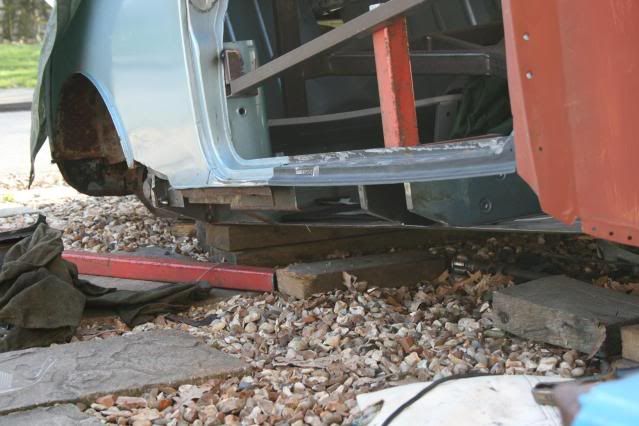
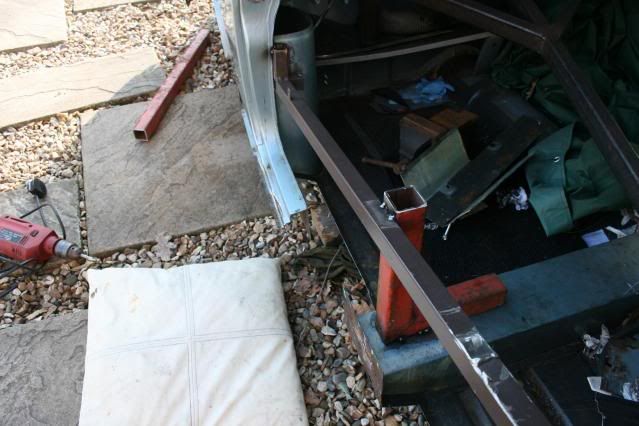
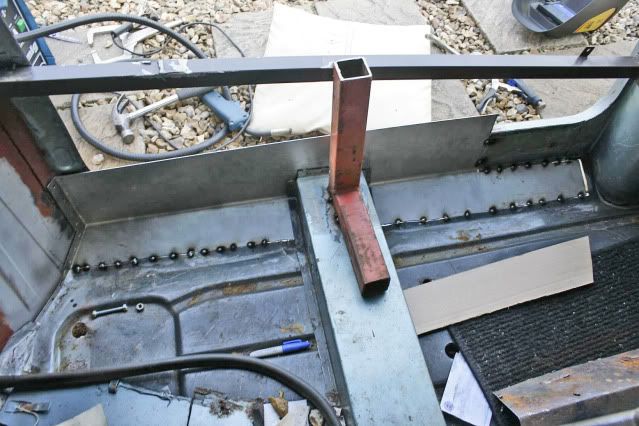
best I have I'm afraid, but they were braced using an old table led from an office desk and some thicker red bar I had, nothing fancy they just need to hold position.
Also on the plug welding front, yes very strong welds, 5mm hole and hold on till the weld pools in the middle then move out in a circle, you'll get it. Down side, they need grinding back !!
Graham
Edited by grahama, 14 March 2012 - 07:49 AM.
#20
brum,brum,mike
-
- Just Joined
-
- 554 posts
Super Mini Mad
- Location: Gloucestershire
Posted 14 March 2012 - 12:49 PM
Thanks for the pictures, they will be a huge help in the near future.
#21
Thorpsta
-

- Members
-
- 327 posts
Speeding Along Now
- Location: Wisbech
- Local Club: Kings Lynn Mini Owners Club
Posted 27 March 2012 - 03:39 PM
Casually replying to a thread that hasn't had a post for 13 days 
Good project so far, keep it up, I'm only 15 and restoring a mk1 for my first car.
Welding is easy, I practiced on scrap metals , placing them different distances away and welding the gaps and such, I managed to pick it within a few hours, it's still not great, and I dare touch a new panel but it's good enough
Grahama pretty much summed it up, hold it there till the weld piles on, then move in a circle - I prefer to move left and right just make sure you stop if it starts to distort
I braced my doors up with an old golf club cart that we had lying around
http://i612.photobuc.../thorpsta/2.jpg
Best of luck :)
Edited by Thorpsta, 27 March 2012 - 03:43 PM.
#22
brum,brum,mike
-
- Just Joined
-
- 554 posts
Super Mini Mad
- Location: Gloucestershire
Posted 29 March 2012 - 07:40 PM
Thanks Thorpsta, i havnt yet had chance to practice welding at all, beacuse i really am cluless on what to do! And to be honest, id rather wait for help than blow up the garage!
Heres a quick update -
This week after school, i cut out some old rust, and made replacment 'patches'. Quite pleased with them to be honest -


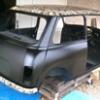
Then, i decided to cut to front end off, trying to do as little damage to the wings and a panels. Went quite well, i just had to cut the innder wing away were the front panel attaches as i couldnt get in there to grind the welds away -


Now with the front end off, you can faintly see where replacment panels have just been welded on top of the originals -


So tomorrow after school im going to tidy the garage, then the next big job is to remove these, then thats pretty much it. I cant to any more until i have some panels and someone to help me weld. And that won't happen until i get real.
Thanks for reading, Mike
Heres a quick update -
This week after school, i cut out some old rust, and made replacment 'patches'. Quite pleased with them to be honest -
Then, i decided to cut to front end off, trying to do as little damage to the wings and a panels. Went quite well, i just had to cut the innder wing away were the front panel attaches as i couldnt get in there to grind the welds away -
Now with the front end off, you can faintly see where replacment panels have just been welded on top of the originals -
So tomorrow after school im going to tidy the garage, then the next big job is to remove these, then thats pretty much it. I cant to any more until i have some panels and someone to help me weld. And that won't happen until i get real.
Thanks for reading, Mike
Edited by brum,brum,mike, 04 April 2012 - 12:50 PM.
#23
brum,brum,mike
-
- Just Joined
-
- 554 posts
Super Mini Mad
- Location: Gloucestershire
Posted 27 September 2012 - 09:30 PM
Time for a long overdue update!
To be honest, i havnt done much! But i have been through alot In may, i was working at a local garage and was stood out o the forecourt, for a reason that i cant particularly remember when an out of control car (very nice car, Corsa VXR. yellow with black wheels) lost control at hight speed smashed 4 petrol pumps, trapped my work collegue in her car, somewhere amoungst all of this i was collected along and dragged to the other end of the forecourt Unfortunatly, the woman was killed. So i hope this explains why not much has been done on my mini -
So, whilst staying at home bored ****less i managed to spend stupid amounts of money -
-
The patches i made in the last update are now redundant as i bought one of these

After a little advice from Sonikk4 we decided to fit the whole panel, instead of making a patch just for the boot floor
Majority cut out -

Complete floor/seat removed -

Had a little help from our new toy! a plasma cutter Dad also bought a new mig welder too, great peices of kit -

floor fitted, but only clamped in -


Fit is OK. Removed the panel this week, removed ecoat in relevant areas and sprayed with weld through primer. Then, we are going to fit the rear subframe once my trunnions are returned from DSN. We are going to use the subframe as a jig for the floor to make sure its in the correct place, then take out the inner arches and replace them using the boot floor as a jig, if that makes sense lol
Anyway, Told you it was only a small update.
I am currently restoring the front and rear subframes (inlcuing suspension arms, radius arms and rear brakes) so will update when they're finished.
Thanks alot for reading,
Mike
To be honest, i havnt done much! But i have been through alot
In may, i was working at a local garage and was stood out o the forecourt, for a reason that i cant particularly remember when an out of control car (very nice car, Corsa VXR. yellow with black wheels) lost control at hight speed smashed 4 petrol pumps, trapped my work collegue in her car, somewhere amoungst all of this i was collected along and dragged to the other end of the forecourt Unfortunatly, the woman was killed. So i hope this explains why not much has been done on my mini - So, whilst staying at home bored ****less i managed to spend stupid amounts of money
-The patches i made in the last update are now redundant as i bought one of these
After a little advice from Sonikk4 we decided to fit the whole panel, instead of making a patch just for the boot floor
Majority cut out -
Complete floor/seat removed -
Had a little help from our new toy! a plasma cutter
Dad also bought a new mig welder too, great peices of kit -floor fitted, but only clamped in -
Fit is OK. Removed the panel this week, removed ecoat in relevant areas and sprayed with weld through primer. Then, we are going to fit the rear subframe once my trunnions are returned from DSN. We are going to use the subframe as a jig for the floor to make sure its in the correct place, then take out the inner arches and replace them using the boot floor as a jig, if that makes sense lol
Anyway, Told you it was only a small update.
I am currently restoring the front and rear subframes (inlcuing suspension arms, radius arms and rear brakes) so will update when they're finished.
Thanks alot for reading,
Mike
#24
MINI WILL
-

- Members
-
- 559 posts
Super Mini Mad
- Location: .
- Local Club: Let Me Do My Thang
Posted 24 January 2013 - 07:54 PM
Looking good mate you finished it yet.
#25
brum,brum,mike
-
- Just Joined
-
- 554 posts
Super Mini Mad
- Location: Gloucestershire
Posted 24 January 2013 - 08:35 PM
ahahaha not yet, need to get on with it really, in my defence i have just done my GCSE exams i missed from the acciedent in may so lots of revising and hoping i get the grades i want!
Bought a couple of new panels for it the other week from adywilsonminiturbo - nice chap, worked out well in the end, emailed him first thing in the morning, was in the garage at 5... considering the distance between us and the fact my uncle was up that way, was very lucky!
Full floor (include's heel board, inner and outer sills, jacking points etc)

And also a toe board. He was very generous and even chucked in 3 extra small panels in for free! Thanks alot Ady.
So boot floors pretty much ready to be welded in, but need to decide wich route to take.
Route 1 - Leave rear quaters, door step's, inner wings and cut the floor out using them as a guide.
Or route 2 - Replace rear quaters, inner rear arches, door steps, inner wings then do the floor.
hmmmmmm... decisions. Opinions?
And MINI WILL - cannot believe your selling your mini. Easily my favourite mini on the forum! If i had the wonga i'd have it! WHY?!
Thanks alot,
Mike
Bought a couple of new panels for it the other week from adywilsonminiturbo - nice chap, worked out well in the end, emailed him first thing in the morning, was in the garage at 5... considering the distance between us and the fact my uncle was up that way, was very lucky!
Full floor (include's heel board, inner and outer sills, jacking points etc)
And also a toe board. He was very generous and even chucked in 3 extra small panels in for free! Thanks alot Ady.
So boot floors pretty much ready to be welded in, but need to decide wich route to take.
Route 1 - Leave rear quaters, door step's, inner wings and cut the floor out using them as a guide.
Or route 2 - Replace rear quaters, inner rear arches, door steps, inner wings then do the floor.
hmmmmmm... decisions. Opinions?
And MINI WILL - cannot believe your selling your mini. Easily my favourite mini on the forum! If i had the wonga i'd have it! WHY?!
Thanks alot,
Mike
#26
brum,brum,mike
-
- Just Joined
-
- 554 posts
Super Mini Mad
- Location: Gloucestershire
Posted 24 January 2013 - 08:43 PM
Also got a new toy from the Machine Mart VAT free day...

Sand blaster! Should be pretty fun
You can also just about see in the pic the rear valance and closing panels have been welded together, just need to sort out the hing panel. The other panel on the floor has also got to be incorporated into the hinge panel as it seems there was a acciedent in the minis history, full of filler!
Thanks again,
Mike
#27
MINI WILL
-
- Members
-
- 559 posts
Super Mini Mad
- Location: .
- Local Club: Let Me Do My Thang
Posted 25 January 2013 - 07:10 AM
Thats going to one nice mini when finished mate! Selling up to buy a swb transit connect van to modify going to miss the old mini it been lots of fun.

#28
Niko-mini1275
-
- Members
-
- 175 posts
Mini Mad
- Location: dubrovnik,croatia
Posted 25 January 2013 - 07:41 AM
nice project!
i admire your dedication to do something like this at your age!
keep it up!
i admire your dedication to do something like this at your age!
keep it up!
#29
ClubbyAsh
-
- Noobies
-
- 149 posts
Mini Mad
- Location: Lincolnshire
Posted 27 January 2013 - 10:46 AM
Great looking project lad hope you're keeping up the good work, can't wait to see it on the road when it's done, i'm not 17 until April and i suppose it won't be too long before you get on the road yourself (don't worry about the wait, had my mini a year and a half and it's only just starting to really bug me now i'm only 3 months away from driving!) 
#30
brum,brum,mike
-
- Just Joined
-
- 554 posts
Super Mini Mad
- Location: Gloucestershire
Posted 27 January 2013 - 07:19 PM
nice project!
i admire your dedication to do something like this at your age!
keep it up!
Thanks, i find tinkering in the garage better use of my time than sat playing computer games, even if it does cost me a fortune!
Great looking project lad hope you're keeping up the good work, can't wait to see it on the road when it's done, i'm not 17 until April and i suppose it won't be too long before you get on the road yourself (don't worry about the wait, had my mini a year and a half and it's only just starting to really bug me now i'm only 3 months away from driving!)
Im 16 in April, and considering its been in the garage just under two years, its scary how little it appears i have done
 . Hopefully one the new floor and toe board is fitted it should start coming together. I can already tell the last year until i will be able to drive will take ages I dont know wether i should get a cheap moped to get used to the roads befoee driving or just save the money for the mini
  .
.Good luck with your fast approaching lessons/test!


1 user(s) are reading this topic
0 members, 1 guests, 0 anonymous users


