Jump to content


Photo
- - - - -

Mini Turbo Project 1980


  • Please log in to reply
22 replies to this topic

#1 mossy2a

mossy2a

    Mini Mad

  • Members
  • PipPipPipPip
  • 182 posts
  • Location: Derbyshire

Posted 06 December 2011 - 10:06 AM

Hi,

Thought i would start this thread, hopefully to both give and receive some useful information during the build process.

I wish i would of started the thread earlier as i have doen alot of work now and am remebering all the completed tasks and pictures taken.

Background

I recently (April 2011) purchased a min project of a TMF member, under the title 'it only needs prepping and painting, it a mint shell etc etc' ... i think you can guess where this is going.

Anyway, 2 sills, 2 a panels, a rear valance, and a footwell later, the welding is eventually complete.

My intention is to build a quickish modified mini, with a bright in your face colour and hopefully some special bits attached.

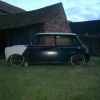
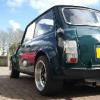
I have had lots of minis previous, all of which i ended up spending too much money on, I attach a picture of my last one (roughly 8 years ago i think)

I went for the zeemax bodykit, wide wheels, bucket seats, i think it was 1310 tuned engine, made around 85 bhp on the dyno i recall. lessons learned, dont fit a 286 cam for road use, it was rubbish in traffic but brilliant with the right foot planted.

This project is to be hopefully a more mature attempt . i stilll like the bodykit look with wide wheels but as i work for an engineering company now i have the ways and means to modify the engine components and a paint shop which i can use at my leisure. (don't tell the boss though).

The mini 850 originally came with 2 engines, a stock 1275 A+ and the metro turbo engine.
a full roll cage, set of 102" wellers and tyres and a set of 13" wellers and tyres.

I was also informed when buying that everything was there to simply rebuild after painting.

On getting the car back i soon realised this was not the case, but crack on i did.

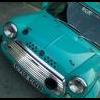
Some photos of when i first got it.

The project started with a good fettel. As you can see inn the photos, the guy who i bought it off had used a wire wheel or similar and taken all the known edges back to bare metal, this was good as it proved there was no rust, but on the downside there was now a ridge of 5 layers of paint all around the car which had to be rubbed down. I have no patience with time wasting so i though i would set to work on the underneath first and work upwards.

I broke out the grinder with wire wheel attachment and removed all the paint from underneath. OH dear... the sills looked like a holey patch work quilt and the heavy smell of filler was hanging in the air for some time. It was at this point a list began to form of tasks to be completed.

both sill and the drivers floor pan needed attention on the underside.

I also noticed the distinct bubbling of the A panels at the bottoms, they were also to be replaced.

The project Rolls on....

As it stands today (05/12/11)

The min is welded up, all sills, floors and a panels are welded on. lots and lots of rubbing down later. THE PAINT IS PURCHASED. Ive gone for Lamborghini Orange. see link for why i chose it. http://www.seriouswh...o-Orange-FA.htm


I have also purchased some orange flake to add some sparkle. Not sutre wether to use it or not. open to opinions.??

Some photos of current progress.

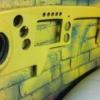
Also have purchased a dash from the tinternet. very nice, someone has spent too much time fibreglassing this, it came with 7" monitor built in and some nice 4" speakers moulded round. I have purchased lots of gauges and cut them out, also added some fancy light up rocker switch holes.

I have managed to find csome nice blue paint, hopefully to compliment the orange.

I will be using this as my second colour, so alot of engine bits, subframes etc will be painted using this. I have also managed to purchase some blue leather bucket seats which i must say look pretty good.Attached File  IMG_0220.JPG   1.17MB   2 downloads


I am really quite lucky that i work for an engineering company which onsite have a large blasting machine, a huge spray booth and facilites to machine and modify anything i can throw at them.

So all the subframes and suspension parts have been cleaned, shot blasted, primed and painted.

Anyway, to carry the story on.

I managed to find myself a fibreglass bodykit which i have probably spent more time on than the whole car so far with rubbing down, filling the little pin holes and priming. The wife was not impressed when she walked in the kitchen to find 2 bumbers, 4 arches and 2 sideskirts laying on the floor covered in dust. (it was raining outside and i'm tight for room in the garage)

The rest of the day was spent in silence... i had some making up to do.

The mini came with an arch angel fibrglass bonnet, this wasn't too much trouble, a bit of filling around the edges where there were holes in the gel coat. simples

The doors were a bit of a pain, they looked really good, until i started rubbing the bottom edges down it was full of seam sealant hiding a lots of holey metal. New door required.

My friend builds mini stock engines and has a huge supply of mini parts from doors to camshafts, which he has collected over the years, im not talking one or two items im talking a room about 10metres sqyare full of racking, full of bits. its an alladins cave of everything. Im sure you could probably build at least 3 maybe 4 complete minis with the bits hes got. So when i needed a door and bootlid, he's the man to visit. also has a rolling road which will come in handy when setting the turbo engine up.

Had to do some long days, my friend who is painting the car for me is going on holiday in the next couple of weeks so has said if i want it painting, then i need to get it to his unit for this saturday. BIG GULP so i will be spendin all day and night building and fitting the subframes to get it rolling.

During the bodywork which is being done at home i am trying to be as productive as possible and do things at work during luch time (honest) such as the metro turbo calipers. I have had new Stainlews steel pistons made up, blasted and painted the calipers and fitted all new nipples.

I have also had the flywheel lightened and intend to install oil crown cooling jets, so the block when fully stripped and chemical cleaned will be undergoing surgery. I have attached a photo of the carb assembly i have been working on, a total strip, de grease, polish and paint where necessary and reassemble with new gaskets and seals. Then into a box until required.Attached File  IMG_0725.JPG   1.64MB   21 downloads

Last week was spent in the garage, every night after work was spent rubbing down, priming or flatting. but the mini is getting there, the doors are fitted and lined up. The boot lid is also prepped and fitted.

Outstanding Items for painting.

Assemble subframes
Fit onto car
paint the thing.

I have missed lots of details out and with time i will add more photos when have uploaded them from my iphone.


To be continued...


Edited by mossy2a, 01 June 2013 - 08:53 PM.


#2 cityspeed

cityspeed

    Mini Mad

  • Noobies
  • PipPipPipPip
  • 193 posts
  • Location: Essex

Posted 06 December 2011 - 07:07 PM

Wow! Your flying along!
Your so lucky working in a place that can do all that!
look forward to seeing the photo's and keep up the good work!

#3 mossy2a

mossy2a

    Mini Mad

  • Members
  • PipPipPipPip
  • 182 posts
  • Location: Derbyshire

Posted 07 December 2011 - 11:32 AM

A few more photos. alot of my photos didnt seem to add from my initial post.


As i recieved the mini.
Attached File  2643724-1.jpg   50.84K   20 downloads
Attached File  DSC00619.jpg   163.19K   7 downloads

some rubbing down needed here!
Attached File  DSC00626.jpg   86.87K   4 downloads


here are a few more tasters. Please ignore the gaps in the bodykit, it wasnt dfully bolted up, just a quick check that nothings rubbing.Attached File  IMG_0736.JPG   899.88K   9 downloads

starting the rubbing down process.
Attached File  IMG_0166.JPG   1.76MB   5 downloads

After (Ignore the mess, needing a good tidy up)
Attached File  IMG_0223.JPG   1.63MB   6 downloads

Still to tidy up, but , turbo box DONE.
Attached File  IMG_0613.JPG   1.4MB   22 downloads


i seem o have used my file allocation. i will add more photos soon, hopefully with some paint on it.

to be continued...

#4 2-alex-2

2-alex-2

    Speeding Along Now

  • Members
  • PipPipPipPipPip
  • 480 posts
  • Location: wales
  • Local Club: SouthWalesMini club

Posted 07 December 2011 - 06:27 PM

wow looks realy nice hope you get it on the road soon. also try getting a photobucket account instead not account alocation lik there is on here :)

#5 mossy2a

mossy2a

    Mini Mad

  • Members
  • PipPipPipPip
  • 182 posts
  • Location: Derbyshire

Posted 03 January 2012 - 07:36 PM

Why im waiting for the painting to be done, thought id do some other sideline parts


picture of the dash before it was stripped.

oldminidash.jpg


photo of my new fibreglass one during mock assembly.
IMG_0393.jpg


The mk1 slat grill i have striped, cleaned, blasted and painted. (don't tell the wife, its on the kitchen worktop.
IMG_0334.jpg


Front subby installed, not the best of photos.
IMG_0809.jpg


rear subby assembly.
IMG_0823.jpg


Come on paint. hurry up.

Im hoping the lambpurghini orange and the blue will go together, i am also unsure of what op colout to paint the dash, keep it orange and blend in or go for the blue and stand out???


Edited by mossy2a, 30 June 2013 - 07:26 AM.


#6 mini_in_progress

mini_in_progress

    Super Mini Mad

  • Members
  • PipPipPipPipPipPip
  • 641 posts

Posted 03 January 2012 - 08:10 PM

looks good bud, you want to copy and paste the img file on photo bucket tho save clicking links lol :D :P

#7 mossy2a

mossy2a

    Mini Mad

  • Members
  • PipPipPipPip
  • 182 posts
  • Location: Derbyshire

Posted 31 May 2013 - 01:48 PM

Thread ressurection...


after may many months off from tinkering on the mini.  i thought id pop a few photos up of whats been occuring.


In no particular order.


Engine build - 1275, mint bores so gave them a hone.  Acid dipped the block, ew oil and water gallery plugs, 11 stud machined.

some nice new total seal piston rings for the metro turbo pistons, balanced crank and rods. Compression Ratio of 9:1 (i dont want to go mad)


Head - ported and chambered cylinder head, 35.7. inlets and sd 29mm exh. ew guides and unleaded seas, 11 stud drilled.

IMG_2597_zpsb2c35d3c.jpg


Gearbox - recoditiond 22g1040 gearset with 4 pi diff, centre oil pick up, all new bearings and seals. 

IMG_2026_zps8742aaa2.jpg

IMG_2024_zpsdd05d0b6.jpg


Clutch - RTS with ARP friction plate, lightened verto flyweel

IMG_2152_zpse6e91bfe.jpg


Turbo - Garret Gt17, modifiedactuator bracket, adaptor plate (may need trimming to fit egine bay) so i can install onto standard T3 maifold.


Got myself a megajolt V4 to use.  i plan to use the option switch to run two different boost levels, nothing dramatic, probably, std 4psi for everyday and then 8psi for we i feel like it. 


engine installed into body last weekend.

50b1ff96-5132-4f84-82b2-0cad71d060f5_zps


Im hoping from now on that the thing willl start to take shape pretty quick, ive got most of the parts so i need to persuade the wife to let me spend a bit more time to get it moving.


Edited by mossy2a, 05 August 2013 - 08:43 PM.


#8 Turbo Phil

Turbo Phil

    Up Into Fourth

  • TMF+ Member
  • PipPipPipPipPipPipPipPipPip
  • 2,426 posts
  • Location: Cumbria
  • Local Club: Cumbria Classic Mini Club

Posted 31 May 2013 - 04:13 PM

Good effort !


#9 mossy2a

mossy2a

    Mini Mad

  • Members
  • PipPipPipPip
  • 182 posts
  • Location: Derbyshire

Posted 28 June 2013 - 10:32 AM

Bee a busy bunny recetly.


Ive welded and re-tapped the Turbo maifold to siut te GT17, I have also made a new exhaust elbow to fit the standard downpipe.


Im not sure of te extra cooling yet, but going from my last my which was N/A not turbo, i always struggled with cooling, so i have managed to fit a small radiator which i plan to connect up to the turbo then back into the system. this will hopefully give me the extra cooling if required.


IMG_2817_zps0f64c0be.jpg


IMG_2816_zps22119ae1.jpg


A few more images of the turbo fitment, without the elbow ad downpipe inplace

IMG_2788_zps8635b1b1.jpg


Something else i had made at work.

IMG_2775_zps19976a5e.jpg


Next tasks to complete.


install turbo, carb and exhaust, then dash and hopefully start the beast up.  :-)


#10 mossy2a

mossy2a

    Mini Mad

  • Members
  • PipPipPipPip
  • 182 posts
  • Location: Derbyshire

Posted 29 July 2013 - 02:54 PM

Over the last few weeks i have been adding engine components and ironing out the little electrical gremlins i seem to have.


Firstly,  all engine components in and running.  did my first oil pressure check last week, 4 bar seems ok for just turning over.

IMG_2945_zps6e7a25e5.png


Next step was to put some of tescos finest momentum unleaded in and check for fuel leaks and pressure at the carb.

all was good and after setting the fuel pressure to 4 psi, i thought id check for a spark from the megajolt and NOOOOO.


no bloody spark., after checking all the wiring (again) i found it to be the crank trigger not sending a singal to the edis.  i removed the sensor and found it gave a voltage when swept over carbon steel so it must be the gap to the trigger wheel.


i had previously feeler gauged the gap at 0.5mm. which i thought would be ok, obviously not.  i filed down the spacer on my sensor and got the gap to ~0.25mm and this did the trick.

IMG_2961_zpsdda2718e.jpg

Then off i went for a test run...  after a bit of spluttering, she purred into life and ran on high idle while i checked the oil pressure, looked for leaks etc.


all was good,

heres my little setup for my turbo oil feed and external oil pressure sensor.

IMG_2906_zpsa2197583.jpg


little shot of the engine bay almost complete.

IMG_2978_zpsad2f8784.jpg


now that that was running and i was happyish i turned my attention to my wiring.


the brake lllights were on constantly, the headlights didnt work, the foglight switch didnt work and the fuel gauge didnt work.


i have fitted a new loom and replaced almost all connections on things like headlights and brake lights so was a bit miffed.


the majority of the issues turned out to be dodgy earths on the body, a few hours later and everything works as it should including my reverse camera and dvd player and screen.

IMG_2980_zpsdd1011af.jpg


so as it stands the engine runs :-)

the electrics appear to be working as they should.

the wife is getting annoyed though, all this mini stuff and not enough family stuff.


#11 mossy2a

mossy2a

    Mini Mad

  • Members
  • PipPipPipPip
  • 182 posts
  • Location: Derbyshire

Posted 03 August 2013 - 09:40 PM

update


02/08/13


all intercooler pipework is fitted, engine is running beautifully.

fitted a decent alarm with lots of sensors to try and keep thieving gits away.

air filter to turbo fitted. 


the only thing i can think for the engine bay to do is install the horn and grille.


next things to do


install reverse camera and dvd switch to my built in screen. 

install dash.

Install Rollcage

instal interior & seats

install windows

test drive & MOT


pictures to follow...


#12 mossy2a

mossy2a

    Mini Mad

  • Members
  • PipPipPipPip
  • 182 posts
  • Location: Derbyshire

Posted 05 August 2013 - 09:28 AM

Photos of current engine condition.


IMG_2987_zpsf2a845a5.jpg

IMG_2997_zpsec887879.jpg


#13 AndyFrenchMan

AndyFrenchMan

    On The Road

  • Noobies
  • PipPip
  • 39 posts
  • Location: Laon

Posted 05 August 2013 - 03:36 PM

I'm in love with this engine :wub: . I hope you'll post some video of this monster  :-)  !


Is it allowed to put a turbo into a Mini in the UK ?


Regards.


#14 mossy2a

mossy2a

    Mini Mad

  • Members
  • PipPipPipPip
  • 182 posts
  • Location: Derbyshire

Posted 05 August 2013 - 08:36 PM

I'm in love with this engine :wub: . I hope you'll post some video of this monster  :-)  !


Is it allowed to put a turbo into a Mini in the UK ?


Regards.

I hope so... :blink:   there are quite a few already complete so should be ok.   fingers crossed.


ive re-registered the vehicle with the turbo engine on the log book,  the only issue may eb the bulkhead modifications, but ive seem welded the box in.


i will try and upload a video soon...


Cheers


David


#15 domdee

domdee

    Formally known as dominicdee

  • Members
  • PipPipPipPipPipPipPip
  • 1,183 posts
  • Location: hull
  • Local Club: hull clubs on FB

Posted 08 August 2013 - 12:01 PM

nice build


1 user(s) are reading this topic

0 members, 1 guests, 0 anonymous users