Jump to content


Photo
- - - - -

Radius Arm Bracket Bolt Spinning


  • Please log in to reply
23 replies to this topic

#1 Notay

Notay

    Mini Mad

  • Members
  • PipPipPipPip
  • 153 posts

Posted 09 December 2011 - 11:36 AM

Hi - trying to remove my radius arm bracket so I can put a recon arm on.

I have removed three of the four bracket bolts and I have one left to remove but it keeps spinning and not turning out.

The bolt which is causing a problem is one of the two bolts you loosen from underneth the car. It is the one closest to the grease nipple of the radius arm. Is there any way of removing it?

I was hoping to just cut the head off and once the bracket is removed I should be able to see why the bolt was not coming out, since the bracket covers any access to the thread of the bolt - but wanted your expert opinions first. Thanks

#2 greensilver mini

greensilver mini

    Super Mini Mad

  • Members
  • PipPipPipPipPipPip
  • 585 posts
  • Location: Peterborough
  • Local Club: HAMOC

Posted 09 December 2011 - 11:45 AM

sounds like the nut which is welded onto the subframe has broke free so just spinning
also the side your saying is hidden in the subframe so someone else may tell you how to get over this.

Edited by greensilver mini, 09 December 2011 - 11:51 AM.


#3 Notay

Notay

    Mini Mad

  • Members
  • PipPipPipPip
  • 153 posts

Posted 09 December 2011 - 05:45 PM

hi - yea that sounds about right but cannot figure out exactly how to get to it. Just had a look. even if I cut off the head to remove the bracket I cannot get to the bolt since it is boxed in and the only open access to it is on the sill side. So effectively I would have to remove the subframe to get to the nut which has broken free. Don't really want to remove the frame. I am thinking of just putting it all back together and waiting till the summer when I restore it. The main reason for me to remove the arm in the first place was because of a bent radius arm - the bearings seem fine with no obvious play.

What do you think?

#4 Cooperman

Cooperman

    Uncle Cooperman, Voted Mr TMF 2011

  • TMF+ Member
  • PipPipPipPipPipPipPipPipPipPipPip
  • 23,294 posts
  • Location: Cambs.
  • Local Club: MCR, HAMOC, Chelmsford M.C.

Posted 09 December 2011 - 05:46 PM

Grind the head off of the bolt and remove the bracket. Then you punch the nut with the remains of the bolt inside the enclosed area. Cut a rectangulat hole and make up a nut plate with a welded-on 5/16" UNF nut. Then weld the plate in position so that the bracket will re-assemble properly.

#5 Notay

Notay

    Mini Mad

  • Members
  • PipPipPipPip
  • 153 posts

Posted 09 December 2011 - 05:51 PM

cooperman you are great. Good idea. Must admit I am a beginner in welding but if I cut the rectangle out could I just use the same plate and add a captive nut to that or would I need to replace the plate that I have cut out?

Also what would punching the nut do - and would i do this against the top of the frame?

#6 Cooperman

Cooperman

    Uncle Cooperman, Voted Mr TMF 2011

  • TMF+ Member
  • PipPipPipPipPipPipPipPipPipPipPip
  • 23,294 posts
  • Location: Cambs.
  • Local Club: MCR, HAMOC, Chelmsford M.C.

Posted 09 December 2011 - 06:21 PM

Well, if you cut a rectangle slightly larger than the size of the nut then the old nut will come out with the old piece of steel. I had to do this quite recently and I used a new piece of 16 SWG (approx 1.5 mm) steel sheet and a new 5/16" nut. If you make the new rectangular piece of steel slightly larger all round than the hole you have cut, then wriggle it into place through the hole and weld all round, grind the weld back flush and paint it then it will be fine.

#7 Notay

Notay

    Mini Mad

  • Members
  • PipPipPipPip
  • 153 posts

Posted 09 December 2011 - 06:25 PM

cheers - one more thing - I have been told welding upside down can be tricky with mig correct? I think this is where I am going to struggle.

#8 Tamworthbay

Tamworthbay

    Crazy About Mini's

  • Members
  • PipPipPipPipPipPipPipPipPipPip
  • 7,025 posts
  • Name: Clive
  • Location: Tamworth
  • Local Club: A5 minis

Posted 09 December 2011 - 07:37 PM

cheers - one more thing - I have been told welding upside down can be tricky with mig correct? I think this is where I am going to struggle.


Just put a couple of quick tacks to hold it then seam weld around and you will be fine. MIG welding upside down is not a problem, but sorting helmet clamps etc etc can be! Obviously if you are directly under it there is more of a risk of getting covered in spatter so be careful, but I would think this would be more of a side on-uphill job than one where you would lie on your back if that makes sense.

If you haven't got one already then an auto darkening helmet will be the best money you've spent in a long while.

#9 bmcecosse

bmcecosse

    Crazy About Mini's

  • Members
  • PipPipPipPipPipPipPipPipPipPip
  • 9,699 posts
  • Local Club: http://www.srps.org.uk/

Posted 09 December 2011 - 08:17 PM

+ 1 for the auto helmet

#10 Cooperman

Cooperman

    Uncle Cooperman, Voted Mr TMF 2011

  • TMF+ Member
  • PipPipPipPipPipPipPipPipPipPipPip
  • 23,294 posts
  • Location: Cambs.
  • Local Club: MCR, HAMOC, Chelmsford M.C.

Posted 09 December 2011 - 08:40 PM

I once changed a radius arm just before a rally and the trapped nut came adrift. So, being short of time I just tack welded the bracket to the sub-frame then, after the event, I ground the weld off and did the repair. It was fine!

#11 sonikk4

sonikk4

    Twisted Paint Polisher!!!

  • Admin
  • PipPipPipPipPipPipPipPipPipPipPip
  • 16,040 posts
  • Name: Neil
  • Location: Oxfordshire

Posted 09 December 2011 - 08:45 PM

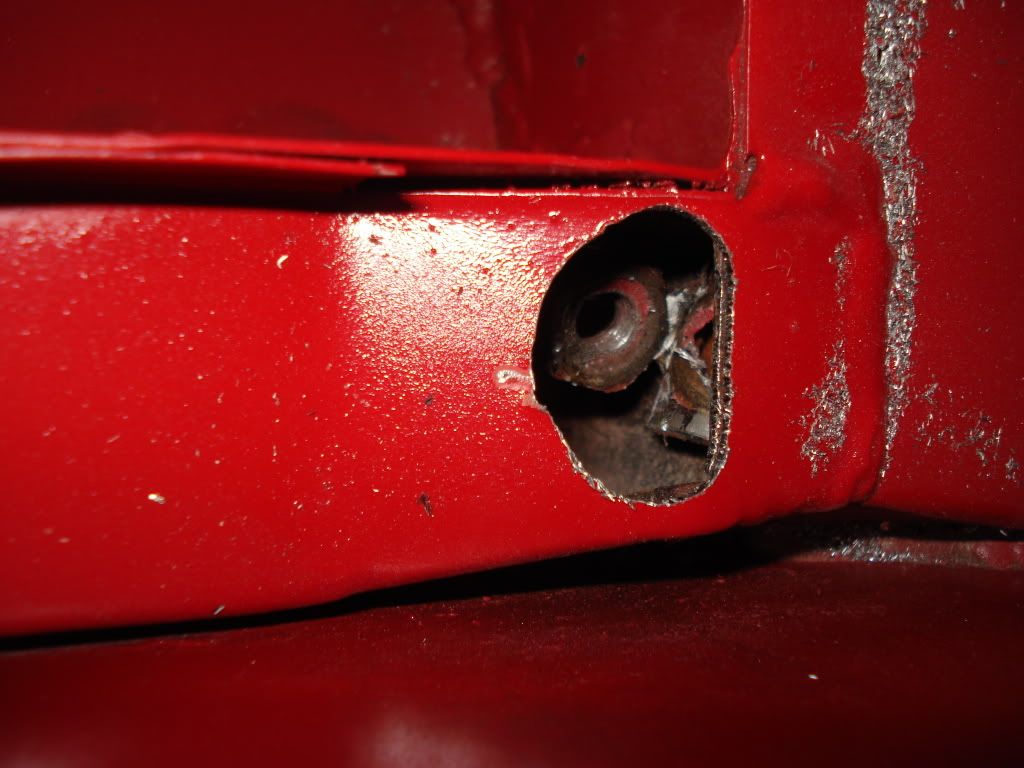
Before you cut into the sill have a look in the companion bin. You will see the inner sill stiffener. Cut a hole in this large enough to get your spanner in there and then fit the nut a bit like this.
Posted Image

I will be fitting a blanking plate using an anchor nut to secure it.

#12 Cooperman

Cooperman

    Uncle Cooperman, Voted Mr TMF 2011

  • TMF+ Member
  • PipPipPipPipPipPipPipPipPipPipPip
  • 23,294 posts
  • Location: Cambs.
  • Local Club: MCR, HAMOC, Chelmsford M.C.

Posted 09 December 2011 - 08:47 PM

I think the OP means the radius arm mounting bracket, not the rear sub-frame trunnion bolts/trapped nuts. But you are right, although I normally cut a rectangle about 3" x 2" at the end of the sillto gain access. It's easier to weld up afterwards in my opinion.

#13 sonikk4

sonikk4

    Twisted Paint Polisher!!!

  • Admin
  • PipPipPipPipPipPipPipPipPipPipPip
  • 16,040 posts
  • Name: Neil
  • Location: Oxfordshire

Posted 09 December 2011 - 08:51 PM

Unfortunately for us after spending a lot of time paint and stone chip i really did not want to cut into a brand new sill. Other wise i would agree with doing it your way Cooperman and i see what you mean about the mounting bracket.

The annoying bit for me was it was a Heritage heelboard as well which was a bit of a shock. Such is life.

#14 Cooperman

Cooperman

    Uncle Cooperman, Voted Mr TMF 2011

  • TMF+ Member
  • PipPipPipPipPipPipPipPipPipPipPip
  • 23,294 posts
  • Location: Cambs.
  • Local Club: MCR, HAMOC, Chelmsford M.C.

Posted 09 December 2011 - 08:57 PM

Unfortunately for us after spending a lot of time paint and stone chip i really did not want to cut into a brand new sill. Other wise i would agree with doing it your way Cooperman and i see what you mean about the mounting bracket.

The annoying bit for me was it was a Heritage heelboard as well which was a bit of a shock. Such is life.


It pees you off when it happens on an old and slightly corroded heelboard, but on a new one it's just poor quality.

#15 Ethel

Ethel

    ..is NOT a girl!

  • TMF Team
  • PipPipPipPipPipPipPipPipPipPipPip
  • 25,953 posts
  • Local Club: none

Posted 09 December 2011 - 09:03 PM

Drill the hole first, you might manage to hold the captive nut by wedging in a large screw driver or chisel. If we're talking about the same captive nut (the one's pointing towards the front of the car), the two that bolt upwards are accessible from the outside - they're square so you might hold it with an open ended spanner.


1 user(s) are reading this topic

0 members, 1 guests, 0 anonymous users