Right,
I've got a rear wheel that's well +ve camber. We have changed the radius arm and it's still drunk, so I'm going to fettle the bracket. There are lots of posts on the forum that this is the best solution for a daily drive, but none spell out exactly what to do. I presume I'm filing the single large hole in the bracket. The one through which the trailing arm fits, the bracket seems to be strengthened here. I intend to file this so I can lift the end of the training arm.
I know it will be a process of trial and error, but does anyone have some idea of a starting point. I read in one post that someone increased the hole by half an inch to get a 0.5 degree improvement. (I hope he's wrong because I may need to go all the way through the bracket before I get my wheel straight).
Once set I'll tack weld a large washer onto the bracket to keep the thing fixed


Rear Camber Adjustment:- Standard Outer Radius Arm Bracket
Started by
Nu2mini
, Apr 25 2012 08:56 AM
28 replies to this topic
#2

racingbob
-

- Members
-

- 3,061 posts
Up Into Fourth
- Location: Hampshire
Posted 25 April 2012 - 09:08 AM
i filed out mine and must have been 1/2 "
then lifted the wheel up as hard as i could
so shaft hitting where i filed to
and tightened the nut to about 70lbs
its given me about 1/4 deg camber
ive used soome of those bought ones and they broke
mind you my wheels had a lot of pos camber to start with
then lifted the wheel up as hard as i could
so shaft hitting where i filed to
and tightened the nut to about 70lbs
its given me about 1/4 deg camber
ive used soome of those bought ones and they broke
mind you my wheels had a lot of pos camber to start with
#3
Nu2mini
-
- Members
-
- 442 posts
Speeding Along Now
- Location: Lancaster
Posted 25 April 2012 - 09:26 AM
OK thanks. I'll check later today, but I would have thought if you file 1/2" up you'd be beyond the strengthening on the bracket.
#4
racingbob
-
- Members
-
- 3,061 posts
Up Into Fourth
- Location: Hampshire
Posted 25 April 2012 - 09:59 AM
no it didnt have a look it was at least 3/8 i filed
#5
Nu2mini
-
- Members
-
- 442 posts
Speeding Along Now
- Location: Lancaster
Posted 27 April 2012 - 09:08 AM
OK,
Got all setup to do the job over the weekend. Car currently an axle stands whilst I let the penetrating oil do its stuff on all the bracket bolts. Just thinking the next step through. Do I have to loosen the inner end of the trailing arm before repositioning the outer end in the modified bracket or will it be OK to refit the outer bracket without touching the inner end of the trailing arm.
Also, should I take the shock offf the trailing arm before removing the bracket or can I leave it on
As I said in original post lots of advice that modifying the bracket was the thing to do, just never found a post which spelt out the process.
#6
Cooperman
-

- TMF+ Member
-
- 23,326 posts
Uncle Cooperman, Voted Mr TMF 2011
- Location: Cambs.
- Local Club: MCR, HAMOC, Chelmsford M.C.
Posted 27 April 2012 - 10:25 AM
You shouldn't need to file it very much at all. It's trial and error. File it a measured amount, re-fit and measure the revised camber, then you'll know how far you need to go.
After filing to the right amount it is best to MIG-weld a large washer to the bracket to strengthen the bracket and hold the dimension correct.
After filing to the right amount it is best to MIG-weld a large washer to the bracket to strengthen the bracket and hold the dimension correct.
#7
Nu2mini
-
- Members
-
- 442 posts
Speeding Along Now
- Location: Lancaster
Posted 27 April 2012 - 10:40 AM
Thanks Cooperman, though like racingbob I think I might need more than most as it's way out at the moment. I'll get some actual readings once I know the bracket bolts will all move
Is it OK to remove the bracket without first removing the rear shock ?
Is it OK to remove the bracket without first removing the rear shock ?
#8
Cooperman
-
- TMF+ Member
-
- 23,326 posts
Uncle Cooperman, Voted Mr TMF 2011
- Location: Cambs.
- Local Club: MCR, HAMOC, Chelmsford M.C.
Posted 27 April 2012 - 10:47 AM
Yes, first of all measure the camber. Then just undo the big nut on the end of the rad arm, then undo the 4 5/16" UNF bolts holding the bracket to the sub frame and prize the bracket out with a big screwdriver. File it, say, 1/8" upwards, re-fit, lower the car and measure the camber again. That will show you how much difference 1/8" has made.
#9
Nu2mini
-
- Members
-
- 442 posts
Speeding Along Now
- Location: Lancaster
Posted 27 April 2012 - 11:03 AM
Thanks Cooperman, That's the level of detail I need 
#10
racingbob
-
- Members
-
- 3,061 posts
Up Into Fourth
- Location: Hampshire
Posted 27 April 2012 - 11:07 AM
i had to drop shocky and i had to slacken rear nut on radius arm
had a hell of a job gettting mine back on and lining up holes
that mount thing for subframe was in the way
getting the bracket off. as i say mine was showing pos camber at least 1 deg pos
on the rear. in my opinion 1/8" will prob not be enough
see if i can get a photo
had a hell of a job gettting mine back on and lining up holes
that mount thing for subframe was in the way
getting the bracket off. as i say mine was showing pos camber at least 1 deg pos
on the rear. in my opinion 1/8" will prob not be enough
see if i can get a photo
#11
racingbob
-
- Members
-
- 3,061 posts
Up Into Fourth
- Location: Hampshire
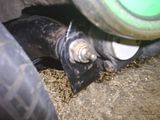
Posted 27 April 2012 - 11:24 AM
here you go a photo of mine

#12
Cooperman
-
- TMF+ Member
-
- 23,326 posts
Uncle Cooperman, Voted Mr TMF 2011
- Location: Cambs.
- Local Club: MCR, HAMOC, Chelmsford M.C.
Posted 27 April 2012 - 02:57 PM
The brackets will come off with the damper still attached and I always do it this way.
You file exactly 1/8" first of all in order to give you a 'calibration' figure. Then re-fit the bracket and 'nip up' the 4 off bolts, lower the car and re-measure.
If you can lift both sides of the car equally at the same time and lower it equally the camber will be as it will be on the road. If not, you need to drive the car backwards & forwards a bit to settle the suspension. The final height of the car relative to the wheels doesn't matter as the rad arms are true training arms and the camber does not change as the car is raised/lowered.
It's a nice little job to do - easy and satisfying when done correctly.
#13
Nu2mini
-
- Members
-
- 442 posts
Speeding Along Now
- Location: Lancaster
Posted 27 April 2012 - 03:34 PM
No problem lifting equally as I'm fortunate to have the mother of all ramps, which are adjustable (You know the C J Autos ones). So all I do is lift the rear end using both ramps. Fix axle stand under side to be worked on remove wheel from one side modify bracket. re-fit wheel and bring ramp back up to take the weight back off the axle stand. Re-Check camber and repeat as necessary. Does this seem to make sense. I'm assuming the fact that the front end point down at 45 degrees (slight exageration maybe, but not far off) has no effect on any rear camber reading I take.
#14
Ethel
-

- TMF Team
-
- 26,074 posts
..is NOT a girl!
- Local Club: none
Posted 27 April 2012 - 04:14 PM
No, as Cooperman says, the arms only move in the vertical plane. You will want to measure the camber with the car sat at the usual attitude though.
You could draw a full scale (or bigger) plan: an arc the length of the arm's swivel pin. Draw a couple of radii separated by the desired change in camber angle and measure how far apart they are along the arc to see how much filing is likely.
You could draw a full scale (or bigger) plan: an arc the length of the arm's swivel pin. Draw a couple of radii separated by the desired change in camber angle and measure how far apart they are along the arc to see how much filing is likely.
#15
racingbob
-
- Members
-
- 3,061 posts
Up Into Fourth
- Location: Hampshire
Posted 27 April 2012 - 06:01 PM
the back you can get a very good idea of camber
just by looking from the back and bending down
just slightly leaning in at the top is good
well i can tell - maybe its from my racing days
as cooperman says should come off easy did off my race cars
but this road car i have now had to drop shocky and
loosen rear nut on arm and then lever radius arm out
to pull off


1 user(s) are reading this topic
0 members, 1 guests, 0 anonymous users


