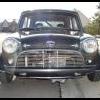
Jump to content


Photo

Mk1 Earth Scorcher


  • Please log in to reply
296 replies to this topic

#46 mike.

mike.

    Crazy About Mini's

  • Members
  • PipPipPipPipPipPipPipPipPipPip
  • 6,176 posts

Posted 12 December 2007 - 11:42 PM

Forgive my idiotness....but what is it? :shifty: gearbox perhaps?

Could it be reverse?

Alan...


Thats what i thought...

#47 Monte Busa

Monte Busa

    Super Mini Mad

  • Noobies
  • PipPipPipPipPipPip
  • 681 posts
  • Location: Michigan, USA

Posted 13 December 2007 - 04:15 AM

It's my new Promotive R1 kit, safely in a box ready to be dispatched across the pond. What you are looking at is a mk1 subframe, as viewed from the bottom, bespoke modified by Promotive - other pieces visible are portions of the chain drive and jackshaft assembly in addition to the custom cast case covering a Quaiffe ATB and made to suit std Mini drive shafts....fun stuff! No reverse on this one yet...but who needs it though if the car will weigh only a bit more than 1000lbs...Fred Flintstone did it in forward at highway speeds, as well as in reverse, surely I can do it in reverse backing out of parking spots...yeesh!

Here's another picture of the subframe as it was being built up, minus the ATB diff:
Attached File  Aric_20Built_20up_20frame.jpg   572.94K   245 downloads

...and a pic of the diff before it was loaded into the case:
Attached File  Aric_ATB.jpg   598.38K   66 downloads

Cheers,

Aric


Forgive my idiotness....but what is it? :shifty: gearbox perhaps?

Could it be reverse?

Alan...


Thats what i thought...


Edited by Monte Busa, 13 December 2007 - 04:25 AM.


#48 Jammy

Jammy

    Moved Into The Garage

  • Members
  • PipPipPipPipPipPipPipPipPipPipPip
  • 25,397 posts

Posted 13 December 2007 - 09:17 AM

Thats quite sexy!! Is it a mini diff casing they use?

#49 supermotolee

supermotolee

    One Carb Or Two?

  • Members
  • PipPipPipPipPipPipPip
  • 1,120 posts

Posted 13 December 2007 - 03:48 PM

kinda its half a mini diff casing the other half is custom made ali casting its very impressive!

your gonna love it aric its a pleasure to put together too its all nicley thought out!

have fun!

#50 Baldspeed Racing

Baldspeed Racing

    One Carb Or Two?

  • Members
  • PipPipPipPipPipPipPip
  • 1,185 posts
  • Location: Southam

Posted 13 December 2007 - 05:35 PM

fair play its arrived then Darren did say it was ready to be shipped off, gonna keep an eye out for progress pics

#51 dermow

dermow

    Passed Test

  • Noobies
  • PipPip
  • 29 posts
  • Local Club: irish mini owners club

Posted 14 December 2007 - 03:11 PM

Pictures at last!

#52 supermotolee

supermotolee

    One Carb Or Two?

  • Members
  • PipPipPipPipPipPipPip
  • 1,120 posts

Posted 18 December 2007 - 06:42 PM

be interested to know how u get on with the quaife as mines a trans x diff...

#53 Monte Busa

Monte Busa

    Super Mini Mad

  • Noobies
  • PipPipPipPipPipPip
  • 681 posts
  • Location: Michigan, USA

Posted 21 December 2007 - 03:00 AM

yeah, looking forward to that - should help on the track assuming I can keep both front wheels on the ground.

be interested to know how u get on with the quaife as mines a trans x diff...


#54 Monte Busa

Monte Busa

    Super Mini Mad

  • Noobies
  • PipPipPipPipPipPip
  • 681 posts
  • Location: Michigan, USA

Posted 25 December 2007 - 04:20 AM

Well, the shell's off to the painter's this AM for media blasting, a small bit of body work (just dents, no rust!) and paint. Will by dropping off all the Curley carbon fiber goodies (doors, CF boot floor, removable front) in a couple weeks...moving right along now, and now I have a bit more room in the garage to work on the Monte Carlo.

Cheers, and merry Christmas to all!

Aric

Edited by Monte Busa, 25 December 2007 - 04:21 AM.


#55 Monte Busa

Monte Busa

    Super Mini Mad

  • Noobies
  • PipPipPipPipPipPip
  • 681 posts
  • Location: Michigan, USA

Posted 09 January 2008 - 12:28 AM

Here's a short update:

1.) Most of the miscellaneous body work is done, and I picked a paint scheme - charcoal / Anthracite mettalic with a black roof. Unfortunately I forgot to get out my camera when I was at the body shop today, but it's lookin' good - with most of the extranous holes in the shell filled that I won't be needing, and the ripply roof about 90% smoothed out.


2.) They also started chopping out the boot floor, and I brought my carbon boot floor over to finish the job:

Attached File  DSC00151.JPG   42.03K   47 downloads

3.) I also got all the rest of the hardware for the seat brackets I adapted to the Elise sport seats - which turned out to be manufactured by Curley - I'm turning into one of their best customers with all the bits I'm putting on this car and the Monte! I ended up cutting down some tall ally side mounts to adapt to the Elise seats and building up a small adapter for the seat front mounts from 1 X 0.75 box section and some 1/8" plate (just tacked for now), which are a combination of bottom and side mount. The brackets will end up being powder coated silver. the front lip of the seat just clears the box section in the car - which suits the ultra-low mounting position of the seat in the car...

Attached File  DSC00154.JPG   45.52K   50 downloads

Attached File  DSC00155.JPG   37.34K   21 downloads

Attached File  DSC00158.JPG   52.93K   46 downloads

Attached File  DSC00159.JPG   62.22K   39 downloads

Fun fun!

Cheers,

Aric

Edited by Monte Busa, 09 January 2008 - 12:29 AM.


#56 koss

koss

    One Carb Or Two?

  • Members
  • PipPipPipPipPipPipPip
  • 1,399 posts
  • Local Club: The Greenbank working mens social club

Posted 09 January 2008 - 12:51 AM

Looking good Aric. Wont be long now. Cant wait to see the shell.

#57 Monte Busa

Monte Busa

    Super Mini Mad

  • Noobies
  • PipPipPipPipPipPip
  • 681 posts
  • Location: Michigan, USA

Posted 25 January 2008 - 01:38 AM

Parts continue to slowly trickle in. Got some titanium "bling" along with some whippy wheels from Fast Carl (thanks Carl!!!) yesterday. Can't decide whether to frame them and hang them on the wall or use them for what they're intended...works of art every piece!

The wheels with centerlocks...
Attached File  DSC00161.JPG   70.69K   87 downloads

A close-up
Attached File  DSC00162.JPG   66.85K   76 downloads

Front Centerlock disassembled
Attached File  DSC00163.JPG   62.5K   75 downloads

Rear Centerlock disassembled, also showing custom socket for the "big nuts"
Attached File  DSC00164.JPG   60.92K   63 downloads

Fun stuff!!

Edited by Monte Busa, 25 January 2008 - 01:44 AM.


#58 Purtsi

Purtsi

    Speeding Along Now

  • Members
  • PipPipPipPipPip
  • 417 posts
  • Location: Way too often online
  • Local Club: Mini Club Flying Finns

Posted 25 January 2008 - 07:22 AM

Parts continue to slowly trickle in. Got some titanium "bling" along with some whippy wheels from Fast Carl (thanks Carl!!!) yesterday. Can't decide whether to frame them and hang them on the wall or use them for what they're intended...works of art every piece!


I had the same feeling when I got my wheels assembled =]

ps. those wheels are just pain in the **s to clean because of the round shape, but it's well worth it :thumbsup:

#59 Rogue Se7ens

Rogue Se7ens

    Mini Mad

  • Noobies
  • PipPipPipPip
  • 125 posts

Posted 25 January 2008 - 07:22 AM

Monte Busa, looks like a nice build. I caught your update and had to go back and read the earlier postings. I'm anxious to see how the Pro-Motive kit works out as I am working on a build that may use a similar R1 layout (one of these days I'll start a build thread). Look forward to further updates.

#60 Monte Busa

Monte Busa

    Super Mini Mad

  • Noobies
  • PipPipPipPipPipPip
  • 681 posts
  • Location: Michigan, USA

Posted 16 February 2008 - 10:30 PM

Was out at the media blaster Ron's today (great job Ron!) for a good blasting (glass media) before driving it back to Jeff's body shop for some final body work, prep and paint. I forgot to take some "before" pictures but Ron did, so when I get them I'll put them up in this post. Ron said he used almost 900lbs of media balsting this little guy by the way...that's almost as much as the car will weigh when it's done :P

It actually looks like I'm making progress now....amazing!

Attached File  DSC00234.JPG   82.85K   50 downloads
Attached File  DSC00231.JPG   90.55K   39 downloads
Attached File  DSC00232.JPG   93.95K   27 downloads
Attached File  DSC00237.JPG   72.86K   40 downloads

This picture shows the only body filler on the whole car, just in front of the rear fender there's a shallow depression....no big surprises here fortunately and pretty amazing!

Attached File  DSC00239.JPG   95.44K   39 downloads
Attached File  DSC00241.JPG   84.73K   47 downloads
Attached File  DSC00242.JPG   93.02K   19 downloads
Attached File  DSC00245.JPG   63.08K   24 downloads
Attached File  DSC00247.JPG   53.29K   28 downloads
Attached File  DSC00249.JPG   56.35K   30 downloads
Attached File  DSC00250.JPG   58.63K   24 downloads
Attached File  DSC00252.JPG   50.69K   34 downloads

Believe it or not, the below was the only sign of ANY structural rust on the whole car....little pinholes next to the lower door hing mounts....not bad for a Mini that's almost 48 years old, eh?

Attached File  DSC00253.JPG   50.22K   41 downloads

Edited by Monte Busa, 17 February 2008 - 04:23 AM.


0 user(s) are reading this topic

0 members, 0 guests, 0 anonymous users