

What Makes Huey Tick? (Picture Heavy)
Started by
Teapot
, Dec 11 2012 04:06 PM
83 replies to this topic
#31
: post #31")
Bungle
-

- Members
-

- 28,971 posts
Original Spamster
- Location: Cornwall
- Local Club: cornish mini club
Posted 19 December 2012 - 07:51 PM
keep up the good work watching Mr T
#32
Teapot
-
- Members
-
- 5,010 posts
TMF Legend
- Location: Seaton, East Devon
Posted 21 December 2012 - 10:36 AM

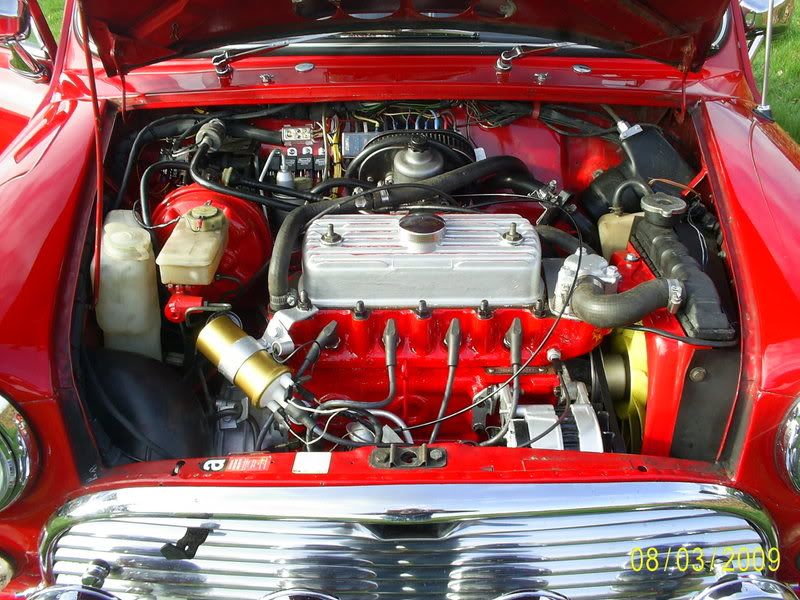
Electrolysis strikes on an alternator bolt. Bit wary of trying to clean this item

Behold, it was green before it was red

Trying to remove the rusted stud to seal the thread in the block. Er, it's probably rusted ...

Looks like it's had at least two engine numbers in its time

The new exhaust valves had different finishes so they have been
machined to give uniform surfaces. Dougie explained about
soft edge, sharp edge which I'm still struggling with

The daily grind ... not too much needed, and fine grade paste

I'd forgotten how beautiful metal can be. Takes me back to the
days of hot-metal printing and the silver-grey type
glinting in the chases ... reminisces for 2,000 hours

Springs compressed, new collets from Dougie's special tin of bits (ex-Cadbury's Roses)
#33
Teapot
-
- Members
-
- 5,010 posts
TMF Legend
- Location: Seaton, East Devon
Posted 29 December 2012 - 11:09 AM

Prior to refitting the replacement rocker assembly on the head, the tappet nuts are loosened off. They were
much too tight, probably done up with a long spanner.

The head goes back on the block with a BK450 gasket. The rusted stud which we couldn't extract for fear of snapping it
has had a smear of sealant around the base and all fingers are crossed (technical term)

The pushrods are relocated in their original places

The rocker cover is masked off and replaced ready for spray-painting the head & block, with orifices blocked

Cleaning is a long job using whatever we've got, namely engine degreaser and then by turns thinners and white spirit with
a toothbrush, rags and wire brush, more washing down with thinners and blowing the crud out of the cavities with the air gun.
A lot more green paint comes to light
Edited by Teapot, 30 December 2012 - 10:09 AM.
#34
Teapot
-
- Members
-
- 5,010 posts
TMF Legend
- Location: Seaton, East Devon
Posted 29 December 2012 - 11:19 AM


The RED lid on the high temp spray can says RED, so the paint is probably RED.
Haha. It's white.
 Naturally the shop hasn't got any red. At least I got my money back
So it's Plan B, brushing on the spare paint, which was all I could get at 3pm on a Friday afternoon in a seaside town ...
heat-resistant Blackfriar QD90. Leave to dry for half an hour before touching up ...

... which gives us time to examine previous rolling road printouts
and dream of a few more horses
#35
Teapot
-
- Members
-
- 5,010 posts
TMF Legend
- Location: Seaton, East Devon
Posted 29 December 2012 - 11:49 AM

Dougie has polished the dashpot cover ...

... and refits the spring, piston & needle and fills the dashpot with medium oil

Finally the Millers oil arrives. How much? £62 for 10 litres??
I have to go and lie down

#36
brad-the-bear
-

- Members
-
- 1,114 posts
One Carb Or Two?
- Location: under the bonnet
Posted 29 December 2012 - 12:25 PM
looking good pal!
oh and before your rebuild when the engine was running could you hear a timing chain rattle?
oh and before your rebuild when the engine was running could you hear a timing chain rattle?
#37
Teapot
-
- Members
-
- 5,010 posts
TMF Legend
- Location: Seaton, East Devon
Posted 29 December 2012 - 12:33 PM
Too right, see page 1 for links to various debates about chain rattle, timing & tensioners
#38
Artful Dodger
-

- Members
-
- 4,435 posts
" I AM THE SPECIAL ONE"
- Local Club: aint no body got time fo dat
Posted 29 December 2012 - 12:37 PM
What power did it put out with the 286 fitted?? I got one in my engine and I'm not sure if I want to go larger? 
Cracking build by the way! Another good build thread 8)
Cracking build by the way! Another good build thread 8)
#39
Bungle
-
- Members
-
- 28,971 posts
Original Spamster
- Location: Cornwall
- Local Club: cornish mini club
Posted 29 December 2012 - 01:04 PM
everyone knows red engines make the most power 
#40
Teapot
-
- Members
-
- 5,010 posts
TMF Legend
- Location: Seaton, East Devon
Posted 29 December 2012 - 05:35 PM
@Artful Dodger: 87bhp at the flywheel @ 6270rpm, torque 78lb/ft @ 4160rpm. But that was on 13x6s.
@Bungle: Is there any red paint left in Cornwall or have you used it all?
@Bungle: Is there any red paint left in Cornwall or have you used it all?
#41
steven
-

- Banned from Buying/Selling
-
- 1,195 posts
One Carb Or Two?
- Location: Uk
Posted 29 December 2012 - 05:43 PM
great work ! keep it up 
#42
davej
-

- Members
-
- 985 posts
Kelly Jones
- Location: North Wales
Posted 29 December 2012 - 06:01 PM
Great work, how did you get the dash pot so shiny??
#43
Teapot
-
- Members
-
- 5,010 posts
TMF Legend
- Location: Seaton, East Devon
Posted 29 December 2012 - 06:16 PM
@davej: That's one of the things Dougie does at work and he won't tell me how!
#44
Teapot
-
- Members
-
- 5,010 posts
TMF Legend
- Location: Seaton, East Devon
Posted 01 January 2013 - 10:06 AM

After refitting the crank pulley (75lb/ft this time) and lining up the timing marks, the dizzy goes back on ...

... using the Haynes Metro manual and the old numbered plug leads to double-check the positioning. At this point Dougie found the diaphragm in the vacuum unit was fubar'd and we had a short debate about whether an efficient (we hope) 1380 merits an upgrade to an expensive Aldon.We decided to get a new diaphragm and set it all up by instinct and see what the r/r suggests. To borrow from another thread ...
Aldon will only make a 'best guess' at setting up a dizzy curve for you. Best to take it a decent rolling road place where they will customise the curve for YOUR engine on the rollers.
Also I wonder how much longer Huey will cope on 145 Falkens, so an upgrade to 165s, maybe Yokos, will be another expense.
I'm actually having to spend my OAP heating allowance on heating this year, so no spare dosh

Setting the tappets to .016" for the time being

Trying out new nuts for the thermostat housing. Note to self: when replacing thermostat, fit it first, followed by the gasket, otherwise
it doesn't sit properly. The nuts are so shiny that Dougie has taken the cover to work to polish that too.
Have you spotted the big spacer on the fan boss? We hope it can be machined down a bit to push the fan clear of the timing cover
breather. Either the fan will sit deeper into the radiator shroud and be more efficient,
 or it will shred itself
and the radiator.
 Certainty is so boring, don't you think?
Happy New Year.
Edited by Teapot, 02 January 2013 - 10:20 AM.
#45
mattbeddow
-

- TMF+ Member
-
- 337 posts
Speeding Along Now
- Location: Warwickshire
Posted 01 January 2013 - 12:51 PM
I must say you are doing an amazing job with this engine.
I hope the car its going into is/will be of a similar standard :)
I hope the car its going into is/will be of a similar standard :)


3 user(s) are reading this topic
0 members, 1 guests, 0 anonymous users
-
Bing (2)


