Jump to content


Photo

My '81 Mini Van (95) From The Netherlands


  • Please log in to reply
30 replies to this topic

#1 snackey

snackey

    On The Road

  • Noobies
  • PipPip
  • 46 posts

Posted 16 December 2012 - 04:17 PM

Hi guys,

almost two years ago i bought my '81 Mini Van from it's second owner. He stored it 14 years ago after failing the MOT.
I didn't have any experience restoring cars whatsoever (except changing a wheel perhaps) so it was quite the challenge for me.

This is how I bought the car:

Posted Image

Posted Image

Fortunately it really wasn't bad at all, except for the front which kind of had an accident.

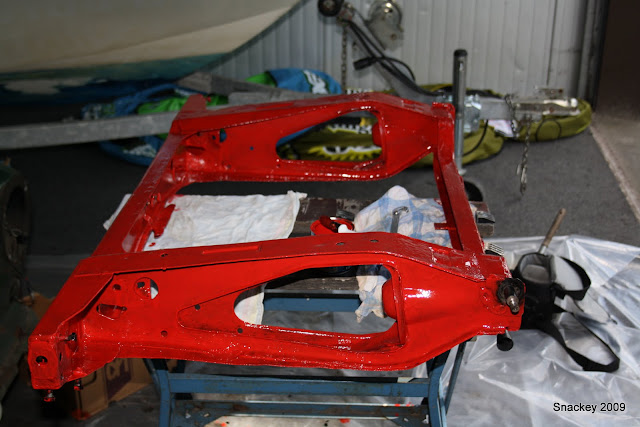
After some serious de-assembling (is that a word??) i started with the rear subframe. Surprisingly after having it blasted, it showed no holes whatsoever, so after a fress paintjob it was as good as new. In this pic you can see the frame and the coated underside of the car (which really did help against the rust!)

Posted Image

Posted Image

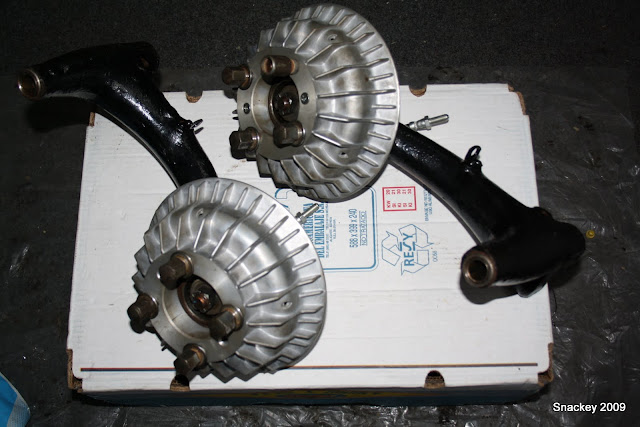
After this i revised all the other parts on the frame, resulting in

Posted Image

Suspensing was renewed as well, but I can't seem to find the image.

After the rear frame was done, the engine was removed and we could start welding the front

Posted Image


Resulting in a fresh nose!

Posted Image

I decided to save me some money by not painting the inside, so i could let the painter do all the prep-work. Finally after about one year, the mini was painted. Colour is the Porsche-colour, L63A, which was only used on the Porsche 911 Sport Classic.

Posted Image

Then it was the engines turn, first some repainting

Posted Image

Posted Image

Front subframe refitted, ready for the engine!

Posted Image

Posted Image

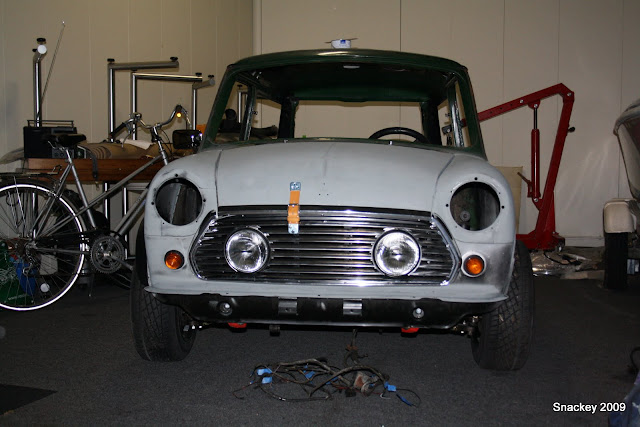
Now the front is pretty much completed, some more overall pics

Posted Image

Posted Image

Since i decided not to paint the inside of the car (most parts), i wanted to upholster the side panels. Doing this with a ribbed pattern is not the smartest move... Aligning really uhm, was a challenge.

Posted Image

Posted Image

Posted Image

After some sweat and tears, i was pretty much pleased with the result. I thought some wood would look great, somewhat like the old USA chevy pick-ups. Well, why not just give it a try?

Posted Image

I thought this was the hard part.. i was wrong, that was filling the seams! I just the same stuff they use on teakdecks. You can easily sand it down after drying.

Posted Image

Well this is basicly the status right now. Next step is refitting all the windows, doors, dash and then some.
Of course chrome detailing has yet to be done, but he no rush right? Also, all those beautiful parts need to be shipped overseas first..;-)

I'll keep you guys posted!

Grtz, Snackey from The Netherlands

#2 Mini-Mad-Craig

Mini-Mad-Craig

    Crazy About Metro's

  • Members
  • PipPipPipPipPipPipPipPipPipPip
  • 9,298 posts
  • Location: Travelling in a fried out Kombi

Posted 16 December 2012 - 04:25 PM

Very very nice! The first picture is brilliant. I love your work on the headlining and door inserts, and the load bay is an absolute work of art! you should be very proud to achieve THAT for your first restoration considering you'd only changes a spare wheel before!

Are you planning on any road trips to the UK for the show season next year? it should definitely come to the IMM in 2014!

#3 snackey

snackey

    On The Road

  • Noobies
  • PipPip
  • 46 posts

Posted 16 December 2012 - 06:18 PM

He thanks a lot!

Well, IMM 2014 could be a good deadline ;-)! It's just a hobby car so i'd be great to do some trips to england and scotland for some sightseeing. We shall see!

#4 iMurray

iMurray

    Mild Cheddar

  • Members
  • PipPipPipPipPipPipPip
  • 1,396 posts
  • Location: Southampton

Posted 16 December 2012 - 10:48 PM

Lovely colour and lovely inside!


Cracking van. Imm is a must

#5 snackey

snackey

    On The Road

  • Noobies
  • PipPip
  • 46 posts

Posted 05 January 2013 - 04:22 PM

A little addition the loading bay, so IF ever used for transport, the floor will come out clean!

Posted Image

Posted Image

It still needs two straps (the same as used on the bonnet) to hold the bunch together when rolled up.

#6 jamesmpi

jamesmpi

    Camshaft & Stage Two Head

  • Members
  • PipPipPipPipPipPipPipPip
  • 1,940 posts
  • Location: Chichester
  • Local Club: Abingdon Mini Owners Club

Posted 05 January 2013 - 04:52 PM

That looks excellent. Personally I would retain the metal pressed grille. But thats my opinion. Still looks fab.

#7 snackey

snackey

    On The Road

  • Noobies
  • PipPip
  • 46 posts

Posted 05 January 2013 - 05:00 PM

I know, I wasn't sure as well when rebuilding the nose. But I just really loved the grille with the spotlights. I'll probably try to make an insert piece from a standard pressed grill so i can switch the look every now and then.

#8 snackey

snackey

    On The Road

  • Noobies
  • PipPip
  • 46 posts

Posted 15 January 2013 - 08:43 PM

I decided to make my dashcards myself, so they match the doorcards. Also, it saved me 50 quid compared to Minispares ;D!

Here some pics, making the template was pretty tricky but eventually it all came together.

Posted Image

Posted Image

Posted Image

Not too shabby :highfive:

#9 steven

steven

    One Carb Or Two?

  • Banned from Buying/Selling
  • PipPipPipPipPipPipPip
  • 1,195 posts
  • Location: Uk

Posted 15 January 2013 - 08:46 PM

lovely van ! wouldn't mind one of these myself

#10 Shep76S

Shep76S

    Super Mini Mad

  • TMF+ Member
  • PipPipPipPipPipPip
  • 541 posts
  • Location: Kent
  • Local Club: L&SMOC

Posted 16 January 2013 - 06:31 PM

Very nice, well done so far.

#11 Tomlad

Tomlad

    Passed Test

  • Noobies
  • PipPip
  • 34 posts

Posted 16 January 2013 - 06:58 PM

Really nice well done mate!

#12 ba-tat

ba-tat

    Stage One Kit Fitted

  • Noobies
  • PipPipPip
  • 53 posts

Posted 16 January 2013 - 08:01 PM

I love this van! The floor is clever, practical and the interior detailing is lovely.

#13 snackey

snackey

    On The Road

  • Noobies
  • PipPip
  • 46 posts

Posted 16 January 2013 - 08:26 PM

Thanks lads, progress will be pretty slow from now on because of the lack of parts.
But when somethings changes i'll put it up here!

#14 SAL 821X

SAL 821X

    Camshaft & Stage Two Head

  • Members
  • PipPipPipPipPipPipPipPip
  • 1,890 posts
  • Location: Hinckley
  • Local Club: Leicester Mini Owners Club

Posted 17 January 2013 - 03:04 PM

Really liking that teak floor for the load deck...

Hmmmm that gives me an idea ;)

#15 snackey

snackey

    On The Road

  • Noobies
  • PipPip
  • 46 posts

Posted 17 January 2013 - 04:28 PM

@SAL 821X; please do copy, I hope to have started a trend :proud: !

One more edition to the interior, how could I forget..

Before and after:
Posted Image

Posted Image

Brackets are now painted the same colour as the body of course.

Edited by snackey, 17 January 2013 - 04:29 PM.


0 user(s) are reading this topic

0 members, 0 guests, 0 anonymous users