It's been a very long afternoon but i am finally moving closer to a major milestone in the build.
Before i could progress,i needed to take the Subframe back out and the boot floor too.


Then i remembered i hadn't ordered any drill bits. so i took a walk round to Hurst's to see what they had. i only really needed a 6mm bit but at almost a fiver for one drill bit, i decided to go for this instead


nice draper ones, a bargain thought I. Then I noticed that the sticker on the tin was a bit peeled so i tore it back a bit and found this

cheeky buggers. i was in two minds whether or not to take it back but i thought i would give them a try. They are really good so will be staying.
Anyway, The first thing was to remove the battery earth clamp set nut from the old floor.

The new floor doesn't come with one so I carefully removed it, cleaned it up and zinc sprayed it


Whilst that dried, I made up a template for the fuel line hole in the floor to convert to the earlier single line type

And welded it it


I just need to drill the hole for the single fuel line now but at that point i was waiting for measurements from Neil before i could drill. (Thanks Neil for those)
In the mean time, i welded in the earth clamp captive nut holder thing


Next, I made up a few of these.

which go here

a splash of Zinc

Whilst that dried, i decided to drill the bumper holes in the new bumper lip i made. Before i dropped the floor out, i marked the position with a marker pen so all i needed to do was drill up from underneath with a small drill bit

Then a slightly bigger one

then the step cutter to the correct size

I did all three.
Then i drilled a load of 6mm holes every 20mm

probably a bit over kill but never mind.
Then i received the measurements for the fuel line hole so measured and drilled that


and that's the floor ready

Next i drilled the holes for plug welding on the lower rear bulkhead

Marked out

and drilled

Then it was time to put the boot floor back in

and in


secured with bolts through the bumper holes


After a bit of tweaking,it was fitting well but i noticed that i need to trim the bumper lip i made for the rear panel a bit one side
So marked it out


And ill trim it tomorrow.
it is important to have the 3 layers (bootfloor, back panel, rear valance) stepped so that you can get paint and sealer in. If they were all flush with one another, it would be difficult to seal the edges and water would creep in there in no time at all and rust it all out again.
Tomorrow, ill need to re-fit the subframe to check alignment again and then weld it all in.
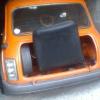
A question for you though, How many wiring tabs should there be along the back edge of the boot floor? I have installed 5 and their location was determined by square dimples pressed into the back edge of the floor but there was only 5. it seems to me that there should perhaps be another on the left of this picture?? (blue square)

would someone be able to check please?
Cheers
Ben