My friend had some on his mini and they were really nice to use
I bought some and struggled to fit them for hours before figuring out that the captive nuts were a different bolt spacing to the subframe. My tip is to work this out before you put the engine in
I think there’s only one or two captive nuts left as the others separated from the mount and now I’ve got regular nuts on there


Why Didn't I Buy Engine Mounts With Captive Nuts!
Started by
Scoop77
, Jul 10 2014 08:23 PM
41 replies to this topic
#31

timmy850
-

- Members
-

- 3,395 posts
Up Into Fourth
- Location: NSW, Australia
- Local Club: MITG
Posted 23 July 2025 - 07:37 AM
#32
Icey
-

- Traders
-
- 1,554 posts
Camshaft & Stage Two Head
- Location: Wiltshire
Posted 23 July 2025 - 11:55 AM
I had some of the rivnut types. After a couple of years, when I needed to take the engine out again one of the rivnuts failed. Massive pain to get the bolt out. Would never fit them again.
Nice idea, terrible in practise.
Nice idea, terrible in practise.
#33
nicklouse
-

- Members
-
- 18,719 posts
Moved Into The Garage
- Location: Not Yorkshire
- Local Club: Anonyme Miniholiker
Posted 23 July 2025 - 08:13 PM
They are total *******. Bolts fitted incorrectly and when the nut captive fails you are in a world of pain.
For what its worth I was a little aspersive to use them at first. but then talked with no less than 10 people and they all loved them. Maybe you just got a bad set when you tried to use them.
Fair enough. But having been asked by friends since these first came out to help them when failed they get a big NO from me. But if your car is a trailer queen then I can see them not causing a problem. But for a daily, as they were for us back then. No Fing way. But a nut on the mount and welding it is a BIG upgrade to these supplied items as you can still get a spanner on them if they fail.
a Fork every time. Even for the MC pins

#34
mini-mad-mark
-

- TMF+ Member
-
- 876 posts
One Carb Or Two?
- Local Club: northants wot no brakes
Posted 23 July 2025 - 09:37 PM
I was shown a hack for this, but apologies I don't have a picture.
Use a reasonably stiff (i.e. reasonably thick) cable tie tightened round the bolt head and then use that to wiggle the bolt in; once the nut is on its pretty straightforward to pull the cable tie off (they don't go on that tight that you can't pull them off)
Probably goes without saying that you need a good podger to line up one hole first then tighten that one fairly tight so that when you podge the second hole it stays in place - I have an ex-scaffolding spanner that I use
#35
cmonson
-

- Noobies
-
- 28 posts
Passed Test
- Location: Santa Rosa, CA
- Local Club: MOASF
Posted 23 July 2025 - 10:31 PM
They are total *******. Bolts fitted incorrectly and when the nut captive fails you are in a world of pain.
For what its worth I was a little aspersive to use them at first. but then talked with no less than 10 people and they all loved them. Maybe you just got a bad set when you tried to use them.
Fair enough. But having been asked by friends since these first came out to help them when failed they get a big NO from me. But if your car is a trailer queen then I can see them not causing a problem. But for a daily, as they were for us back then. No Fing way. But a nut on the mount and welding it is a BIG upgrade to these supplied items as you can still get a spanner on them if they fail.
a Fork every time. Even for the MC pins
My mini is far from a trailer queen. its almost a daily driver.
Slightly modified - LOL. 1310, Supercharged, EFI, Water/Methanol Injection, Protech adjustable shocks, KAD brakes with bias pedal box, 1st Gen Miata seats, etc, etc,
Aside from the motor mounts and an adjustable dog bone I also have 2x engine stabilizers on the gearbox. the engine does not move at all.
From the outside it looks like a British Open Classic.
Edited by cmonson, 23 July 2025 - 10:34 PM.
#36
colinf1
-

- Members
-
- 1,031 posts
One Carb Or Two?
- Location: Dundalk
Posted 24 July 2025 - 07:24 AM
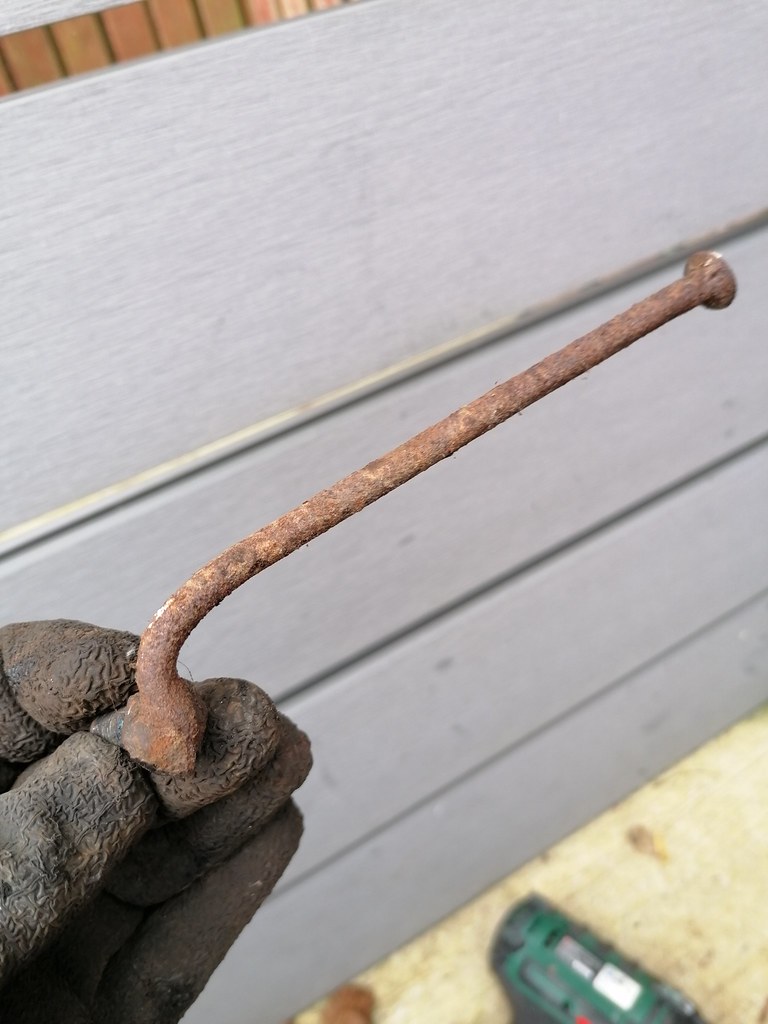
For 60 years, I have been welding some 30mm long tags of 1/4" round bar (Used to come from the nails in the ashes of burnt pallets) to the top of the setscrew, not like a T but like an L.
I push my welded tag into a bit of rubber petrol pipe and use the pipe, as per the dining fork, to insert the setscrew through the engine mount and subframe. Having lightly screwed on the nut, I pull off the rubber tube and the tag saves trying to get a spanner on the head of the setscrew.
#37
1984mini25
-

- Members
-
- 8,786 posts
Crazy About Mini's
- Location: -
Posted 24 July 2025 - 12:29 PM
Unless you’ve unfortunately purchased some engine mounts were the holes are a mile off (been there) I really don’t see what’s so hard with… using a flat screwdriver or spike jammed through the subframe/mount to force the holes to line up. Then take one ½” spanner, bolt and masking tape, place masking tape on head of bolt and push into ring end of spanner, the rest is pretty self-explanatory.
 2017-02-25 12.40.47.jpg 84.38K
1 downloads
2017-02-25 12.41.54.jpg 54.22K
1 downloads
2017-02-25 12.40.47.jpg 84.38K
1 downloads
2017-02-25 12.41.54.jpg 54.22K
1 downloads
#38
Cooperman
-

- TMF+ Member
-
- 23,332 posts
Uncle Cooperman, Voted Mr TMF 2011
- Location: Cambs.
- Local Club: MCR, HAMOC, Chelmsford M.C.
Posted 24 July 2025 - 04:40 PM
I always weld 5/16” unf nuts onto the mountings.
Then I open up the holes in the sub-frame to 3/8”.
This I have been doing for many years and it makes everything so much easier.
Also put a smear on grease onto the subframe before lowering the engine in.
Then I open up the holes in the sub-frame to 3/8”.
This I have been doing for many years and it makes everything so much easier.
Also put a smear on grease onto the subframe before lowering the engine in.
#39
imack
-

- TMF+ Member
-
- 2,209 posts
Up Into Fourth
- Location: Orpington, Kent
Posted 24 July 2025 - 05:01 PM
I've never tried the fork method, but it looks good. I've always wrapped a length of binding wire or welding rod around the bolt to insert it from the engine side, then remove the wire by yanking it with a pair of pliers.
Attached Files
-
20250724_175457.jpg 22.42K
2 downloads
#40
cmonson
-
- Noobies
-
- 28 posts
Passed Test
- Location: Santa Rosa, CA
- Local Club: MOASF
Posted 24 July 2025 - 05:24 PM
For 60 years, I have been welding some 30mm long tags of 1/4" round bar (Used to come from the nails in the ashes of burnt pallets) to the top of the setscrew, not like a T but like an L.
I push my welded tag into a bit of rubber petrol pipe and use the pipe, as per the dining fork, to insert the setscrew through the engine mount and subframe. Having lightly screwed on the nut, I pull off the rubber tube and the tag saves trying to get a spanner on the head of the setscrew.
That's actually a pretty cool idea. especially for the bolts on the fire wall side.
#41
nicklouse
-
- Members
-
- 18,719 posts
Moved Into The Garage
- Location: Not Yorkshire
- Local Club: Anonyme Miniholiker
Posted 24 July 2025 - 07:47 PM
They are total *******. Bolts fitted incorrectly and when the nut captive fails you are in a world of pain.
For what its worth I was a little aspersive to use them at first. but then talked with no less than 10 people and they all loved them. Maybe you just got a bad set when you tried to use them.
Fair enough. But having been asked by friends since these first came out to help them when failed they get a big NO from me. But if your car is a trailer queen then I can see them not causing a problem. But for a daily, as they were for us back then. No Fing way. But a nut on the mount and welding it is a BIG upgrade to these supplied items as you can still get a spanner on them if they fail.
a Fork every time. Even for the MC pins
My mini is far from a trailer queen. its almost a daily driver.Slightly modified - LOL. 1310, Supercharged, EFI, Water/Methanol Injection, Protech adjustable shocks, KAD brakes with bias pedal box, 1st Gen Miata seats, etc, etc,Aside from the motor mounts and an adjustable dog bone I also have 2x engine stabilizers on the gearbox. the engine does not move at all.From the outside it looks like a British Open Classic.
They do almost F all.
no top mounts at all just a pair of lower. Ps it’s the same if you put one on the other side. All the do is help the mounts in shear.
https://youtu.be/c0v...mU1ODqesWcFYgb5
#42
floormanager
-

- Members
-
- 726 posts
One Carb Or Two?
- Location: Haywards Heath, West Sussex
- Local Club: Mini Club Sussex
Posted 25 July 2025 - 06:32 AM
I've never tried the fork method, but it looks good. I've always wrapped a length of binding wire or welding rod around the bolt to insert it from the engine side, then remove the wire by yanking it with a pair of pliers.
That's how a mechanic taught a young 17 year old idiot (me).


1 user(s) are reading this topic
0 members, 1 guests, 0 anonymous users


