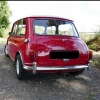
Looking at your photo's it seems as though you have the front bumper fitted to the back. You'll never open the boot lid fully like that. I guess you have the rear bumper fitted to the front. That may be why the overriders foul.


'89 Mini City To 'mk1 Cooper S'
Started by
johnR
, Apr 09 2015 05:02 PM
617 replies to this topic
#76

Vinmin
-
- Noobies
-

- 104 posts
Mini Mad
- Location: Coventry
- Local Club: RCMOC
Posted 15 June 2015 - 07:52 AM
#77
Midas Mk1
-

- TMF+ Member
-
- 5,837 posts
Crazy About Mini's
- Location: Manchester
- Local Club: S.U.N.M.C
Posted 15 June 2015 - 08:37 AM
You have the front bumper on the rear, hence the problem at the front. There is the notch cut out in the bumper lip for the overriders. You'll have difficulty with your boot with the above.
Edit: Beaten to it.. aha
Edited by Midas Mk1, 15 June 2015 - 08:38 AM.
#78
JamesC
-
- Just Joined
-
- 125 posts
Mini Mad
- Location: Kent, United Kingdom
- Local Club: Mini Cooper Register
Posted 15 June 2015 - 08:03 PM
Great build! I'm looking forward to seeing this beast finished!! 
#79
johnR
-
- Members
-
- 2,319 posts
Up Into Fourth
- Location: Dorset
Posted 15 June 2015 - 08:39 PM
Thanks Vinmin & Midas Mk1 for spotting my rookie mistake - I'd pre-assembled the bumpers and overriders while the car was away being welded and when I fitted them I just put them on without thinking of the different lengths of bars.
The downside to having that problem solved is that I can no longer use my lovely stainless towing eye as it now fouls the front overrider!
John
The downside to having that problem solved is that I can no longer use my lovely stainless towing eye as it now fouls the front overrider!
John
#80
johnR
-
- Members
-
- 2,319 posts
Up Into Fourth
- Location: Dorset
Posted 18 June 2015 - 09:30 PM
Spent some time yesterday tidying up the new wheelarches - how have people mounted them - with a sealant as well as the rivets?
I've taken some more parts missed in the first batch to the platers and used cad (you know which type) to produce a bracket for the foglamp,
I've sent my seats off to Newton for covering and asked a friend with an engine crane to pencil in next weekend to help fit the engine.
Just need to get new brake pipes and fit them before that.


#81
jagman.2003
-

- Members
-
- 1,307 posts
One Carb Or Two?
- Location: In the shed.
- Local Club: Owner of my own club of Minis
Posted 19 June 2015 - 06:44 AM
For my arches I drilled all the holes prior to paint. I then used nuts & bolts on the front & rivnuts on the rear.
Between the arch & the body I used a rubber seal. Plenty of profiles & sizes available.
#82
johnR
-
- Members
-
- 2,319 posts
Up Into Fourth
- Location: Dorset
Posted 20 June 2015 - 02:57 PM
While I'm waiting for a parts delivery I thought I'd plan some brackets for the extra switches needed for starter, heated rear window, hazard lights and fog lamps on the separate one.
Also one for the manual windscreen washer pump.
Had a bonus today when I noticed that Somerford have re-manufactured the Mk1 heater knob - the last period part I was struggling with.

Edited by johnR, 01 November 2015 - 09:47 AM.
#83
Zeemax Adventure
-

- TMF+ Member
-
- 301 posts
Speeding Along Now
- Location: Llandudno
Posted 21 June 2015 - 12:48 PM
Wow what a great finish. I hadn't even thought about zinc plating but you've answered my question as to getting that OE finish for my cooper sport. Did u clean up everything first before sending them off for plating?
#84
johnR
-
- Members
-
- 2,319 posts
Up Into Fourth
- Location: Dorset
Posted 25 June 2015 - 01:31 PM
Yes I de-rusted them in Deox C and gave them a light spray of WD40 to keep them that way.
The platers vapour blasted the old paint off the clutch master for me before re-plating it - all in all a great service that really makes a difference to the detailing without going to the expense of buying everything new.
I've got my bonnet and boot back from the sprayers and fitted some of the bits to them. Having the bonnet also meant I could check the position of the grill and surround and fit them too.
My new brake pipes arrived today, together with the interior door furniture which will give me the period look I'm going for.


#85
Vinmin
-
- Noobies
-
- 104 posts
Mini Mad
- Location: Coventry
- Local Club: RCMOC
Posted 25 June 2015 - 03:10 PM
I really hope you haven't drilled the bootlid yet as the S looks wrong. It should be more slanted
#86
johnR
-
- Members
-
- 2,319 posts
Up Into Fourth
- Location: Dorset
Posted 25 June 2015 - 05:29 PM
I looked at all the images I could find and there seemed to be a huge variety of positions so I just put it where I thought looked best and drilled the holes - I may have placed it the wrong way up - it's not fixed yet.
Had a result with some Lucas 7" spotlamps for a good price on Ebay today so I'll need some brackets - which type are best?
John
#87
jagman.2003
-
- Members
-
- 1,307 posts
One Carb Or Two?
- Location: In the shed.
- Local Club: Owner of my own club of Minis
Posted 26 June 2015 - 07:40 AM
Coming together nicely..!
#88
johnR
-
- Members
-
- 2,319 posts
Up Into Fourth
- Location: Dorset
Posted 26 June 2015 - 04:11 PM
Here's the door furniture I'm going to use.
I fitted the rear brake pipes today and started cutting the holes in the master cylinder blanking plate for the heater hoses - now I need to wait for the larger stepped hole cutter I've ordered to arrive to be able to finish it.
Edited by johnR, 27 January 2018 - 02:59 PM.
#89
Vinay-RS
-

- Members
-
- 2,115 posts
Put's foolish ideas in peoples heads
- Location: Cape Town
Posted 27 June 2015 - 10:06 AM
Ooh so shiny :)
#90
johnR
-
- Members
-
- 2,319 posts
Up Into Fourth
- Location: Dorset
Posted 27 June 2015 - 07:40 PM
Today I spent way too long putting the grill surround ends on - an article I read talked about sliding the moulding onto the clips but this isn't possible - they need to be pressed onto the clips. I used self tappers to fix the clips so I could adjust them as necessary.
I tried running the new front to rear brake pipe but found that it's shorter than the original one - which is odd as virtually all the other pipes were slightly longer. The original pipe followed the heel board over the rear subframe but I think I can make the new pipe fit by routing it under the subframe straight to the 'T' connector - with the bonus that I wont have to take the rear subframe out to fit it.
The new minisport fuel pipe is longer than the original so I've routed that under the subframe too,using an extra 3" of pipe.
I've dropped the front subframe out to fit these pipes and the battery lead - although I'm struggling to work out what route this takes from the toe-board?
Edited by johnR, 13 June 2017 - 09:04 AM.


0 user(s) are reading this topic
0 members, 0 guests, 0 anonymous users


