Jump to content


Photo

Help Getting My Welder Set Up


  • Please log in to reply
24 replies to this topic

#16 Daz1968

Daz1968

    Up Into Fourth

  • Members
  • PipPipPipPipPipPipPipPipPip
  • 2,058 posts
  • Location: Dudley

Posted 16 April 2015 - 05:54 PM

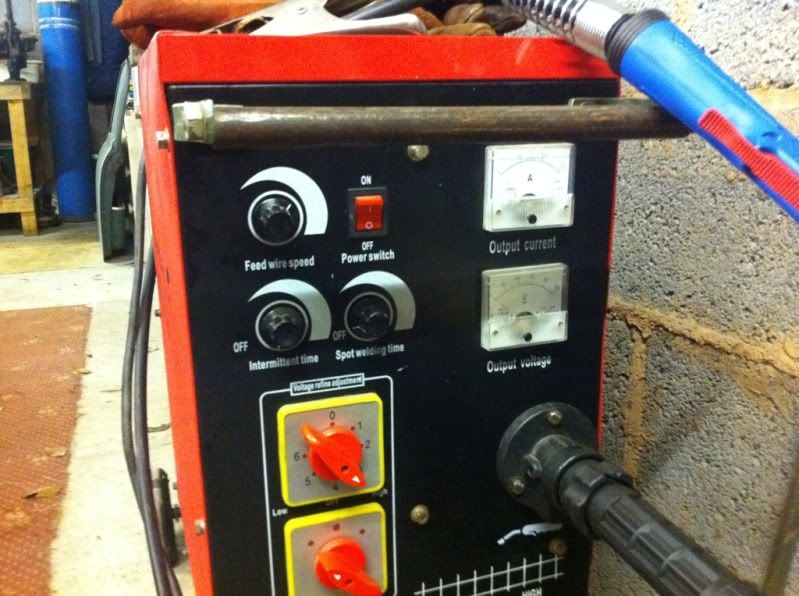
Different welder but mine is set on low volts range and number 3, then wire speed about half way, at this setting when welding on 0.6 it shows about 50amps. Mig welding current is controlled by wire size and feed. the settings are volts, the current flows to melt the wire so the faster the wire feed the more current flows to melt it. Thicker wire carries more current to melt

533E0B2E-2D01-4066-B364-F2CA337CEBAF-569

Edited by Daz1968, 16 April 2015 - 05:54 PM.


#17 coopdog

coopdog

    Up Into Fourth

  • TMF+ Member
  • PipPipPipPipPipPipPipPipPip
  • 4,506 posts
  • Location: South Wales

Posted 16 April 2015 - 07:46 PM

yeah so i figured out what i was doing was turning the power up and decreasing the wire speed.......


#18 Stu.

Stu.

    One Carb Or Two?

  • Members
  • PipPipPipPipPipPipPip
  • 912 posts
  • Location: My workshop.

Posted 16 April 2015 - 08:22 PM

A neat way to understand wire speed -

Turn the wire speed to zero, and set the welder power to min & 1. While slowly increasing the speed knob, draw the torch across the workpeice slowly at normal distance (it can be a little tricky one handed but can be done). The weld will begin to splatter badly as you increase the speed, but the more you increase the wire speed the better it will sound. Eventually you'll get a fast sizzle noise, and your welds should look better.

Understanding how wire speed affects the process is crucial to developing welding skill.

I'm still learning basic welding too by the way, but I've certainly realised you need correct settings, proper panel prep, good earthing and technique to get it sweet.

#19 coopdog

coopdog

    Up Into Fourth

  • TMF+ Member
  • PipPipPipPipPipPipPipPipPip
  • 4,506 posts
  • Location: South Wales

Posted 17 April 2015 - 06:32 PM

i had another go today and what a difference!!!!


i know the welds aint pretty but i didnt want to grind them too much just incase the welds wernt the best haha


went from this


tumblr_nmyr8gVMz11qco8kdo2_1280.jpg


tumblr_nmyr8gVMz11qco8kdo3_540.jpg


to this :)

tumblr_nmyr8gVMz11qco8kdo1_400.jpg


then tackled this part

tumblr_nmyr8gVMz11qco8kdo2_400.jpg


tumblr_nmyr5a3vZv1qco8kdo9_540.jpg


tumblr_nmyr5a3vZv1qco8kdo6_250.jpg


tumblr_nmyr5a3vZv1qco8kdo1_400.jpg


dont think its terrible for a first go :D


#20 Stu.

Stu.

    One Carb Or Two?

  • Members
  • PipPipPipPipPipPipPip
  • 912 posts
  • Location: My workshop.

Posted 17 April 2015 - 06:46 PM

Great. Pleased for you.

#21 JonnyAlpha

JonnyAlpha

    Up Into Fourth

  • Members
  • PipPipPipPipPipPipPipPipPip
  • 2,748 posts
  • Location: North Devon
  • Local Club: Exmoor Minis

Posted 17 April 2015 - 07:00 PM

Glad you got this sorted out, before long you'll be adjusting the weld settings based on noise and feel :-) It took me ages to get it right but after watching loads of You Tube videos and asking questions on here and the Mig Welding Forum (Which also has some great tutorials on setting up a welder, I am now pretty proficient especially with thin stuff (Which is most of the Mini!!).


P.S Just about to tackle the same repair as you have shown here, after I finish the floor that is :-)


#22 KEV@POWARTEK

KEV@POWARTEK

    Mini Mad

  • Traders
  • PipPipPipPip
  • 163 posts
  • Location: Teesside or Hampshire depending on the day

Posted 18 April 2015 - 08:10 PM

Reading this thread, I suggest using the advice by stu on page 1 regarding pulse welding. As an professional fabricator & welder that is the best technique for someone learning to weld. This will also allow you to keep the amps up for good penetration of the weld. No point in having a pretty bead sat on the joint that's not holding the metal together. With time and practice your stitch welds will become seamless.

#23 Rich_L

Rich_L

    Just On Tickover

  • Noobies
  • Pip
  • 5 posts
  • Location: Guildford

Posted 22 April 2015 - 11:08 AM

Have also recently bought a Clarke 135TE, and like yourself its taken me quite a lot of practice, but thought i'd share my findings with you in case it helps.


I found that having the power setting on 1 - Min, wire speed around 5, and holding the torch just 20 degrees from vertical about 3/4mm from the metal surface to be the most successful with thin metal welding. I had the gas bottle that came with the welder on full as well, as the guy in machine mart told me the 1-6 marked on top of the gask pressure regulator is rather useless and its best just to consider it as on or off! As stated above, doing a tack weld every 30mm or so and then doing short bursts of welds between the tacks stops the metal getting to hot and the weld pool to big and hence blowing through.


hope that helps :) keep us up to date with your findings on settings for this welder, i'd be interested to know 


#24 Stu.

Stu.

    One Carb Or Two?

  • Members
  • PipPipPipPipPipPipPip
  • 912 posts
  • Location: My workshop.

Posted 23 April 2015 - 06:41 AM

Rich. Dump the small crappy bottles and get some Hobbyweld Co2 / Argon with a proper regulator. The small bottles and their regulators dont give anywhere near enough shielding gas flow.

#25 Ginge620

Ginge620

    Stage One Kit Fitted

  • Noobies
  • PipPipPip
  • 86 posts
  • Location: Chesterfield

Posted 24 April 2015 - 08:25 PM

I have a 135TE. The 2 settings i use are: 2 MIN and 7 for wire speed. Also 1 MAX and 6 wire speed for the large gaps and/or if previous setting blows through. I mainly weld 1.2mm to my mini. Also i use 0.6 wire and 10-15 CFM Hobyweld 5 argon mix gas. Hope that helps. heres and example of what i managed tonight.

From the Welded side https://dl.dropboxus...05/DSC_0046.jpg

From the inside https://dl.dropboxus...05/DSC_0050.jpg


Needs some touching up the grinder and some paint but you can how those settings work.


Edited by Ginge620, 24 April 2015 - 08:48 PM.


1 user(s) are reading this topic

0 members, 1 guests, 0 anonymous users