Good luck with the rebuild
Looking great so far


Mini Mad

Posted 14 October 2015 - 01:49 PM
Good luck with the rebuild
Looking great so far
Starting My Mini Up

Posted 19 October 2015 - 10:25 PM
One Carb Or Two?

Posted 19 October 2015 - 10:43 PM
One Carb Or Two?
Posted 01 November 2015 - 05:40 PM
small update
decided to start the job ive been dreading since i bought the car,the rotten roof gutter at the back and it turns out i was dreading it for good reason its took me 2 days and ive only managed one side and im not very happy with the result to be honest
i did the driver side rear corner as this was the worst bit ..i didnt get a before picture so a pic of the other side will have to do just imagine the same only a bit worse and with a hole in the roof about the size of a 5 pence piece
passenger side stripped back

driver side finished...sort of ...needs a fair bit more shaping its a bit wavy at the bottom ...which wont be covered by the roof trim so cant cut corners on it it ha to be right


cant really tell from the pictures but i had to do it in 4 section to get the curve anywhere near the right shape ...tried one piece first it was awfull
One Carb Or Two?
Posted 22 November 2015 - 03:57 PM
did the other side of the gutter last week but forgot to take any pictures ...it went better than the driver side anyway.
this weekends job was the rear panel
i preped the new bit in the week

then cut out the old panel yesterday

while that was off i welded these little gusset panels in ....tacked them from inside then drilled and plug welded them from behind


then spot welded the back panel on ...after many hours of adjustments ...the fit still isnt perfect but its close enough that only i can tell....according to the misses

trying to go off the leading edge of the old boot floor was a waste of time it took me 3 hours of swearing and cussing to realise that the edge of the boot floor had been patched previosly and was nowhere near where it should be ...or even the right length in some places
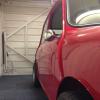
quick side on of the nearly finished back end

Speeding Along Now

Posted 22 November 2015 - 05:17 PM
You have been busy. From what looked to be a reasonably solid car turned out to be a not so solid. Great work replacing that rear end...will all be worth it. You must be chuffed :)
One Carb Or Two?
Posted 24 November 2015 - 05:09 PM
small update
Had a bad day today ....first thing i spun the car on its side n it slipped out my hands onto an axle stand...and put a ding in my new rear quarter ...not a massive one bout the size of a 20 pence peice but still some filling needed that wasnt before ...could of knocked it out if it was an inch higher but its perfectly inline with the inner stiffener inside the door pocket,i might be able to use a bar between the two panels at a later date when i have the door pocket off .
after a lot of swearing i got started on cutting out the old boot floor...which went ok

lots of old scrap bits

the hole from inside


had a bit of trouble getting 2 old patches off that were welded to the bottom of the bulkhead so unfortunately i will need to do some small repairs to the bulkhead lip

The whole boot floor removed
Now for anyone thinking of buying an entire boot floor a word of warning ...the following bits do not come with the panel ...the earth captive nut for the battery terminal,the bit under the car that the brake lines pass through,the barcket that the petrol tank strap bolts to and the stiffener panel for the leading edge of the seat base ive roughly cut them all out ready to tidy up and weld to the new boot floor

and finally i trial fitted the boot floor ..clamped it up and used bolts in the bumper mounts and also the sub mounts through the floor ... and the fitment was horrific ...after 4 hours fettling i still couldnt get one side of the sub mount holes to line up and i couldnt get the seat base to fit onto the rear kick plate properly ..theres a cm gap or so if you look under the seat base from inside the car......now normally id because myself for the fitment of the other panels that i welded in , however this morning when i cut out the old boot floor everything lined up perfectly with said floor granted a few bits were missing but all the main reference points were there so im gonna blame the new panel for fitting like s**t.....because that way i dont feel so bad about the day i just wasted.
Ive got the entire week off and it looks like the next day or 2 will be spent drinking more tea and scratching my head more than nik from project binky ...wish me luck
One Carb Or Two?
Posted 24 November 2015 - 05:13 PM
i'm blaming my even worse than normal spelling on being tired aswell lol
One Carb Or Two?

Posted 24 November 2015 - 05:33 PM
One Carb Or Two?
Posted 25 November 2015 - 12:42 PM
been out this morning spent a few hours fettling and also used a wee bit of brute force and ignorance followed by a lot of self tapers and the panel now lines up bar 2 little imperfections ...the driverside rear corner is a few mill our i think because the arch to floor stiffener/sub mount support bracket is slighty off,that corner had been patched poorly in the past and that could be why i mounted the panel slightly off causing the boot floor to be out....the only other issue is that where the boot floor meets the rear panel the floor overlaps a bit more than i would like ,it could just need the back panel pulling out slightly but i dont want to do that untill i get the car off its spit so i can fit the boot lid to make sure that lines up aswell.
here it is clamped and screwed inplace for its trial fit


The plan for the rest of the day is to make a teemplate and then tack in the 2 patches for the edge of the bulkhead then take the boot floor out to prep it and attach all the little brackets of the old floor and then weld up the bulkhead repairs properly.
In hindsight i should of replaced a bit more of the bulkhead up where it attached to the inner arch as its a bit scabby and has lots of old welds on from previous repairs that are proving difficult to flat off.
I then need to address a few inperfections in my repairs .... the first lot of spot welds i did along the inner arch to side panel lip have been bugging me so im going to drill a few out and put a few plug welds in just to be sure....for anyone else planning on using a spot welder,ive been using a weld through priimer to prep all the seams and sprayed onto the inner 2 faces (the ones that sit against each other) it seems ok and the spot takes properly,but if you also spray the outer 2 faces aswell (where u attach the spot welder to) it struggles to take and in some cases just burns a hole so for most the spots ive done ive only coated the inner 2 faces then spotted it and then primed the outer faces.Did't know this at the beggining so my early spot welds are looking a bit dodgy .... you learn something everyday...aparently.
One Carb Or Two?
Posted 25 November 2015 - 02:20 PM
Looking good. Whist heritage panels are far better than repro panels they can be a struggle to get right at times. Looking at the pictures the boot floor doesn't seem too bad a fit at all now. One tip with the spot welder is making sure the tips of the electrodes are clean and well dressed as they quickly pick up bits of swarf and steel from the panels and then don't leave the nice clean indentations you get with a factory finish.
One Carb Or Two?
Posted 25 November 2015 - 05:38 PM
yep i learned that one pretty quick to ...i keep a bit of scotch bright handy now
went back out after dinner,did'nt get massive amounts done but i did finish the bulkhead and put a few plug welds in anywhere where the spots didnt look quite right

I had a few issues with the metal being too thin to weld to so i had to do a patch on each side about an inch or so up instead of just replacing the lip ... didnt really want to put a patch in as cutting out the thin bits was tricky round the nice new arches ... some of the welding wasnt as neat as i would of liked either but penetration was ok and you wont actually see it all behind the seats etc....might see if it can be tidied up a bit when all the weldings done and i go round the car preping it for paint.In hindsight i should of done it all when i was doint the arches but i didnt realise it was so thin.
Tommorow i plan to prep the floor and get all the little bits from the old floor welded on ready to fit the whole panel on friday ....maybe lol ....
Up Into Fourth

Posted 25 November 2015 - 06:01 PM
One Carb Or Two?
Posted 28 November 2015 - 06:26 PM
The back end is all in and almost completely welded in ...th elast bottle of welding gas id been saving must have srung a leak because when i went to use it it was empty  ...and i also ran out of primer so theres a few bits that still need dressing back and one or 2 bits to touch up with the welder,
Still pretty happy with what ive got done this week although i'm actually more tired than if i'd been to work lol

shot from inside the car...the eagle eyed among you will notice that the two ends of the spot weld holes on the seat base have not been filled thia is because i still have to replace both ends of the sub mount panel and both door pockets
i also only just noticed that the seat support looks off centre in this pic....hoepfully just the angle i took the picture at but ill check it at some point and put it right

underside ...still needs a bit of work on the plug welds ...flatting back etc but it will do for now

The completed back end :)
You can't see in this picture but there is a stupid amount of spot welds on the back panel lip,this is because i spotted the boot floor to the back panel then drilled holes in the valance lip to plug weld to the boot floor thinking that my spot welder wouldnt go through 3 panels,i then ran out of welding gas so i thought sod it and tried spotting through the 3 panels ...and it went right through ..which was nice so theres double the spots than i originally planned,does mean i have holes in the valance lip now though lol might weld them up anyway when i get some gas even though they arent visable ill know their there.
i also fitted the subframe to make sure everything is where it should be and dropped the car onto axle stands ready to do a bit of work on the boot lid while i earn some more pocket money for the sills etc...hopefully have a nice full piggy bank by bingley.
One Carb Or Two?

Posted 02 December 2015 - 10:41 PM
Just read through your project. Great work.
Quick question for you if you dont mind. Are you able to run your Clarke spot welder off a 13 amp plug / socket without it tripping it, and have you had to make any modification to your supply?
I'm considering getting one and was wondering how easy they are to use.
Thanks, Stu.


0 members, 0 guests, 0 anonymous users


