Jump to content


Photo
- - - - -

Furry Micra Mini


  • Please log in to reply
319 replies to this topic

#91 thelegg

thelegg

    Super Mini Mad

  • Members
  • PipPipPipPipPipPip
  • 601 posts
  • Location: Forton

Posted 30 December 2015 - 10:44 PM

Spent all of today working on my frame, started off by cleaning it up with a wire wheel and then cranked up the welder :) got most of the frame seam welded now

35488199051_55c197df7e_n.jpg

Still need to change my rear engine mount haha also I've decided I'm going to alter the bottom rear part of my frame between the towers as at the moment the engine gets trapped under it when you try removing it once I've done that I'll drop the engine back in n weld in some additional strength
Have left the engine mounts just tacked at the moment just in case the engine positions need a little tweaking

Edited by thelegg, 31 October 2017 - 02:34 PM.


#92 jackjewelljj

jackjewelljj

    Mini Mad

  • Members
  • PipPipPipPip
  • 241 posts
  • Location: chard

Posted 31 December 2015 - 09:04 PM

Frame looks good, I know its a different engine but when I have to take mine out the frame I lift it at an angle so block is high and the gearbox is low it wont come out level would that work for you?

#93 Shingler4596

Shingler4596

    Mini Mad

  • Members
  • PipPipPipPip
  • 221 posts
  • Location: Llanelli
  • Local Club: South Wales Mini Club

Posted 31 December 2015 - 09:53 PM

Have you checked that the pot joints don't hit anything? The one on the right will probably touch the bottom of the tower if you engine is a similar height to mine. Also you need to check distances of the driveshafts in full suspension movement. Especially the longest shaft as it gets very close. Also what I noticed with mine is when I put the top arm in there was a bit of twist in the tower so extra strength was needed. :)

#94 thelegg

thelegg

    Super Mini Mad

  • Members
  • PipPipPipPipPipPip
  • 601 posts
  • Location: Forton

Posted 01 January 2016 - 11:18 AM

Engine still tight even when tilted at an angle so defiantly need to alter the back for easier engine removal etc else I'll scrape all the paint off each time haha ummmm not really anything left of the bottom of the towers :/ but will check that Sunday or Monday fingers crossed it'll be ok as for my towers Thats the next job on my list to reinforce them :)

#95 Shingler4596

Shingler4596

    Mini Mad

  • Members
  • PipPipPipPip
  • 221 posts
  • Location: Llanelli
  • Local Club: South Wales Mini Club

Posted 02 January 2016 - 05:36 PM

This is how far away the bottom of the tower after adjustment is away from the bottom of the hole for the top arm

Attached Files


#96 thelegg

thelegg

    Super Mini Mad

  • Members
  • PipPipPipPipPipPip
  • 601 posts
  • Location: Forton

Posted 02 January 2016 - 06:19 PM

I'm so confused where is that measurement ?

#97 Shingler4596

Shingler4596

    Mini Mad

  • Members
  • PipPipPipPip
  • 221 posts
  • Location: Llanelli
  • Local Club: South Wales Mini Club

Posted 02 January 2016 - 06:42 PM

The big hole for the top arm bar

Attached Files


#98 thelegg

thelegg

    Super Mini Mad

  • Members
  • PipPipPipPipPipPip
  • 601 posts
  • Location: Forton

Posted 02 January 2016 - 09:43 PM

Oh ok that makes sense ummmm mine measures about 20mm :/ if I need to trim some off then it's easily doable so will keep that in mind once I've got the engine back in with all the bottom n top arms on the frame,

Remade the back of my frame this evening although didn't take any pics as it's all just tacked together, also started planning out my new rear mount so stay tuned for pics of this over the next few days :)

#99 thelegg

thelegg

    Super Mini Mad

  • Members
  • PipPipPipPipPipPip
  • 601 posts
  • Location: Forton

Posted 03 January 2016 - 11:10 PM

Ok so didn't have the early start that I intended to have this morning as the workshop was half flooded so had to sweep that out first, also about a foot of water in the pit so won't be going down there anytime soon haha then found a few ditches blocked up so had to sort them out before work on the mini could start.
Anyway I did manage to get some stuff done :) cut the outer pully off the crank so this has made fitting the engine easier


34777223544_409d2f0759_n.jpg


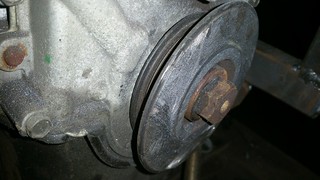
Some nasty rubber/sealer stuff in the centre of the pully, had to vacate the workshop after hitting it with the grinder as the fumes were unbearable!
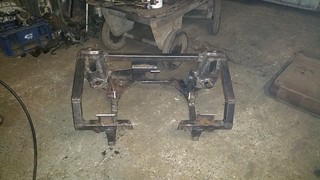
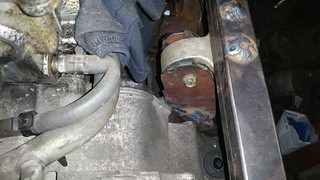
Managed to sort out my rear mount, decided to use one of the Nissan mounts as it lined up pretty well


35618460745_0d2413c9a0_n.jpg


35488199591_bfc45d5c27_n.jpg


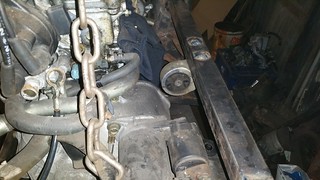
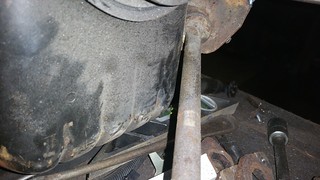
Put my bottom arms and tie bars on and found out that clearance on the sump is about a fag paper so the sump may need abit of fine adjustment


34777220594_124fec3599_n.jpg


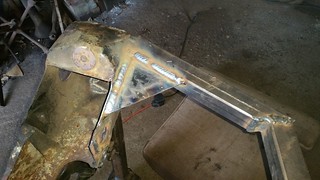
Engine fitting and removal is very easy now that I've modded the back of my frame so I will seam weld it up tomorrow as I ran out of time this evening :( another full day on it tomorrow too as I don't start work till Tuesday :D


Edited by thelegg, 31 October 2017 - 02:40 PM.


#100 lawrence

lawrence

    One Carb Or Two?

  • Members
  • PipPipPipPipPipPipPip
  • 1,330 posts

Posted 03 January 2016 - 11:31 PM

Rear mount looks so much better bud. Certainly an improvement once the nut and bolt from before!

Get the lump hammer for clearance :) mines been tweaked that way also ;)

Keep up the great work

#101 thelegg

thelegg

    Super Mini Mad

  • Members
  • PipPipPipPipPipPip
  • 601 posts
  • Location: Forton

Posted 04 January 2016 - 12:39 AM

Cheers mate :) May refill the mount with polyurethane at a later date to make it abit stiffer, any idea how much I can "adjust" my sump before it touches something Inside ?

Edited by thelegg, 04 January 2016 - 12:40 AM.


#102 DrFrankenstein

DrFrankenstein

    Learner Driver

  • Noobies
  • PipPip
  • 23 posts
  • Location: Ebbw vale South wales

Posted 04 January 2016 - 07:39 PM

Had no idea you was doing a micra build mate this looks like an awesome build how is things going as well ?

#103 lawrence

lawrence

    One Carb Or Two?

  • Members
  • PipPipPipPipPipPipPip
  • 1,330 posts

Posted 04 January 2016 - 07:47 PM

Quite a lot if you can see on my pictures
20151110_120241.jpg

There's like a baffle thing inside but you wouldnt damage any important components

#104 thelegg

thelegg

    Super Mini Mad

  • Members
  • PipPipPipPipPipPip
  • 601 posts
  • Location: Forton

Posted 04 January 2016 - 11:37 PM

Quite a lot if you can see on my pictures


Holy sh*t you've dented it in loads lol don't think I need to go that extreme!

Jon good to hear your back in the mini scene your new build looks great :)

Right then small update bit of reinforcing done today, first bit was at the top of the towers


35618462015_b84de8fb0a_n.jpg


2nd bit was inside the towers


35488202501_8d4f52f956_n.jpg


Hopefully they should be nice and strong again now :) apart from my bottom arm mounts any ideas if I need to reinforce other areas ?


Edited by thelegg, 31 October 2017 - 02:44 PM.


#105 Shingler4596

Shingler4596

    Mini Mad

  • Members
  • PipPipPipPip
  • 221 posts
  • Location: Llanelli
  • Local Club: South Wales Mini Club

Posted 05 January 2016 - 01:20 AM

Quite a lot if you can see on my pictures

Holy sh*t you've dented it in loads lol don't think I need to go that extreme!

Jon good to hear your back in the mini scene your new build looks great :)

Right then small update bit of reinforcing done today, first bit was at the top of the towers

20160104_151916_zpsk86no9xe.jpg[/URL]

2nd bit was inside the towers

20160104_170611_zpsgvwvynfe.jpg

Hopefully they should be nice and strong again now :) apart from my bottom arm mounts any ideas if I need to reinforce other areas ?
put the top arm in and check for twist in the tower. Noticed a bit in outs so cut a bit of 20x20 box in half and curved it around the outside :-)


4 user(s) are reading this topic

0 members, 0 guests, 0 anonymous users


    Google (4)