Jump to content


Photo
- - - - -

No Rear Subframe Mounting Holes


  • Please log in to reply
26 replies to this topic

#1 ryan13mt

ryan13mt

    Passed Test

  • Just Joined
  • PipPip
  • 32 posts
  • Location: Malta

Posted 24 June 2016 - 05:28 AM

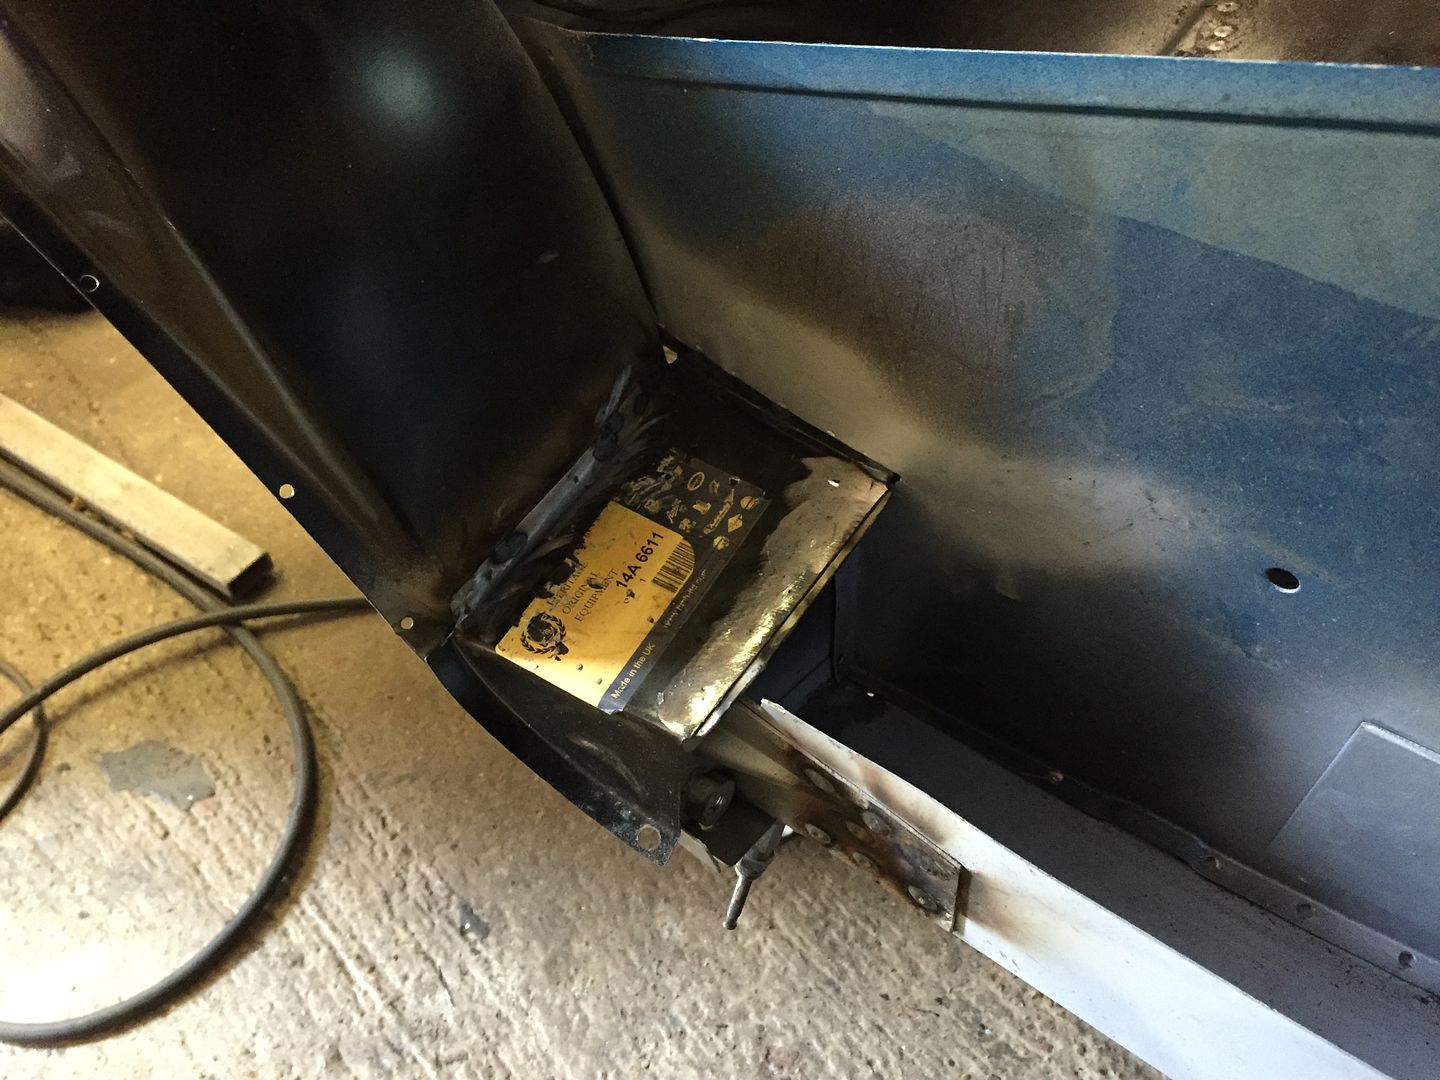
I bought my car fully dismantled with an already restored body. Yesterday while i was fixing the brake and fuel lines i tried to see where the rear subframe mounts to the body. I found the 4 holes where the rear trunnions attach but could not find the front mounting holes.


When i looked inside i found that the previous owners probably had that panel rusting so they welded a new one on top of it. 


Here are 4 pictures. 2 Are showing the rusted old panel which was still left there....


Attached File  13515279_10206759374804111_1632883064_n.jpg   31.19K   79 downloads

Attached File  13530300_10206759374644107_671042029_n.jpg   34.11K   59 downloads


And the other 2 are where the 4 holes are supposed to be.


Attached File  13493680_10206759374484103_2124632860_o.jpg   38.77K   80 downloads

Attached File  13493722_10206759375244122_1751175457_o.jpg   35.3K   48 downloads


Any suggestions on what i can do? I am really panicking and thinking i've bought a bad shell. Is it fixable?


I was thinking that the nuts are still there, they probably just welded a new piece over the old ones without bothering to drill the holes. So my idea was to drill a small hole in the approximate area of where the original should be, then continue do bigger holes until the old ones are completely uncovered.


#2 62S

62S

    One Carb Or Two?

  • Members
  • PipPipPipPipPipPipPip
  • 1,244 posts
  • Local Club: You must be joking!

Posted 24 June 2016 - 06:19 AM

If you are lucky they may just have seam sealer in them. It looks as though the holes may be there, I'd have a gentle dig around for starters.

#3 nicklouse

nicklouse

    Moved Into The Garage

  • Members
  • PipPipPipPipPipPipPipPipPipPipPip
  • 18,707 posts
  • Location: Not Yorkshire
  • Local Club: Anonyme Miniholiker

Posted 24 June 2016 - 06:19 AM

Opps I don't think you will find any weld nuts there.

Time for some cutting and welding and painting.

Edited by nicklouse, 24 June 2016 - 06:19 AM.


#4 GraemeC

GraemeC

    Crazy About Mini's

  • TMF+ Member
  • PipPipPipPipPipPipPipPipPipPip
  • 7,440 posts
  • Location: Carnforth

Posted 24 June 2016 - 06:28 AM

You may find a new heel board has welded over an old one. but it must be a panel they have fabricated as and proper panel would certainly have had the holes in them.

For reference, where you're looking on the inside is not where the nuts would be - they'e inside the box section towards the outside of the car from your photos (can't be seen without cutting the inner sill or upper closing panel)


#5 ryan13mt

ryan13mt

    Passed Test

  • Just Joined
  • PipPip
  • 32 posts
  • Location: Malta

Posted 24 June 2016 - 06:29 AM

Opps I don't think you will find any weld nuts there.

Time for some cutting and welding and painting.

Why do you say that? Are the weld nuts attached to the sill or the back panel?


If you are lucky they may just have seam sealer in them. It looks as though the holes may be there, I'd have a gentle dig around for starters.

I'm really hoping this is the case. Will prod around with a small magnet and see.


#6 Batmini

Batmini

    Speeding Along Now

  • Members
  • PipPipPipPipPip
  • 378 posts
  • Location: Stourport

Posted 24 June 2016 - 06:55 AM

They are welded on the inside of the heel board. I would run a wire brush over it to see if as others have suggested they have just filled them in. Other than that, bad news is you will have to cut a hole in the sill to have a look inside

#7 ryan13mt

ryan13mt

    Passed Test

  • Just Joined
  • PipPip
  • 32 posts
  • Location: Malta

Posted 24 June 2016 - 07:06 AM

They are welded on the inside of the heel board. I would run a wire brush over it to see if as others have suggested they have just filled them in. Other than that, bad news is you will have to cut a hole in the sill to have a look inside

If i cut a small hole in the sill, small enough just to let me manage to get a nut in there by hand and just tighten the subframe mount and not weld anything, do you think i will manage? Or do i need to remove the whole panel and add a new one with the nuts welded in?


#8 sonikk4

sonikk4

    Twisted Paint Polisher!!!

  • Admin
  • PipPipPipPipPipPipPipPipPipPipPip
  • 16,080 posts
  • Name: Neil
  • Location: Oxfordshire

Posted 24 June 2016 - 07:51 AM

On a standard car you can't see the subframe mounts from within the car so the arrows you have pointing inside the car are in the wrong position.

The heelboard mounting bracket welds not only to the heelboard but to the inner sill. This is then covered by the outer sill. This is the correct method not just nuts welded to the heelboard itself.

Now realistically your only option is to carefully remove a six inch section of the outer sill. This will then allow you access to the inner sill and heelboard end.

If there are not brackets fitted at each end then you can buy these from M Machine. The next problem you will have is alignment. The brackets will be able to move vertically but not sideways so at least providing that area has not been bodged at all it's only the vertical alignment that you need to sort out.

That's bad to be honest if there are no mounts but I would carefully remove some paint to see what is going on before cutting anything just to make sure there is no filler hiding the holes.

#9 ryan13mt

ryan13mt

    Passed Test

  • Just Joined
  • PipPip
  • 32 posts
  • Location: Malta

Posted 24 June 2016 - 08:06 AM

On a standard car you can't see the subframe mounts from within the car so the arrows you have pointing inside the car are in the wrong position.

The heelboard mounting bracket welds not only to the heelboard but to the inner sill. This is then covered by the outer sill. This is the correct method not just nuts welded to the heelboard itself.

Now realistically your only option is to carefully remove a six inch section of the outer sill. This will then allow you access to the inner sill and heelboard end.

If there are not brackets fitted at each end then you can buy these from M Machine. The next problem you will have is alignment. The brackets will be able to move vertically but not sideways so at least providing that area has not been bodged at all it's only the vertical alignment that you need to sort out.

That's bad to be honest if there are no mounts but I would carefully remove some paint to see what is going on before cutting anything just to make sure there is no filler hiding the holes.

The pictures with arrows are from outside the car not the inside. The pictures with circles show the inside. 


#10 ryan13mt

ryan13mt

    Passed Test

  • Just Joined
  • PipPip
  • 32 posts
  • Location: Malta

Posted 24 June 2016 - 08:52 AM

I thought maybe since the old panel is still there, the nuts will obviously have not been touched?


#11 nicklouse

nicklouse

    Moved Into The Garage

  • Members
  • PipPipPipPipPipPipPipPipPipPipPip
  • 18,707 posts
  • Location: Not Yorkshire
  • Local Club: Anonyme Miniholiker

Posted 24 June 2016 - 09:32 AM

what makes you think the old panel is still there?


as has been said do some paint removal where the holes should be and see what the situation is.


and if metal has been fitted over rusted panels then they can not have been in very good condition and really should be redone from scratch.


#12 ryan13mt

ryan13mt

    Passed Test

  • Just Joined
  • PipPip
  • 32 posts
  • Location: Malta

Posted 24 June 2016 - 09:41 AM

what makes you think the old panel is still there?


as has been said do some paint removal where the holes should be and see what the situation is.


and if metal has been fitted over rusted panels then they can not have been in very good condition and really should be redone from scratch.

if you look at the photos with the red circles in them. It shows the rusted panel that has been sprayed. Behind it is the new panel.


#13 sonikk4

sonikk4

    Twisted Paint Polisher!!!

  • Admin
  • PipPipPipPipPipPipPipPipPipPipPip
  • 16,080 posts
  • Name: Neil
  • Location: Oxfordshire

Posted 24 June 2016 - 12:19 PM

I cannot see a new panel at all, what i see are the returns that should be there from the inner sill. Now like i said you really need to dig deeper with this. I have done a lot of these especially recently, have a look at the Project Paddy link in my signature and you will see what i mean. Those areas inside the car have nothing to do with the mounting of the subbie. You cannot see the mounts without either cutting out a section of the outer sill or a piece of the inner sill stiffener.


#14 sonikk4

sonikk4

    Twisted Paint Polisher!!!

  • Admin
  • PipPipPipPipPipPipPipPipPipPipPip
  • 16,080 posts
  • Name: Neil
  • Location: Oxfordshire

Posted 24 June 2016 - 12:30 PM

This is what you would see without the inner sill stiffener in place. So as you can see the subframe mounting bracket is attached to the outside of the inner sill.

IMG_4505_zpsaoghabpj.jpg


#15 sonikk4

sonikk4

    Twisted Paint Polisher!!!

  • Admin
  • PipPipPipPipPipPipPipPipPipPipPip
  • 16,080 posts
  • Name: Neil
  • Location: Oxfordshire

Posted 24 June 2016 - 12:31 PM

The stiffener in place meaning you cannot see the mount when you look inside the companion bin

IMG_4509_zpsiepfpuup.jpg


1 user(s) are reading this topic

0 members, 1 guests, 0 anonymous users