Jump to content


Photo
- - - - -

Electrifying Trogdor


  • Please log in to reply
92 replies to this topic

#31 Anchoright

Anchoright

    Mini Mad

  • Noobies
  • PipPipPipPip
  • 127 posts
  • Location: Los Angeles

Posted 04 September 2016 - 01:09 PM

John at EV West explained to me that you have to imagine electricity as if it were water. If you have a big pipe and reduce it to a small pipe, the water will back up. If you have big pipes the water flows happy. Same with the battery power, the bigger the cables, the less resistance, which ultimately means you're not losing power through wire resistance.

EV West makes (or has made) their own massive wires. They sent me home with enough of what I needed on my shopping spree day. I had to get decent cutters to cut the wire, and then an hydraulic crimper to mount the ends. Then some heavy duty heat shrink that has glue on the inside so that it protects the ends of the wire from future corrosion and keeps out moisture.

Attached File  image.jpeg   54.12K   12 downloads
Attached File  image.jpeg   52.51K   13 downloads
Attached File  image.jpeg   53.95K   11 downloads

These wires end up looking so righteous!
Attached File  image.jpeg   55.14K   13 downloads

.

Edited by Anchoright, 04 September 2016 - 01:21 PM.


#32 Anchoright

Anchoright

    Mini Mad

  • Noobies
  • PipPipPipPip
  • 127 posts
  • Location: Los Angeles

Posted 04 September 2016 - 10:38 PM

As you all know, there have been many different emblems on Minis over the years. I'm sure someone has counted all the different emblems but there's a lot.

Attached File  image.jpeg   54.36K   30 downloads

Sitting at my desk I was wondering if after the conversion I would call the car different, like an "E" or a MinE or Mayfair E or something like that. But that is kinda stupid. Still the idea that there are so many emblems made me wonder if I would want to make my own.

Getting ideas from the Mustang pony or the Ferrari emblem, I thought I'd make a Trogdor emblem, with a bright green background and an image of Trogdor. I drew up a few sketches and didn't really like them, but finally decided to stick with something closer to the original.

This is what I ended up going with.

Attached File  image.jpeg   34.61K   26 downloads

.

Edited by Anchoright, 04 September 2016 - 10:42 PM.


#33 nicklouse

nicklouse

    Moved Into The Garage

  • TMF+ Member
  • PipPipPipPipPipPipPipPipPipPipPip
  • 17,935 posts
  • Location: Not Yorkshire
  • Local Club: Anonyme Miniholiker

Posted 04 September 2016 - 10:43 PM

You want to drop that design to stickyfingers (Martin Cull) he will be able to make it look like an original.

http://martincull.cr...et-Shields.html

#34 Anchoright

Anchoright

    Mini Mad

  • Noobies
  • PipPipPipPip
  • 127 posts
  • Location: Los Angeles

Posted 05 September 2016 - 12:24 AM

You want to drop that design to stickyfingers (Martin Cull) he will be able to make it look like an original.

http://martincull.cr...et-Shields.html


Sweet! Thanks!


#35 Anchoright

Anchoright

    Mini Mad

  • Noobies
  • PipPipPipPip
  • 127 posts
  • Location: Los Angeles

Posted 05 September 2016 - 01:07 PM

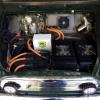
And we are back to the batteries.

I found the batteries rather confusing. What I wanted was the car to go 100 miles on a charge, and for the batteries to operate this 110v (or they call it a 96v) electric motor. I've got eight rectangular batteries. Each one is comprised of 330 AA shaped batteries made by Panasonic, packaged by Tesla into these units, and intended for the Smart Car. So we could say that Trogdor is propelled by 2,640 AA batteries.

Each one of these eight rectangles puts out 57 volts and 57 amp hours. The voltage needs to be around 110. The amp hours is what gives you distance. I think it's something like 2.4Ah per mile.

To make this easiest to understand, I tried to think in a unit I could understand, instead of being intimidated by these rectangular black things that weigh a ton! I reasoned it out in AA batteries. We load multiple AA batteries into different things and sometimes we load them in series, and sometimes in parallel. Like this picture I drew.

Attached File  image.jpeg   33.09K   9 downloads

Putting them in parallel you do not get an increase of voltage, but you get an increase of amp hours.
Putting them in series you get an increase in voltage but you do not get an increase in amp hours.

What I needed to do with these Tesla things is double the voltage and quadruple the amp hours, so I needed to wire them to be groups of four in parallel, and then two of those groups in series.

The guys already have terminology for that, it's "4p2s" or four parallel, two series.

The other thing to consider is that, thinking of electricity as water, if I have a short hose going to one bucket and a longer hose going to another bucket, one bucket will empty faster than the other. So I needed to connect the batteries together with the same length of wire each.

I made this wire, joined together in the middle by a huge hunk of steel so it would not buckle the flow, four wires of one side go to the negative terminals of four of the batteries, the four other side go to the positive terminals of the other batteries.

Then the positive terminals of the first set of batteries go to the safety shut off switch, and then on to the contactor box, the negative terminals of the second set of batteries go to the shunt (which would be the return from the contactor box.

Here's the wire I made.

Attached File  image.jpeg   60.1K   12 downloads

.

#36 A-Cell

A-Cell

    Camshaft & Stage Two Head

  • Members
  • PipPipPipPipPipPipPipPip
  • 1,610 posts
  • Location: Longbridge

Posted 05 September 2016 - 02:13 PM

As you all know, there have been many different emblems on Minis over the years. I'm sure someone has counted all the different emblems but there's a lot.
attachicon.gifimage.jpeg
Sitting at my desk I was wondering if after the conversion I would call the car different, like an "E" or a MinE or Mayfair E or something like that. But that is kinda stupid. Still the idea that there are so many emblems made me wonder if I would want to make my own.
Getting ideas from the Mustang pony or the Ferrari emblem, I thought I'd make a Trogdor emblem, with a bright green background and an image of Trogdor. I drew up a few sketches and didn't really like them, but finally decided to stick with something closer to the original.
This is what I ended up going with.
attachicon.gifimage.jpeg
.


Why not Mini city e Trogdor. e now for electric!
Decals available http://www.minispare...c/MSSK2232.aspx

#37 Anchoright

Anchoright

    Mini Mad

  • Noobies
  • PipPipPipPip
  • 127 posts
  • Location: Los Angeles

Posted 05 September 2016 - 10:21 PM


As you all know, there have been many different emblems on Minis over the years. I'm sure someone has counted all the different emblems but there's a lot.
attachicon.gifimage.jpeg
Sitting at my desk I was wondering if after the conversion I would call the car different, like an "E" or a MinE or Mayfair E or something like that. But that is kinda stupid. Still the idea that there are so many emblems made me wonder if I would want to make my own.
Getting ideas from the Mustang pony or the Ferrari emblem, I thought I'd make a Trogdor emblem, with a bright green background and an image of Trogdor. I drew up a few sketches and didn't really like them, but finally decided to stick with something closer to the original.
This is what I ended up going with.
attachicon.gifimage.jpeg
.


Why not Mini city e Trogdor. e now for electric!
Decals available http://www.minispare...c/MSSK2232.aspx


Eh, it's not a City. It was a Mayfair but I've stripped all the Mayfair differences off it except the rear opening windows. 


#38 keegan

keegan

    Just On Tickover

  • Noobies
  • Pip
  • 8 posts
  • Location: Reading

Posted 05 September 2016 - 10:26 PM

I'm planning on designing new decals for my 30, stick with Trogdor as it's an awesome badge design!


#39 Anchoright

Anchoright

    Mini Mad

  • Noobies
  • PipPipPipPip
  • 127 posts
  • Location: Los Angeles

Posted 06 September 2016 - 03:07 PM

The contactor box is a waterproof box that contains the contactors for the DC to DC converter and for the controller. (In other words what switches each on instead of leaving them running all the time). It also contains the module and shunt that sends info to the battery gauge.

I could have gone two ways with the box, either making an aluminum plate to bolt everything to, or just bolt it all onto the box. I went with bolting everything to the box, but putting silicone on each bolt, and then covering the back with vinyl, that way it's still waterproof.

Attached File  image.jpeg   34.31K   7 downloads Attached File  image.jpeg   26.83K   6 downloads

Then I spent a few weeks in the evenings (when I found time) messing with all the wires from the controller plug. I wanted it to look tidy and professional. Cutting off excess, wrapping the wires in mesh and heat shrinking the ends. The shunt wire needs to be twisted together to get the accurate measurement (something that apparently Mr Bell figured out!)

So I went from this:
Attached File  image.jpeg   50.92K   12 downloads

To this:
Attached File  image.jpeg   53.31K   14 downloads

This is the shunt wire:
Attached File  image.jpeg   27.66K   14 downloads

.

Edited by Anchoright, 06 September 2016 - 03:11 PM.


#40 Anchoright

Anchoright

    Mini Mad

  • Noobies
  • PipPipPipPip
  • 127 posts
  • Location: Los Angeles

Posted 06 September 2016 - 03:21 PM

Next was just connecting dots. I mean wires.
Then I ripped out any extra wires that wouldn't be needed from the Mini wiring (even though it was new wiring but I didn't want extra wires either way) and I wires with the same mesh to make it look tidy.

Attached File  image.jpeg   88.36K   32 downloads
Attached File  image.jpeg   66.82K   13 downloads
Attached File  image.jpeg   35.77K   17 downloads

And the motor compartment is complete!
Attached File  image.jpeg   76.45K   42 downloads
You can see Trogdor ruling from the contactor box lid.

with the engine finished I still need to do the interior:

Attached File  image.jpeg   46.73K   26 downloads

.

Edited by Anchoright, 06 September 2016 - 04:25 PM.


#41 Anchoright

Anchoright

    Mini Mad

  • Noobies
  • PipPipPipPip
  • 127 posts
  • Location: Los Angeles

Posted 06 September 2016 - 03:22 PM

I've been forgetting stuff!

In an effort to reduce more weight to compensate for the batteries, I figured that it was not necessary to have the heavy heater with its radiator etc. so I ripped that out and I made a fan of my own. The fan would serve the purpose of a defogger and some air flow, but it wouldn't be a heater nor air conditioning. They sell electric heaters if I need it, but in California it's not too necessary anyway.

So I ripped this giant heavy clunky thing out:
Attached File  image.jpeg   54.23K   8 downloads

And I made this, out of a computer fan and an electrical box:
Attached File  image.jpeg   56.75K   19 downloads
Attached File  image.jpeg   56.08K   12 downloads

You can see in the pic above of the engine compartment where I mounted it, above the battery chargers in the firewall.

Edited by Anchoright, 06 September 2016 - 03:35 PM.


#42 Rogue Se7ens

Rogue Se7ens

    Mini Mad

  • Noobies
  • PipPipPipPip
  • 125 posts

Posted 06 September 2016 - 03:42 PM

Looking great. Such a nice clean installation.  l've been enjoying the read.


#43 Anchoright

Anchoright

    Mini Mad

  • Noobies
  • PipPipPipPip
  • 127 posts
  • Location: Los Angeles

Posted 06 September 2016 - 03:43 PM

So by needing to move the motor over 2 inches I needed to do something about the drive shafts. In Florida when I did the Suzuki engine swap, I called up someone and he cut them and welded them for me.
Here in California I guess people don't want to be sued if the drive shafts snap. I called every single shop in Los Angeles and every single one said they would not do it. How that it is forged steel and that how the weld doesn't get good and bla bla bla.

So I contacted a shop that could make new ones for me. I asked him to rush the job but he took so long that he ran out of excuses and toward the end I was contacting him every day and sometimes twice to get updates. He ended up passing me off onto a co-worker because he didn't want to deal with me. It took him over a month. So I will not recommend them. But the axles got done.

He wanted another 5 days to paint them and I insisted to give them to me unpainted and I would paint them myself in 20 min.

So 6 weeks and $800 later I had my axles.

I painted them blue
Attached File  image.jpeg   72.85K   9 downloads
Attached File  image.jpeg   64.63K   7 downloads

I remember the morning that I put the axles and the CV joints together. It was just one of those days that everything went wrong. I put the wrong ends on what, I stepped on the grease and it went everywhere, I had gotten the wrong Suzuki axles to get new parts from... But eventually I got these things on the car.

Attached File  image.jpeg   45.22K   14 downloads

So the side that plugs into the differential are Suzuki, the side for the hub is Mini. The center part I don't want to talk about haha!

Edited by Anchoright, 06 September 2016 - 03:46 PM.


#44 Anchoright

Anchoright

    Mini Mad

  • Noobies
  • PipPipPipPip
  • 127 posts
  • Location: Los Angeles

Posted 06 September 2016 - 04:01 PM

I still (today) have not finished the interior, but I'm working on it. The car is running and I'm finding bugs that are wrong and ironing them out as a priority. But I don't want a standard interior, I would like a different dash. Something that gives the impression of more space.

I drew this up and is what I'd like to shoot for:
Attached File  image.jpeg   22.83K   9 downloads

So I'd want the center speedometer coming out a bit like the interior of the Rocketman concept
Attached File  image.jpeg   60.13K   8 downloads

I would have a hidden radio with just the plug for the iPhone. So the iPhone would become the control center and would go directly above the steering wheel.
I made a stand for the iPhone but it turned out more cumbersome than I wanted. While it was going to be hidden behind the dash, still I didn't like it.

Attached File  image.jpeg   46.78K   3 downloads Attached File  image.jpeg   39.64K   3 downloads

Instead I went with this basic thing, which is the same as I have in my lease:

http://www.cravenspe...lexpod-modules/

#45 Anchoright

Anchoright

    Mini Mad

  • Noobies
  • PipPipPipPip
  • 127 posts
  • Location: Los Angeles

Posted 06 September 2016 - 04:16 PM

Long before I started the conversion I was looking at steering wheels. In the end, the steering wheel is the center point of interaction between driver and beast. A nice steering wheel means a happy drive.
I must have spent all my spare time for months just looking at every steering wheel out there!

I really don't like my 2016 MINI S, it's just too BMW. But the one thing I do like about it is the steering wheel. So that started to sway my search. I didn't want a large steering wheel, I wanted it small. But I wanted to have the thumb grips to help with cornering and to feel the wheels. (John Morton taught me the correct way to hold the steering wheel so as to "feel" the traction of the tires).

Finally I found the wheel I wanted.
This is it compared to the 2016 wheel

Attached File  image.jpeg   55.32K   14 downloads

I was toying with which speedometer to get. Same one? New original? Then I came across these guys who make custom gauges and had them make this for me:

Attached File  image.jpeg   43.5K   9 downloads

It does all sorts of cool stuff like keep track of your top speed and measure 0-60 and altitude and stuff.

Edited by Anchoright, 06 September 2016 - 04:17 PM.


0 user(s) are reading this topic

0 members, 0 guests, 0 anonymous users