Fantastic work! Love this stuff. I have God knows how many inlet plenums drawn up in F360 but they're all pie-in-the-sky as it stands and all for a 5-port, I must up my game and draw it up for an 8-port too 

It Started As An Intellectual Exercise
Started by
Trog
, Jan 17 2020 11:01 PM
109 replies to this topic
#61

Mini Manannán
-

- Members
-

- 2,860 posts
Well I'll be buggered if I can find it
- Location: Middle of the Irish Sea
- Local Club: man Estate
Posted 24 January 2020 - 10:17 AM
#62
r.tec
-

- Members
-
- 216 posts
Mini Mad
- Location: Muenstereifel
- Local Club: SfG Schoenau
Posted 24 January 2020 - 11:56 AM
a little bit offtopic here, but if you want to add the diaphragm to the flywheel assembly, I tried to model one but I did not put it on GC because I did not manage to model all the reinforcing ribs and bulges into the design, only armed with a set of calipers. It was sufficient for the mass moment, though.
And the files are on my Dropbox if someone is interested: https://www.dropbox....4-32 .step?dl=0
https://www.dropbox.... 002.FCStd?dl=0
Edited by r.tec, 24 January 2020 - 02:56 PM.
#63
stoneface
-
- TMF+ Member
-
- 424 posts
Speeding Along Now
- Location: Surrey
Posted 24 January 2020 - 09:43 PM
Loving your work.
As some one whos crammed a ford x-flow under a round nose bonnet this project appeals on so many levels.
Very impressive, please keep it coming.
#64
Trog
-
- Just Joined
-
- 91 posts
Stage One Kit Fitted
Posted 24 January 2020 - 09:45 PM
Fantastic work! Love this stuff. I have God knows how many inlet plenums drawn up in F360 but they're all pie-in-the-sky as it stands and all for a 5-port, I must up my game and draw it up for an 8-port too
Carpe diem Take the pie out of the sky and make it happen! If you were in Auzz I would help you but the Isle of Mann is a bit far!
#65
Trog
-
- Just Joined
-
- 91 posts
Stage One Kit Fitted
Posted 25 January 2020 - 10:05 PM
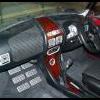
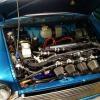
I just realized that I didn't include any images of the finished prototype build in chapter 3. So here are a few:
 Front.jpg 57.46K
5 downloads
Front.jpg 57.46K
5 downloads
Front 2.jpg 59.64K
3 downloads
LHS.jpg 63.66K
1 downloads
RHS.jpg 65.9K
1 downloads
Pipes.jpg 55.86K
0 downloads
Yes the hood closes and clears everything. I spent a lot of time "James Herriot" style with my arms up through the grill measuring clearances using by carefully calibrated fingers! I am aiming at 15mm. clearance between body and engine. (third knuckle middle finger!) A bit tight but I think it will be OK.
#66
Mini Manannán
-
- Members
-
- 2,860 posts
Well I'll be buggered if I can find it
- Location: Middle of the Irish Sea
- Local Club: man Estate
Posted 25 January 2020 - 10:53 PM
Fantastic work! Love this stuff. I have God knows how many inlet plenums drawn up in F360 but they're all pie-in-the-sky as it stands and all for a 5-port, I must up my game and draw it up for an 8-port too
Carpe diem Take the pie out of the sky and make it happen! If you were in Auzz I would help you but the Isle of Mann is a bit far!
You're right, I'll get on it tonight!
#67
no66
-

- Members
-
- 156 posts
Mini Mad
- Location: Saetre, Norway
- Local Club: NMCC (Norsk Mini Cooper Club)
Posted 28 January 2020 - 01:02 PM
Wow, just wow!
#68
Quinlan minor
-

- TMF+ Member
-
- 1,326 posts
One Carb Or Two?
- Location: London
Posted 28 January 2020 - 02:16 PM
My only worry about this project is whether it'll fit straight on to my MPi, because I'd definitely be interested in a production version for mine, if it does!
#69
brownspeed
-

- Members
-
- 451 posts
Speeding Along Now
- Location: Manchester- Gods favourite city
Posted 28 January 2020 - 08:05 PM
WOW!! been away a few weeks; OP ; this is just magic
Mods; if we don't have an award for post of the year, then we should have! no; don't bother; this has won 2020 already
I'm a chartered mechanical engineer; this is better than some stuff that gets people chartered.
#70
DeadSquare
-

- Members
-
- 3,376 posts
Up Into Fourth
- Location: Herefordshire
- Local Club: Unipower GT Owners Club
Posted 28 January 2020 - 08:15 PM
WOW!! been away a few weeks; OP ; this is just magic
Mods; if we don't have an award for post of the year, then we should have! no; don't bother; this has won 2020 already
I'm a chartered mechanical engineer; this is better than some stuff that gets people chartered.
Thankfully, that gives me 11 months to find out how to post photos.
#71
Trog
-
- Just Joined
-
- 91 posts
Stage One Kit Fitted
Posted 29 January 2020 - 12:49 AM
Chapter 4 “Does he really need all this equipment”
While all the packaging work was being done, I was also refining the cylinder head. Once I had got to the point where I knew that the design of the head would package and work within the Mini engine bay it was time to make the big decision:
Do I turn the intellectual exercise into a reality? Or leave it there. I know this may sound like there’s a lot of work to this point, why would I do this if I wasn’t planning to go all the way. Well the simple answer is that up until now I had not put a lot of cash into the project, to go to casting meant a commitment in money, with a chance of wasting a lot of cash that could be spent getting the 5 port going. But to be honest I had actually gone too far to back out and spend the rest of my life wondering…
During all the design process I had been planning how the head would be cast, there would be inlet and exhaust and water jacket cores. The outer mould would be made in three parts, a top, bottom and front piece. As I described earlier, I had modeled a machined head, now I had to re-model it with casting allowances included, as well as the feeder and vents. Casting allowance is 5 mm for all machined surfaces from this I could then model the cores and moulds directly.
That’s right I would model the moulds, no patterns would be made, yes you read that right I did not make patterns. Instead I had the moulds 3D printed in sand… This is one of the ways I kept costs reasonable and kept the pace up. There are a number of advantages to using this technique:
- It’s quick
- It’s very accurate
- Very reasonable price for one off and small volumes
- You don’t have to worry about draft angles and over hangs (indeed the water jacket would be very impossible to make in a single core box)
- It’s seriously cool!
Before I committed to this, I did 3D print a 40% model which I took to the foundry to discuss with the casting gurus there. This was very fortunate as I found that I couldn’t assemble the exhaust core through the water jacket core as I had thought I could. Result was I had to cut the water jacket into 2 pieces. Doh! Has to be said the foundry guys were awesome, spending time to help me and show me around, there wasn’t any issues with helping one dude with a single casting. And their Guru had been casting longer than I have been alive (and I’m 51).
Once I had the OK from them, I went to CSIRO in East Melbourne and they printed my first set of moulds. Again they couldn’t have been more helpful.
To explain these images, the head is cast upside down, however the mould is also assembled upside down… Normally the foundry wouldn’t do this as they don’t like to turn finished moulds over but as this was only a small one they were OK with it (They showed me a flywheel they had just cast at over a tonne, so an 18Kg casting is tiny!)
Mould Slide1.JPG 57.46K
11 downloads
Mould Slide2.JPG 44.66K
16 downloads
I haven’t got any images of the thermostat housing or inlet manifold moulds, they were simple 2 piece moulds, with one core…
Once printed I took them to the foundry who cast them:
Head Slide1.JPG 38.4K
20 downloads
Head Slide2.JPG 42.09K
21 downloads
Ally Slide1.JPG 38.87K
18 downloads
Ally Slide2.JPG 39.59K
8 downloads
If you look at the top (bottom) face of the head casting you can see it’s a bit rough, this was the only area of concern, the rest of the casting was perfect. I can tell you this was a tense time for me, once I had the casting though I was on a bit of a high for a few days. I wanted to have 2 initial heads cast so after the first success I added an extra 3 mm. of allowance onto the top of the casting due to the rough surface being a bit of a worry and had a second mould made.
This casting blew big time, I ended up with a huge hole in the middle. This was probably the lowest time during the whole thing, and I nearly threw the towel in. However I cut it up with an angle grinder and found an issue… When I added the 3mm. of extra allowance I had to update the water jacket design to match… I had the wrong water jacket! This meant that it was not touching the top of the mould so couldn’t vent properly, I now knew why the casting had blown! The printers printed me a new set of moulds and the foundry made the casting, as slowly as possible to aid venting. This third casting looks perfect, I haven't had any machining done on it yet though…
It’s off to machining now, but that’s another Chapter!
#72
Trog
-
- Just Joined
-
- 91 posts
Stage One Kit Fitted
Posted 29 January 2020 - 01:00 AM
My only worry about this project is whether it'll fit straight on to my MPi, because I'd definitely be interested in a production version for mine, if it does!
Um that's not so easy! Alternator and oil filter are in the way... Sure there are ways around that though...
WOW!! been away a few weeks; OP ; this is just magic
Mods; if we don't have an award for post of the year, then we should have! no; don't bother; this has won 2020 already
I'm a chartered mechanical engineer; this is better than some stuff that gets people chartered.
Thanks for the kind words...
#73
Mini Manannán
-
- Members
-
- 2,860 posts
Well I'll be buggered if I can find it
- Location: Middle of the Irish Sea
- Local Club: man Estate
Posted 29 January 2020 - 03:30 AM
Amazing! I'm truly in awe!
#74
Spider
-

- Admin
-
- 15,692 posts
Moved Into The Garage
- Location: NSW
- Local Club: South Australian Moke Club
Posted 29 January 2020 - 04:41 AM
Very seriously impressed !
If I can ask, which Foundry did you use ?
#75
mailman
-

- Members
-
- 222 posts
Mini Mad
- Location: Christchurch
Posted 29 January 2020 - 06:27 AM
This is mind blowing. So impressive


2 user(s) are reading this topic
0 members, 2 guests, 0 anonymous users


