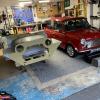
I managed to pick up a few bits on a recent work trip. The right place at the right time.
 C2EEC892-6730-462D-88FC-C6669F9048EB.jpeg 71.15K
0 downloads
C2EEC892-6730-462D-88FC-C6669F9048EB.jpeg 71.15K
0 downloads
Mini Mad

Posted 13 March 2021 - 08:44 AM
I managed to pick up a few bits on a recent work trip. The right place at the right time.
C2EEC892-6730-462D-88FC-C6669F9048EB.jpeg 71.15K
0 downloads
Mini Mad
Posted 13 March 2021 - 08:48 AM
I’ve been looking for two low backed rear seats for ages. I’m going to cut these high backed seats down to suit unless I can do a swap with someone for the two high backed seats.
B61F2D4D-71D2-44D3-A52C-B9ACA085869A.jpeg 63.2K
0 downloads
2E29CBC9-CF4C-43EE-B226-8C6B91046D31.jpeg 72.57K
0 downloads
Moved Into The Garage

Posted 13 March 2021 - 05:31 PM
Nice score there mate.
I saw your tyres there on the previous page. What brand / type are those ? They look a sensibly aggressive tyre that I would think won't be too noisy.
Mini Mad
Posted 14 March 2021 - 09:53 PM
Chris I’m very pleased with my purchases.
The tyres are nothing special, Savero steel radials 185/70. My local tyre man found them for me. We tried a couple of rally tyres but they didn’t look right, too broad. These are slightly broader than I would like as I will have to modify my back bumper.
Mini Mad
Posted 14 March 2021 - 09:58 PM
If I turned the head rests upside down would this work with a hood frame?
545932D7-7643-4E52-BD76-20625787EC28.jpeg 63.16K
1 downloads
D769A792-A3F3-4FC7-A468-76E65E548E45.jpeg 59.64K
1 downloads
Mini Mad
Posted 14 March 2021 - 10:16 PM
Original wiring was a bit ropey. New loom purchased. Now to work out the connections.
049631AA-FAC2-4AFB-BDA1-381C0E6A5C50.jpeg 36.98K
0 downloads
9D4E27CA-DAAB-4D89-A7FE-F42CDDFC820D.jpeg 57.8K
0 downloads
Edited by Martin108, 14 March 2021 - 10:17 PM.
Moved Into The Garage
Posted 14 March 2021 - 11:23 PM
Cheers for the heads up on the Tyres. We don't have anything like them here that I know of. Pickings in 13's are very slim these days.
If I turned the head rests upside down would this work with a hood frame?
Mini Mad
Posted 15 March 2021 - 11:04 PM
The tyres look great but I’m going to have to extend the bumper to allow them to slot into position.
B12883AE-6396-458B-9AAA-D027A64DE42B.jpeg 43.2K
0 downloads
5BE7FF77-5324-4ACA-90EF-9F0E07564B3A.jpeg 46.63K
0 downloads
Mini Mad
Posted 17 March 2021 - 09:17 PM
Fitting the petrol tank. The neck is a bit one sided when viewed without the cap. The opening is huge. I’m planning to fit a perforated tube to catch any bits before they get into the petrol tank. The bracket on the side of the tank has to be fixed through the side pod. I don’t really want to drill into the pod so I’ll try to come up with an alternative fixing method, any suggestions are welcome. The view of all the clean suspension components from below is very satisfying.
65F85983-909E-42CB-9A83-1B9D32A686BB.jpeg 50.57K
0 downloads
0B384526-1093-473E-9CC7-187A08F39FC6.jpeg 26.78K
0 downloads
A64882CE-DEE9-4E9D-8BC8-424D2D79BC62.jpeg 37.73K
0 downloads
85796744-2662-444B-8AD0-650FF38872CD.jpeg 42.91K
0 downloads
71186145-34FE-41D8-9A43-95DD0B032F7F.jpeg 32.08K
0 downloads
69B707DF-AE31-4F01-AB9B-7B15C60FA0D0.jpeg 44.09K
0 downloads
Mini Mad
Posted 22 March 2021 - 06:34 AM
Making a start on the electrics. Trying to identify everything.
37D43605-7D46-452F-BC3C-377FAB0930AB.jpeg 49.12K
0 downloads
Moved Into The Garage
Posted 23 March 2021 - 07:32 PM
The Rear Subframe looks very neat there mate. You clearly seemed to have gotten the Trailing Arms all together.
In regards to the Perforated Tube you are considering for the Fuel Tank Filler, originally they did have a lift out fabricated tube about 6" long. They had 3 ears on top to stop it falling right in, these sat on the landing just inside the Neck. The Fabricated Tube (Rolled 0.8 mm sheet) was only open at the bottom and had a brass mesh soldered to it. It was a sort of strainer, but it's main function was to prevent fuel slosh under the Cap. They were very effective, but most people didn't know what they were for and so threw them away. Then they complained about the smell of petrol,,,,,
I think I have one handy, I'll snap off some pics later.
Personally, I tend to find the loom somewhat an easy job for the most part. It can be a test of patience threading it down through the firewall and the couple of openings in the side pannier, the grommet holes are only just big enough. I don't understand why, but the 4 holes these section goes through, all seem different sizes. I think most of the looms come without Grommets too. I've found these days, there is a lot of 'plastic' grommets available and frankly, I find them awful, just about impossible to fit in to the smaller holes and quite hard on the wiring. I'm not sure of the situation in the UK, but I've had to hunt high and low to find Rubber Grommets in the right sizes here, many I ended up getting from Autosparks.
I see too you have bought a new Speedo, it looks super. The originals though had a different rim on them (not sure how fussy you are wanting to be ?). They had a rounded front edge and were satin black. Also, check the TPM and set the Gearbox up to suit, though, I think you'd be well on to that. I don't know how the Imperial Speedos are supplied, but the Metric types only come in 1000 TPKm. At a guess, that would be around the 625 - 630 TPM ?
It's all looking really good Martin, you'd have to be pleased with how it's all fitting and also the fit issues you are no doubt finding and resolving now before it ends up in colour.
Speaking of which, have you decided on the most important part of the car - the colour ?
Moved Into The Garage
Posted 25 March 2021 - 06:34 AM
You're in luck Martin. Not only did I lay my hands right on the 'Strainer' but I remembered to snap off some pics and post them !


Mini Mad
Posted 30 March 2021 - 09:06 PM
The Rear Subframe looks very neat there mate. You clearly seemed to have gotten the Trailing Arms all together.
In regards to the Perforated Tube you are considering for the Fuel Tank Filler, originally they did have a lift out fabricated tube about 6" long. They had 3 ears on top to stop it falling right in, these sat on the landing just inside the Neck. The Fabricated Tube (Rolled 0.8 mm sheet) was only open at the bottom and had a brass mesh soldered to it. It was a sort of strainer, but it's main function was to prevent fuel slosh under the Cap. They were very effective, but most people didn't know what they were for and so threw them away. Then they complained about the smell of petrol,,,,,
I think I have one handy, I'll snap off some pics later.
Personally, I tend to find the loom somewhat an easy job for the most part. It can be a test of patience threading it down through the firewall and the couple of openings in the side pannier, the grommet holes are only just big enough. I don't understand why, but the 4 holes these section goes through, all seem different sizes. I think most of the looms come without Grommets too. I've found these days, there is a lot of 'plastic' grommets available and frankly, I find them awful, just about impossible to fit in to the smaller holes and quite hard on the wiring. I'm not sure of the situation in the UK, but I've had to hunt high and low to find Rubber Grommets in the right sizes here, many I ended up getting from Autosparks.
I see too you have bought a new Speedo, it looks super. The originals though had a different rim on them (not sure how fussy you are wanting to be ?). They had a rounded front edge and were satin black. Also, check the TPM and set the Gearbox up to suit, though, I think you'd be well on to that. I don't know how the Imperial Speedos are supplied, but the Metric types only come in 1000 TPKm. At a guess, that would be around the 625 - 630 TPM ?
It's all looking really good Martin, you'd have to be pleased with how it's all fitting and also the fit issues you are no doubt finding and resolving now before it ends up in colour.
Speaking of which, have you decided on the most important part of the car - the colour ?
Chris thanks for the strainer pictures. I’ll try to get one knocked up. I’ve been lying low for a few days, had my COVID jab and it knocked me for six.
I’m very pleased with the rear subframe, it turned out really well. I’m now turning my attention to the front one. Let’s see how that goes. It’s currently waiting to be powder coated.
The wiring loom is getting sorted, it’s taking a bit of effort but I’m getting there. As I keep saying a few labels or a wiring diagram from the manufacturer would have helped things. I suppose I’m spoiled in my world in that all equipment we buy comes with good wiring diagrams, no guess work in the air conditioning world. I have a few items I want to add to the loom and I’ve found a lad locally who builds looms for rally cars, he’s going to be a big help.
I picked the new dial on eBay, new old stock for very little money. It doesn’t have an oil light but I’ll sort something out as I want to fit a combined oil and water gauge. My old dial had a chrome (very rusted) ring on it so I replicated that as best as possible. I’m a long way from getting it set up. I’ve still a lot of items to fit and holes to drill before I paint it. Colour yet to be decided, it was going to be red to match my Mini and it still might be. I’m getting used to the colour of the primer. I’m starting to think about green. Something like an old Landrover, in keeping with the utilitarian feel of the Moke.
Mini Mad
Posted 30 March 2021 - 09:15 PM
Started on the next bit of refurbishment. Going to get everything vapour blasted and the rods recoated. As usual there’s always one screw that will not play ball. Broke the head off.
43E2D62D-1E0E-43F7-B03A-8A06D1F661D4.jpeg 62.92K
0 downloads
A4B2FC28-01B1-45B6-A9DB-343BDF564223.jpeg 65.22K
0 downloads
EB93F052-5AFA-42D8-957C-F271F793FC24.jpeg 65.82K
0 downloads
B031697B-7789-4F1F-957A-28DDDC0DAA72.jpeg 45.56K
0 downloads
A08CF52F-3655-4B19-956A-83737B7D3425.jpeg 61.35K
0 downloads
Mini Mad
Posted 30 March 2021 - 09:27 PM
Chris thanks for the strainer pictures. I’ll try to get one knocked up. I’ve been lying low for a few days, had my COVID jab and it knocked me for six.The Rear Subframe looks very neat there mate. You clearly seemed to have gotten the Trailing Arms all together.
In regards to the Perforated Tube you are considering for the Fuel Tank Filler, originally they did have a lift out fabricated tube about 6" long. They had 3 ears on top to stop it falling right in, these sat on the landing just inside the Neck. The Fabricated Tube (Rolled 0.8 mm sheet) was only open at the bottom and had a brass mesh soldered to it. It was a sort of strainer, but it's main function was to prevent fuel slosh under the Cap. They were very effective, but most people didn't know what they were for and so threw them away. Then they complained about the smell of petrol,,,,,
I think I have one handy, I'll snap off some pics later.
Personally, I tend to find the loom somewhat an easy job for the most part. It can be a test of patience threading it down through the firewall and the couple of openings in the side pannier, the grommet holes are only just big enough. I don't understand why, but the 4 holes these section goes through, all seem different sizes. I think most of the looms come without Grommets too. I've found these days, there is a lot of 'plastic' grommets available and frankly, I find them awful, just about impossible to fit in to the smaller holes and quite hard on the wiring. I'm not sure of the situation in the UK, but I've had to hunt high and low to find Rubber Grommets in the right sizes here, many I ended up getting from Autosparks.
I see too you have bought a new Speedo, it looks super. The originals though had a different rim on them (not sure how fussy you are wanting to be ?). They had a rounded front edge and were satin black. Also, check the TPM and set the Gearbox up to suit, though, I think you'd be well on to that. I don't know how the Imperial Speedos are supplied, but the Metric types only come in 1000 TPKm. At a guess, that would be around the 625 - 630 TPM ?
It's all looking really good Martin, you'd have to be pleased with how it's all fitting and also the fit issues you are no doubt finding and resolving now before it ends up in colour.
Speaking of which, have you decided on the most important part of the car - the colour ?
I’m very pleased with the rear subframe, it turned out really well. I’m now turning my attention to the front one. Let’s see how that goes. It’s currently waiting to be powder coated.
The wiring loom is getting sorted, it’s taking a bit of effort but I’m getting there. As I keep saying a few labels or a wiring diagram from the manufacturer would have helped things. I suppose I’m spoiled in my world in that all equipment we buy comes with good wiring diagrams, no guess work in the air conditioning world. I have a few items I want to add to the loom and I’ve found a lad locally who builds looms for rally cars, he’s going to be a big help.
I picked the new dial on eBay, new old stock for very little money. It doesn’t have an oil light but I’ll sort something out as I want to fit a combined oil and water gauge. My old dial had a chrome (very rusted) ring on it so I replicated that as best as possible. I’m a long way from getting it set up. I’ve still a lot of items to fit and holes to drill before I paint it. Colour yet to be decided, it was going to be red to match my Mini and it still might be. I’m getting used to the colour of the primer. I’m starting to think about green. Something like an old Landrover, in keeping with the utilitarian feel of the Moke.
I think the colour is Willow Green. Perhaps I should go right back to Oh Fudge it’s original colour. 🤮


0 members, 0 guests, 0 anonymous users


