Jump to content


Photo

A Panel Bubbling

rust repair

  • Please log in to reply
12 replies to this topic

#1 Jezzer

Jezzer

    Starting My Mini Up

  • Noobies
  • Pip
  • 3 posts
  • Location: St Ives, Cornwall

Posted 12 June 2023 - 08:17 AM

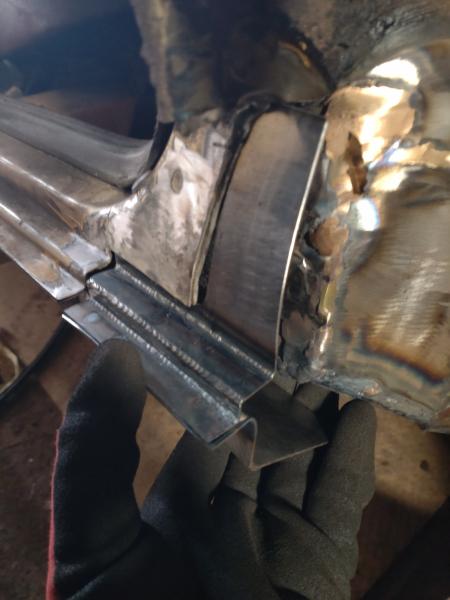
Hi, my 1992 Rover Mini Cooper SPI is starting to bubble at the bottom of the A panel (driver side) as per pics. What's the best course of action please so I can get a welder/bodyshop on the case (I don't have DIY skills)? I had the scuttle repaired last year which involved fresh paint on the scuttle/wings and have a horrible feeling I'm going to have to get the wings painted again as part of the A panel work. Is it likely (from the pics) the inner wing has gone too? I'm just trying to gauge how far I should go in terms of repair or replace. I plan to keep the car for several more years so am looking for a reasonably durable repair, though not at any price! Any tips/advice hugely welcome! Thank you. 

Attached Files


#2 Vanman20

Vanman20

    Mini Mad

  • Members
  • PipPipPipPip
  • 264 posts
  • Location: Stoke on trent

Posted 12 June 2023 - 08:48 AM

That hasn't just started bubbling it's just you've only just noticed it.
That's rust and it will need a new a-panel welding in and painting

#3 stuart bowes

stuart bowes

    Camshaft & Stage Two Head

  • TMF+ Member
  • PipPipPipPipPipPipPipPip
  • 1,587 posts
  • Location: Dagenham

Posted 12 June 2023 - 01:18 PM

probably quicker and easier to replace panel than it is to patch up and properly flush in a repair and then still have to paint a section anyway


also if there's rust starting to show there I can pretty much garuntee you take the A panel off and it'll be grot all the way up that pillar which you'll want to clean and protect properly


Edited by stuart bowes, 12 June 2023 - 01:21 PM.


#4 mbolt998

mbolt998

    Mini Mad

  • Members
  • PipPipPipPip
  • 273 posts
  • Location: East Anglia

Posted 12 June 2023 - 02:16 PM

Mine were both like that. The A-panel was the tip of the iceberg. I had to rebuild a section of the floor, sill, and inner wing as well as finally the A-panel. Both sides had gone, although one was quite a bit worse than the other. Very little rust anywhere else on my car.


It will be hard to tell how extensive the problems are until you take a wire brush to what you see there and see what's underneath. But I doubt it's just the A-panel because I think it starts inside the wing where mud collects and keeps it damp. By the time it's got through to the A-panel it's already eaten through quite a bit of metal.


weld.jpg


#5 mab01uk

mab01uk

    Moved Into The Garage

  • Members
  • PipPipPipPipPipPipPipPipPipPipPip
  • 11,804 posts
  • Local Club: Mini Cooper Register

Posted 12 June 2023 - 02:34 PM

Where the A-panels rear seam is folded over the inside door pillar flange is spot welded all the way up vertically. When water from the inner wheel arch penetrates the seam, rust forms on the inside of the folded over flange and the first you usually notice is the rear edge of the A-panel bulging out between the spot welds as the rust expands behind.....by the time the rust breaks right through the only solution is new A-panels. However as already said the rust may have spread to the door pillar and other panels behind....all will become clear only after digging deeper for repairs.


To prevent the same happening again make sure your new panels are protected with Waxoyl or similar especially the welded seams after painting.


Edited by mab01uk, 12 June 2023 - 02:41 PM.


#6 mbolt998

mbolt998

    Mini Mad

  • Members
  • PipPipPipPip
  • 273 posts
  • Location: East Anglia

Posted 12 June 2023 - 04:17 PM


To prevent the same happening again make sure your new panels are protected with Waxoyl or similar especially the welded seams after painting.

I also put a layer of fibreglass over the new metal in the wheelarch to act as a kind of "liner" (like modern cars often have).


#7 sonscar

sonscar

    Up Into Fourth

  • Members
  • PipPipPipPipPipPipPipPipPip
  • 2,726 posts
  • Location: crowle
  • Local Club: none

Posted 12 June 2023 - 06:57 PM

I would have a good look in the wheel arch and hinge pillar.If not terrible I would replace the rusty part with a butt welded patch and paint with rattle cans.I can do bodywork myself so a weekend would see it right.Beware as I am often looked upon as a bodger.There is a place for wholesale replacement of panels and this may not be one of them.Just my experience running elderly cars.Steve..

#8 sonikk4

sonikk4

    Twisted Paint Polisher!!!

  • Admin
  • PipPipPipPipPipPipPipPipPipPipPip
  • 15,900 posts
  • Name: Neil
  • Location: Oxfordshire

Posted 12 June 2023 - 08:55 PM

The return on the A post will be crusty and i have no doubt the rest of it may be starting to go, so on that note i would personally remove and replace the A panel. Repair any damaged sections of the A post return.


It looks like gloss Black paint so may be able to get away with using a professional rattle can of paint, (they have a better fan pattern and lay on a lot nicer) cut back and jobs a good un.


Buy a Heritage A panel, make sure its stripped back to bare metal, apply epoxy primer and a decent coat of topcoat and this applies to the A post return and wing to A panel return. The three spot welds or plug welds (that all that nomally attaches them to the A post) in those areas, remove the paint and primer and spray or brush on some zinc rich weld through primer. The same applies to the A panel to wing return as well. On the wing to A panel return i normally plug weld every inch or so. Dont forget the small angle bracket that attaches the wing lip to the A panel lip. Pug or spot weld on.


Once its altogther, touch up any damaged paint on the under of the wing to A panel and also A panel to A post. On the underside of the A panel, i seam seal the A panel to flitch area and also the underside of the wing to A panel return. Then you can apply a waxoyl based product of your choice or stonechip or whatever floats your boat.


Now this part may be a tad controversial but at the top of the A panel where it sits against the top of the A post, i seam weld this and then carefully contour it to blend in. You can just leave it as is and seam seal or just paint and leave it.


#9 mbolt998

mbolt998

    Mini Mad

  • Members
  • PipPipPipPip
  • 273 posts
  • Location: East Anglia

Posted 12 June 2023 - 09:12 PM

I just replaced the lower part of the A panel with sheet metal-- not a repair panel. It's a very simple shape. I made the lip on the bottom just by cutting another strip of metal the right width and welding it on with an outside-corner joint (off the car).


#10 Vanman20

Vanman20

    Mini Mad

  • Members
  • PipPipPipPip
  • 264 posts
  • Location: Stoke on trent

Posted 13 June 2023 - 06:17 AM

I used to work in a motor factors that sold panels in the 1980's.
A-panels were one of the most popular items,at about £3 a pop ☺️

#11 Jezzer

Jezzer

    Starting My Mini Up

  • Noobies
  • Pip
  • 3 posts
  • Location: St Ives, Cornwall

Posted 13 June 2023 - 08:03 AM

Thanks everyone, really appreciate your comments, and I've much to think about! I'll have a good chat with a couple of local body-shops about the various options suggested.


#12 bpirie1000

bpirie1000

    Up Into Fourth

  • TMF+ Member
  • PipPipPipPipPipPipPipPipPip
  • 2,119 posts
  • Location: Aberdeenshire
  • Local Club: Amoc

Posted 14 June 2023 - 07:01 AM

Just make sure you find a mini friendly body shop. Some would be tempted to skim fill that...

Only masks your issue and delays grasping the actual problem..

#13 bpirie1000

bpirie1000

    Up Into Fourth

  • TMF+ Member
  • PipPipPipPipPipPipPipPipPip
  • 2,119 posts
  • Location: Aberdeenshire
  • Local Club: Amoc

Posted 19 June 2023 - 08:47 AM

May be worth speaking to local classic car folks.

Edited by bpirie1000, 19 June 2023 - 08:49 AM.


Also tagged with one or more of these keywords: rust repair

0 user(s) are reading this topic

0 members, 0 guests, 0 anonymous users