20231030_103017.jpg
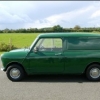
Hi, just thought you might like to see the end result.
Restored Binnacle and Eyeball Vents. Dash trim kit from Optimise Automotive.
Upper dash rail and A pillars trimmed with Leatherette
Chrome upper dash vents and ashtray form Mini-Spares
Tim
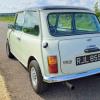
That looks great. I love the look of the original dash. Nice touch with the covered top dash rail too. You say in your original post the car's a '71. Is that a typo or have you fitted later switchgear?
Hi, the car is a 1971 Morris Mini 1000.
However in 1999 a lady commissioned a Mini Builder to build her a Mini. They used the '71, a Metro 1275 engine and a new Heritage shell. They weren't too fussy about originality.
I bought it 3 years ago, shell was near perfect but car was in a tired state. I set about restoring it to as period look as possible.
I would focus on returning to Mk3 but give a little leeway for 60's/70's parts.
Horrid wheel arches came off and chrome trim replaced after paint work.
Full suspension rebuild, all adjustable. 10" Wheels and Cooper S disks.
The dash project shown here ...
Return to Mk2 rear lights
Replace the MINI1000 badge on the boot
100's of hours on detail
Gloss black roof (mk3 option)
And that 1275 is now at Oselli having a full rebuild to 1310 Stage 2 with a torquey road cam.
Your right about the switchgear. Now you have pointed it out, another job on the list :)
Tim
ps we both seem to be in Bedfordshire ...


 20231019_204928.jpg 56.59K
2 downloads
20231019_204928.jpg 56.59K
2 downloads