Jump to content


Photo
- - - - -

1987 Mini City


  • Please log in to reply
46 replies to this topic

#31 Hexxeh

Hexxeh

    Stage One Kit Fitted

  • TMF+ Member
  • PipPipPip
  • 73 posts
  • Location: North West

Posted 03 July 2024 - 09:35 AM

It may tell you the Tpm on the dial at the very bottom of the face almost hidden behind the isn't it shroud.Steve..


Had a look, doesn't appear to be there unfortunately. I've ordered the combo required for the "post '84" since the car is a 1986, hopefully it's right. Fitted them over the weekend with all new gaskets/seals, but obviously can't really test it until the cars on the road. I realised I don't appear to be able to fit the MED crankshaft pulley with the lower engine bracket in place, so I've left that off and just supported the gearbox on some wooden blocks until I'm ready to fit that.


Keeping the progress going, the cars now got all the front suspension refitted and it's back on the ground. It's running Minispares EVO cones and hi-los, finding it's sitting very high and slightly uneven even with the hi-los set to the shortest length. Driver side is 10.5" sill lip to ground and the passenger side is 11.125". I've rolled it back and forth and bounced each corner to try to settle it a bit but that's all it's gone to so far. Is the unevenness a concern? I've checked the cones are seated in the subframe and the hilo, and the hilo is seated into the knuckle joint, it all looks okay. Not completely finished obviously in the photo, just grabbed a shot from ones I took along the way before going round and torquing things up.


7DAMgQY.jpeg


Also decided I will fit the 12G295 head, so I took off the existing head to check what type of pistons it has and measure the piston to deck distance, then dropped it off at the machine shop for a good clean up and a slight skim.


1i5MbFf.jpeg


I measured 16 thou PTD, so with flat top pistons I make that as needing 24.1cc in the head to achieve 9.75 CR. I didn't have a burette so I've asked the machine shop to measure it and let me know so we can work out how much to take off. It had been skimmed for a standard 998 before when I fitted it to the old car but when I measured it with verniers it'd only had about 30 thou taken off so I don't imagine it was anywhere near that. I've read somewhere that very very roughly 15 thou == 1cc, so that'd put it at about 26.3cc and 9.1CR.


#32 Hexxeh

Hexxeh

    Stage One Kit Fitted

  • TMF+ Member
  • PipPipPip
  • 73 posts
  • Location: North West

Posted 09 July 2024 - 01:11 PM

Fitted a new MED duplex vernier timing chain kit, timed the cam in at 104 degrees per advice I've read from ACDodd on various posts. Replaced timing backplate and cover with a billet ally part from RetroSport/DSN. Crank damper is the management version from MED also. I'll be running a dizzy for now, but I figured for the extra cost and hassle of changing it later I might as well fit a toothed version. The timing cover has the mounts for a sensor so it'd be a pretty easy retrofit should I decide to.


Also had the lower engine bracket/rad mount blasted and powder coated, and fresh engine mounts both sides. Wok end was a bit of a pain to do but not too bad.


HUPsPMr.jpeg


Next job is probably fit the last bits for the brakes, I've had braided hoses made up for everything because a lot of it is custom - need to fit those up and fit the front calipers. Struggling to find 5x10" wheels that'll fit over the 7.9" brakes...


Anyone know what thread the screws that hold the large square plate the wiring loom passes through to the bulkhead are? I can't find it on the usual suppliers catalogues.


#33 Hexxeh

Hexxeh

    Stage One Kit Fitted

  • TMF+ Member
  • PipPipPip
  • 73 posts
  • Location: North West

Posted 19 August 2024 - 02:06 PM

Lots more progress, though struggling a bit with poor parts that either aren't fit for purpose. Was torquing up the lower arm pin nut with the wheels on the ground and it sheared off. Went through 3 replacements that were all welded together wonky before I gave up and bought some reconditioned ones. Noticed when removing the aftermarket ones I'd bought didn't even have the dip to clear the driveshafts in the correct place...


Had a rough time with the machine shop too, the measurements they gave me when measuring the head capacity were completely implausible (they said it was 28.cc, but I know it'd been skimmed previously and the chambers haven't been ground out and still have their cast finish). I ended up having to make a bit of a guess. Bought a burette later myself and measured it at 24cc, giving me 9.78 CR so I'm pretty damn close to where I wanted to be. Noticed the chap who built the head up for me last had used one valve spring retainer different to the rest, so had to buy a new set of those which it turns out are quite difficult to find for these early type large groove valves... all sorted now anyway.


Fitted with a Victor Reinz gasket using Loctite 3020 per Calver's recommendation:


rM1rYwL.jpeg


Had some new braided lines made up to fit from the master cylinders along the front subframe, connecting up the adjustable brake limiter valve on it's stainless bracket:


aZbjLMB.jpeg


Clutch one I realised later is a bit too long so a shorter one is on the way.


Billet oil filter housing and braided transfer pipe for a bit of bling:


OxN501O.jpeg


Here's where I'm currently up to with the radiator/piping fitted:


ztkT8xz.jpeg


I'm fitting a HIF38 but I've realised the throttle lever isn't the correct one so I'm trying to source that. I also ordered a stainless alternator fitting kit from Smiffy's Bits but struggling to remember how it all goes together, it comes as a big ol' mixed bag of washers and bolts...


#34 Hexxeh

Hexxeh

    Stage One Kit Fitted

  • TMF+ Member
  • PipPipPip
  • 73 posts
  • Location: North West

Posted 07 October 2024 - 11:42 AM

Forgot to update the thread for a couple months in my rush to get moving on this.


Thought I'd take the bitumen up off the floor while the interior was empty, pretty horrible job with the heatgun and scraper and then white spirit on a rag but it came up okay:


J54FSA1.jpeg


Cleaned it up with a wire brush where needed, spot primed where I'd gone to metal and then gave it a brush coat of 2k:


Ma0fWyi.jpeg


Pretty happy with how it came out to say it's going to be covered by carpet. I forgot to take pictures of this, but the front windscreen came out so I could swap the top dash rail over for one in slightly better nick. Cracked the old screen getting it out so I was pretty nervous about the new one going in, fortunately it went in without too much drama.


The original loom had been bodged a bit and I happened to find a nice tidied up cloth wrapped loom on Facebook for cheap, it'd been fitted to a car since it was done and a couple connectors had been damaged during removal so I repaired that and fitted it. Looks pretty neat with the stainless p-clips holding it along the inner wing:


PWxRTq4.jpeg


Front lights refitted with stainless rings and the older style indicators with the metal retaining rings. Using LEDs for everything but the indicators.


u1pdyIW.jpeg


Stripped down the wiper mechanism, cleaned and re-greased it, fitted with new black arms. They still sag a bit towards the bottom of the screen and are generally a bit crap, so possibly more work to do there.


I originally had 1/2 hoses running from the lower rad hose and inlet manifold through the bulkhead and some 1/2" to 5/8" joiners inside the cabin. It kept kinking the hoses and generally looking a bit rubbish. So here's my solution:


XvDqQ3m.jpeg


These bulkhead fittings secure to the bulkhead plate and give me a nice 90 degree angle inside to run the heater hoses:


CskVwAn.jpeg


The heater box could use a clean up and the fan is a bit noisy, but that's a job for over winter. I really wanted to get it through it's MOT before the weather turned...


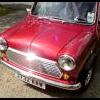
Took it in for it's test a couple weeks ago and though I had a couple dramas getting there I had to keep pulling over and tweaking the carb, but happily it passed with flying colours!


qswD4kc.jpeg


I've only driven it for about 30 minutes, but I've got a list of niggles to sort:


- Next morning after parking it up I noticed a dribble of coolant from the top hose. I'd had problems getting the rad end of the bottom hose not to leak resulting in a rad remove/refit 30 mins before the MOT. I've looked at this since and the bottom hose is seemingly murder for not sealing if it's even slightly off being squarely fitted. I ended up fitting the bottom hose off the car with the open ends all blocked up and pressure testing it and adjusting the position until it sealed ok. It's a brand new rad, hose and genuine stainless jubilee clip so I've no idea why this has proved such a faff. When I refitted it the water pump end leaked - the breather canister puts pressure on it and pushes it off square. Removed the breather to refit the hose square and tighten it before refitting the canister (but that involved taking the inlet manifold off, took a whole day to sort this all told...).

- The idle is too high, like 1200rpm and sticks. I've looked since and think the throttle cable was a bit too tight so I've adjusted that, yet to pull it out and try it again.

- I messed up with the speedo. I thought I had the post 84 smiths 90mph clocks and so fitted 6/16 speedo drives. It ended up underreading by about 10%. Turns out I have the "Smiths early tri clock" and the gears already fitted were the correct ones... the gear behind the engine mount is a pain to get to so I really wasn't happy about doing this again. I've got this refitted but now struggling to get the speedo cable to click into the clocks again...

- There's a rattle/rubbing noise driving me insane, sounds like it's coming from the back of the car. I thought it might be the plastic trim fitted around the roof line so I've removed that, but also might be the rear seat back rubbing against the parcel shelf. Need to road test again to figure this out.

- Driver side front wheel is rubbing the arch, even raised up an extra inch and the tie bar lengthened. Hoping this gets a little better when I switch to 10s and gain a bit of clearance, but not sure if changes in offset will, um, offset that.


#35 lsto

lsto

    Super Mini Mad

  • Members
  • PipPipPipPipPipPip
  • 606 posts
  • Location: Essex

Posted 11 October 2024 - 10:01 PM

Well done for getting it through the MOT. I had a random rumbling, rubbing noise from the rear when turning, it turned out the rear tyre very slightly rubbed the body when turning because the inner wheel arch was slightly bent at the bottom. I cured that with a dig with a hammer. If it makes you feel better my car has been on the road for over a year and between 55 and 65mph I have a random rattle behind the dash that I can't find for love nor money...

#36 Hexxeh

Hexxeh

    Stage One Kit Fitted

  • TMF+ Member
  • PipPipPip
  • 73 posts
  • Location: North West

Posted 14 October 2024 - 09:27 AM

Well done for getting it through the MOT. I had a random rumbling, rubbing noise from the rear when turning, it turned out the rear tyre very slightly rubbed the body when turning because the inner wheel arch was slightly bent at the bottom. I cured that with a dig with a hammer. If it makes you feel better my car has been on the road for over a year and between 55 and 65mph I have a random rattle behind the dash that I can't find for love nor money...


Had read that from a couple folks so I checked the rear wheels for signs of any rubbing, seems all good.


Really struggled with the coolant leak. Found after I thought I'd sorted the rad end of the bottom hose, it was leaking by the water pump. Tried to refit it 5-6 times, still leaked. Took it off the car and noticed it was weeping out of the cords. It was brand new from Minispares which is surprising. Happened to be in Mini Sport buying wheels on Friday so bought a bottom hose from then as a last ditch option. That seemed to do the trick, fitted it up and all dry so far.


Mostly sorted the high idle, the throttle cable was too tight, loosening it off a bit and re-adjusting the idle let me get the idle lower than I could before and it returns to idle quite nicely now, I've set it about 900rpm since it sounds happiest there. Parked up at the shops for 15 minutes and got back in, started it without choke and it was idling at like 700rpm for 30 seconds or so until it slowly came up - is that normal? Haven't driven cars with a choke much before.


Swapped the speedo gears back, had a nightmare with that too, ended up messing up the ends on the two cables I had, couldn't get it seated at both ends. New cable finally sorted it and it's reading perfectly now (30mph on the clocks was 28.8mph on GPS giving me a little tolerance).


Rattling noise appears to be a combo of loose silver plastic trims on the companion bins and the rear seat rubbing the parcel shelf. I've ordered some felt tape to cover the edge of the parcel shelf to hopefully fix that, the silver trims just removed for now (I have the plastic bins to replace them but I need to cut the rear quarter cards to fit which I'm a bit nervous about doing!).


Was hoping fitting the 10" wheels would sort the rub given the diameter is 18mm less (calculated). Bought some 5x10 GB minilites on Friday with 165/70 tyres since Mini Sport told me they'd fit over the 7.9" brake kit. Went on Friday to pick them up, only to be told nobody was around to actually fit the tyres...


Ended up buying them anyway and trying to find somewhere to fit them, lots of places just couldn't do 10" wheels. Found a place finally that charged me £60 to fit them, but then I got home and found the stick on weights they'd used didn't clear the brakes. Ended up having to pay another £33 to get them rebalanced somewhere else that had knock on weights, and now they fit! I do wonder whether Mini Sport would have used stick ons too and I've had had the same issue. The clearance is literally like 3-4mm, very close...


lWi0D4J.jpeg


Gritters started going out last night in some areas nearby so I think this is probably it's last outing for the year. Been a rough few weeks frantically trying to get it out on the road so I think I'll be having a few weeks off it and then checking off some of the small jobs like finishing the interior and audio wiring over winter ready for spring.


#37 lsto

lsto

    Super Mini Mad

  • Members
  • PipPipPipPipPipPip
  • 606 posts
  • Location: Essex

Posted 14 October 2024 - 06:10 PM

The idling sounds about right. My car is always a bit fluffy for a few mins if I start it when it's hot. I just assumed it's the heat from the exhaust warming up the carb evaporating the fuel, then once it's running the fresh fuel cools the carb again. That's my theory anyway...
I love the look of 10's, the car looks awesome. Id love 10's but I'm running 8.4 disks so stuck with my 12's for now.

Also just an edit, if your going to plot it up for the winter then put some fuel stabiliser in it. The modern fuel will eat your carb otherwise and you'll have a headache next year.

Edited by lsto, 14 October 2024 - 06:13 PM.


#38 Hexxeh

Hexxeh

    Stage One Kit Fitted

  • TMF+ Member
  • PipPipPip
  • 73 posts
  • Location: North West

Posted 02 June 2025 - 04:46 PM

I forgot to put fuel stabiliser in it, so hopefully it's okay starting this year! I did leave the tank pretty empty so I could top it up with fresh fuel, and it had 99 octane in it.


Been doing a few more jobs through the winter:


- There was a bit of a leak on the rear panel/rear quarter seam in the boot - looks to just have been a slight gap in the seam sealer, re-applied but still need to repaint. Can't be bothered mixing up 2K just for that so waiting to do it at the same time as some other bits.

- Wired up a semi-hidden Bluetooth receiver + amp to drive the parcel shelf speakers - this is the little black box you can see tucked under the dash rail in the photo below. The enclosure is all 3D printed with carbon-fiber reinforced Polycarbonate.

- Fitted the front door cards (with the plastic membranes).

- Replaced the front and rear plates with pressed black+silver ones, both magnetically attached. The front uses a 2mm steel plate to attach to, so it doesn't get bent at the edges over time (and to give the magnets something solid to attach to).

- Took the steering column out again in preparation for fitting carpet, repainted it and replaced both bushes. Also replaced the ignition switch since the wiring had been bodged a bit on the old one.

- Fitted the carpet (everything glued in place except the front/rear carpets, which are held with velcro and their own weight).

- Replaced the heater with a MPI unit (bought this for £250 on eBay assured it was in great condition - despite having a new heater matrix one of the pipe stubs was perforated and the heater resistor was broken - fixed both...)

- Working on adding all the under-dash ducting - the main feed to the heater is in, I'm 3D printing some little angled adapters to neaten up the windscreen vent tubes.


8GTUTic.jpeg


TSBsN0U.jpeg


The heater resistor is a 3.9 ohm 5w part based on the suggestion at https://www.theminif...-2#entry3710818 - struggled to find a good reference for what this should actually be. In free air it gets pretty damn hot but then so would the original wire coil I imagine, so hoping in the airflow of the heater it's okay.


One thing I'm still not sure of is the carb needle, read a lot of folks saying you need to be wary of bore wash. It's going to go to a rolling road but I'd like to be able to run it a bit in the meantime to check everything's okay before it goes (and it's a ~45 minute drive to get there anyway).

I've fitted an ABD needle at the moment because that's what WinSU suggests, but I've seen an ABY suggested also for setups similar to mine.


As a reminder, I've got a 988cc with 12g295 head (CR 9.78), a HIF38, a maniflow exhaust manifold with RC40, minispares inlet and standard airbox with K&N filter.


Any suggestions on what would be a reasonable needle starting point to let me safely drive it around until I get it tuned properly?


Edited by Hexxeh, 02 June 2025 - 04:52 PM.


#39 timmy850

timmy850

    Up Into Fourth

  • Members
  • PipPipPipPipPipPipPipPipPip
  • 3,384 posts
  • Location: NSW, Australia
  • Local Club: MITG

Posted 03 June 2025 - 02:46 AM

The best way to get a good needle for running in is to measure the exhaust with an O2 sensor and adjust accordingly. An O2 sensor is much cheaper than a rebore and new pistons

#40 Hexxeh

Hexxeh

    Stage One Kit Fitted

  • TMF+ Member
  • PipPipPip
  • 73 posts
  • Location: North West

Posted 03 June 2025 - 08:54 AM

Yeah I thought about buying a wideband but given I can't modify the needle myself it'd only really help me confirm the idle mixture, with no guarantee the rest of the needle profile is anywhere near correct.


I figure there must be something that you can determine as a good starting point, since factory engines had to come with something consistent, I don't think they got hand-tuned before leaving the factory did they?


#41 timmy850

timmy850

    Up Into Fourth

  • Members
  • PipPipPipPipPipPipPipPipPip
  • 3,384 posts
  • Location: NSW, Australia
  • Local Club: MITG

Posted 03 June 2025 - 10:09 AM

Any needle that you install will need to be tuned at idle to get it running without bore washing

You don’t necessarily need to profile a needle, once you try the first one you can figure out if it needs to be richer or leaner and work from there.

The factory cars were all very similar and were “hot run and tuned” at the factory.

#42 PaulF

PaulF

    Mini Mad

  • TMF+ Member
  • PipPipPipPip
  • 160 posts
  • Local Club: HAMOC

Posted 04 June 2025 - 08:17 AM

Your engine spec is pretty much the same as mine and I used winsu to pick a needle. It suggested ABD and with the idle afr hovering around 13.3-13.8 it seems to run perfectly fine. I did try ABY but that was far too rich

#43 Hexxeh

Hexxeh

    Stage One Kit Fitted

  • TMF+ Member
  • PipPipPip
  • 73 posts
  • Location: North West

Posted 04 June 2025 - 08:54 AM

Your engine spec is pretty much the same as mine and I used winsu to pick a needle. It suggested ABD and with the idle afr hovering around 13.3-13.8 it seems to run perfectly fine. I did try ABY but that was far too rich


Ah, that's reassuring, thank you! What is your spec out of curiosity?


#44 PaulF

PaulF

    Mini Mad

  • TMF+ Member
  • PipPipPipPip
  • 160 posts
  • Local Club: HAMOC

Posted 04 June 2025 - 03:24 PM

Exactly the same as yours but my cylinder is a mini spares stage 3 but I imagine it's similar to a 12g285

#45 Hexxeh

Hexxeh

    Stage One Kit Fitted

  • TMF+ Member
  • PipPipPip
  • 73 posts
  • Location: North West

Posted 17 June 2025 - 07:18 PM

Noticed when I got the car out last week it took a very long time (a few minutes doing 10s bursts) to build oil pressure enough for the light to go out (I removed the plugs and turned it over on the starter). Tried it again today, and it was the same, even though it'd only been sat a week. Decided to buy a pressure gauge to see what's happening.

Once it's built pressure once, turning over on the starter I get about 55psi after maybe 7-8 seconds, once I stop it drops to zero pretty much immediately.

I popped out the oil pressure relief valve and it's free, not seized. Some slight scoring on the shuttle piece.

Does this mean my oil pump is goosed?

Edited by Hexxeh, 17 June 2025 - 07:44 PM.


1 user(s) are reading this topic

0 members, 1 guests, 0 anonymous users