Jump to content


Photo

Rover/mini Map Sensor Replacement/adaptation In The Control Unit Mne10086


  • Please log in to reply
9 replies to this topic

#1 Rui paulo santos

Rui paulo santos

    Starting My Mini Up

  • Noobies
  • Pip
  • 3 posts
  • Location: viseu

Posted 09 February 2025 - 08:49 PM

 
Hello everybody.
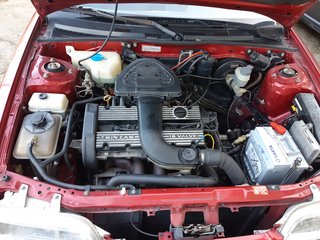
I don't have a mini but a 1992 Rover 214 GSI (SPI) with 87,000 km. It's the get-out-of-the-way car here at home and it's mostly abandoned because it's rarely needed, but it forced me to enter the world of electronic injection because of this fault.
Only now it started giving problems, a burst water pipe, engine flywheel sensor, and now this.
Sometimes it didn't work, or it worked very irregularly.
Through this forum I discovered that it was possible to access the control unit, so I made the respective cable and had to learn how it all worked.
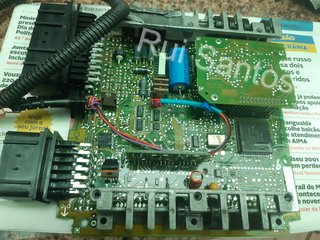
Result, failure in the map sensor located inside the control unit.
I searched everywhere and didn't find anyone who had replaced this sensor, they just replaced the control units with used ones, but I didn't want this because it would subject me to buying one that was even worse than the one I had.
So I decided to disassemble mine, remove the sensor and as I couldn't find an identical sensor or datasheet, I decided to try with what was available.
With a potentiometer I simulated this sensor (at idle) and the engine started again.
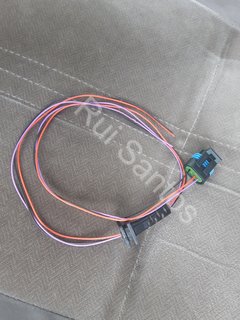
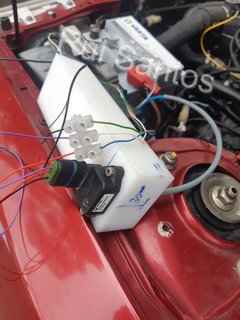
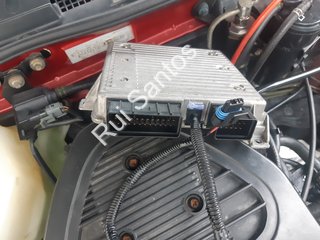
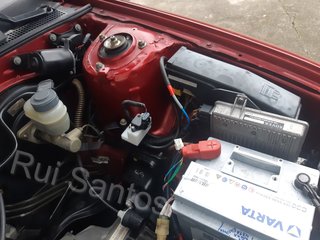
So I acquired the MHK100820 sensor from the Rover 25, created a nylon box for it and mounted it outside the control unit,(           created the respective plug (electrical cable) and soldered the wires to the control unit. (+5v, gnd, signal)
This sensor has one more temperature sensor pin that I didn't use.
I didn't know if it would work, I just knew that it was also a 5v and 0-100kpa sensor but the kpa vs voltage characteristic curve could be different from the original and work poorly.
After everything is connected, with the engine off, the control unit reads 87kpa, it should be around 100kpa (the sensor is good, as I tested it on a Rover 25 and it shows correct values), but as soon as the engine is started, it works very well and goes to 30 to 40kpa.
The lambda probe started working again and started working in a closed loop. Impeccable.
I just need a threaded connector to connect to the vacuum tube (it is temporarily with a tube and insulating tape)
I've only driven about 50 meters and it seems to work fine.
Sorry for the long text but I decided to waste this time, as I believe it can help a lot of people.
 
regards from Portugal
 
Here are the photos:
Unfortunately I received an indication that I do not have permission to post the images here...
 
Edit: This post took so long to be accepted that I ended up forgetting about it...
Now let me post the photos!
I hope this can help someone.


1.jpg

2.jpg

3.jpg

4.jpg

5.jpg

6.jpg

7.jpg


Edited by Rui paulo santos, 27 August 2025 - 06:53 AM.


#2 madazv8

madazv8

    Mini Mad

  • TMF+ Member
  • PipPipPipPip
  • 149 posts
  • Location: Sydney

Posted 10 February 2025 - 10:00 AM

Well done,  I thought this was possible also.  I was lucky to find an original sensor on e-bay.


https://www.theminif...sor-in-the-ecu/


#3 Designer

Designer

    One Carb Or Two?

  • TMF+ Member
  • PipPipPipPipPipPipPip
  • 733 posts
  • Location: Surrey
  • Local Club: LSMOC

Posted 10 February 2025 - 12:28 PM

Hi,


Well done on repairing your problem and thank you for posting your procedure on the forum.

If you reply to this comment you may be able to upload your pictures by clicking on the More Reply Options bottom right of the reply box.


Paddy


#4 brivinci

brivinci

    One Carb Or Two?

  • TMF+ Member
  • PipPipPipPipPipPipPip
  • 1,225 posts
  • Location: New Jersey

Posted 18 February 2025 - 09:33 PM

This is really interesting and could be quit helpful down the road. Not sure I ever knew what the MAP sensor looked like inside the ECU. Makes it even more interesting when you hear of people suggesting sticking cotton up there and putting on heater to dry up/clean. Seems a little far fetched to think any strand of material could 1: make it all the way up to the sensor, and 2: do anything in the way of cleaning it. 

Looking at this, is there any safe cleaner one can use to spray into the outlet pipe on the ECU to clean these? I know they make specific sprays for MAP sensors but are these different and would break if used?


#5 madazv8

madazv8

    Mini Mad

  • TMF+ Member
  • PipPipPipPip
  • 149 posts
  • Location: Sydney

Posted 22 February 2025 - 06:51 AM

This is really interesting and could be quit helpful down the road. Not sure I ever knew what the MAP sensor looked like inside the ECU. Makes it even more interesting when you hear of people suggesting sticking cotton up there and putting on heater to dry up/clean. Seems a little far fetched to think any strand of material could 1: make it all the way up to the sensor, and 2: do anything in the way of cleaning it. 

Looking at this, is there any safe cleaner one can use to spray into the outlet pipe on the ECU to clean these? I know they make specific sprays for MAP sensors but are these different and would break if used?

Would tend to agree after you look at the pics.  It would be helpful to remove any build-up in the inlet tube,  but not the sensor itself. From what I could tell it was just a MEMS type pressure sensor with a silicone membrane over the top.  Without trying I can't say,  but something which wont destroy silicone.... and then the heater trick to dry it out afterwards.


#6 hungdynasty

hungdynasty

    Mini Mad

  • Members
  • PipPipPipPip
  • 179 posts
  • Location: Hong Kong

Posted 22 February 2025 - 09:22 AM


This is really interesting and could be quit helpful down the road. Not sure I ever knew what the MAP sensor looked like inside the ECU. Makes it even more interesting when you hear of people suggesting sticking cotton up there and putting on heater to dry up/clean. Seems a little far fetched to think any strand of material could 1: make it all the way up to the sensor, and 2: do anything in the way of cleaning it.

Looking at this, is there any safe cleaner one can use to spray into the outlet pipe on the ECU to clean these? I know they make specific sprays for MAP sensors but are these different and would break if used?

Would tend to agree after you look at the pics. It would be helpful to remove any build-up in the inlet tube, but not the sensor itself. From what I could tell it was just a MEMS type pressure sensor with a silicone membrane over the top. Without trying I can't say, but something which wont destroy silicone.... and then the heater trick to dry it out afterwards.
Just wonder from your picture of the open sensor, is it possible to replace the silicon membrane to rebuild the sensor?

#7 madazv8

madazv8

    Mini Mad

  • TMF+ Member
  • PipPipPipPip
  • 149 posts
  • Location: Sydney

Posted 23 February 2025 - 07:59 AM


This is really interesting and could be quit helpful down the road. Not sure I ever knew what the MAP sensor looked like inside the ECU. Makes it even more interesting when you hear of people suggesting sticking cotton up there and putting on heater to dry up/clean. Seems a little far fetched to think any strand of material could 1: make it all the way up to the sensor, and 2: do anything in the way of cleaning it.

Looking at this, is there any safe cleaner one can use to spray into the outlet pipe on the ECU to clean these? I know they make specific sprays for MAP sensors but are these different and would break if used?

Would tend to agree after you look at the pics. It would be helpful to remove any build-up in the inlet tube, but not the sensor itself. From what I could tell it was just a MEMS type pressure sensor with a silicone membrane over the top. Without trying I can't say, but something which wont destroy silicone.... and then the heater trick to dry it out afterwards.
Just wonder from your picture of the open sensor, is it possible to replace the silicon membrane to rebuild the sensor?


I would imagine that would be hard.  Silicone elastomers come in a wide range of durometers when cured, so even if you could replicate the thickness you would not be guaranteed a good result.   I think the 3 wire solution with a suitable generic MAP sensor is the best - when the originals can't be bought any more.


#8 brivinci

brivinci

    One Carb Or Two?

  • TMF+ Member
  • PipPipPipPipPipPipPip
  • 1,225 posts
  • Location: New Jersey

Posted 25 February 2025 - 11:13 PM

Just need someone to list out which wire is which. Also, would there be any benefit to having the sensor closer to the manifold? Does it matter that its a bit of a distance away currently?


#9 Rui paulo santos

Rui paulo santos

    Starting My Mini Up

  • Noobies
  • Pip
  • 3 posts
  • Location: viseu

Posted 27 August 2025 - 06:59 AM

Well done,  I thought this was possible also.  I was lucky to find an original sensor on e-bay.


https://www.theminif...sor-in-the-ecu/


Hi, I saw your project.
I also searched on eBay, but I only found one, but with a different code. Since I couldn't find the datasheet for it, I didn't risk it because it might not work and it was very expensive.

Regards


#10 Rui paulo santos

Rui paulo santos

    Starting My Mini Up

  • Noobies
  • Pip
  • 3 posts
  • Location: viseu

Posted 27 August 2025 - 07:04 AM

This is really interesting and could be quit helpful down the road. Not sure I ever knew what the MAP sensor looked like inside the ECU. Makes it even more interesting when you hear of people suggesting sticking cotton up there and putting on heater to dry up/clean. Seems a little far fetched to think any strand of material could 1: make it all the way up to the sensor, and 2: do anything in the way of cleaning it. 

Looking at this, is there any safe cleaner one can use to spray into the outlet pipe on the ECU to clean these? I know they make specific sprays for MAP sensors but are these different and would break if used?

Hi, I don't know about this, as I'm not a mechanic, but my advice is to only "clean" it when the sensor is completely dead, as it won't do any harm.
 
Without being sure whether it will work or not, I wouldn't risk further damage.
 
I just injected WD40 in there, but it didn't solve anything.


0 user(s) are reading this topic

0 members, 0 guests, 0 anonymous users