sweet work man...

Rusty The Minus (aka Mr Hoskins)
Started by
Jammy
, Aug 28 2007 10:19 PM
697 replies to this topic
#61
: post #61")
CanadianMiniFan
-
- Members
-

- 1,591 posts
Camshaft & Stage Two Head
Posted 11 September 2007 - 11:44 PM
#62
paulrockliffe
-
- Members
-
- 1,763 posts
Camshaft & Stage Two Head
- Location: Durham
Posted 12 September 2007 - 09:07 PM
No update today.......... 
#63
biggav
-

- Members
-
- 5,830 posts
Crazy About Mini's
- Local Club: South Central
Posted 12 September 2007 - 09:09 PM
the "updates" actually all happened weeks ago and jammy has only had time to post them since getting back from germini... jammy doesn't work that quickly!!!!!!!!! 
#64
mini93
-

- Members
-
- 8,615 posts
He's just too casual!
- Location: Warwick
- Local Club: Medievil minis of Warwickshire
Posted 12 September 2007 - 09:24 PM
jammy doesn't work that quickly!!!!!!!!!
thats not what she said!! ooooh!....fiiiine well someone was going to say it
#65
Jammy
-
- Members
-
- 25,397 posts
Moved Into The Garage
Posted 13 September 2007 - 08:14 AM
Raz will testify to counter that!jammy doesn't work that quickly!!!!!!!!!
thats not what she said!! ooooh!....fiiiine well someone was going to say it

And Biggav is pretty much right!
 All the work, pretty much is what happened between me recieving the car on the 28th of July and trying to get it ready for the start of BH2N, 29th August! However, since I've been back I have:
Changed the rear Hi-los for genuines
Wired in the headlights
Fitted the KAD engine steady
Wired in and fitted the fog light
Wired in and fitted the bootlid light
Wired in and fitted the side repeaters, and then wired up the front indicators
Removed the bushes from the front r/j tie-bars, and changed the track rod ends for longer items
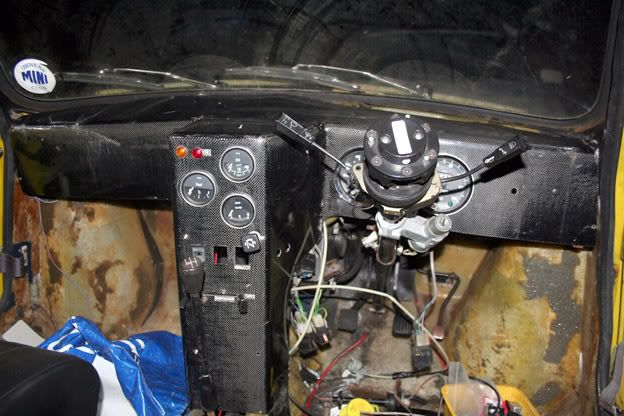
Temporarily but the Curley CF dash in place (Alburglars old one)
Fitted the door
List of things still to do for MOT:
- Wire up the dash and bolt in place
- Fit arches
- Set up the front suspension
- Fit bonnet, bonnet pins and buckles
- Fit seat and harness
#66
THE STIG
-

- Members
-
- 2,506 posts
Da stig says, GO GO GO
Posted 13 September 2007 - 02:53 PM
Never mind, I made arrangements to go to Germini with The Stig in his supercharged mini. This then involved bleeding his clutch at Maidstone services (25 miles from Brands Hatch), then re-arranging his breather system about a dozen times through France, Belguim and Germany - the engine was breathing heavy, pressurising the oil system and chucking oil ALL OVER the engine bay. At one point we seemed to have fixed it when we go stuck in traffic going by Liege, causing the clutch to go again. We bunny-hopped across the lanes, and by now we were working well as a team to get the clutch bled very quickly! The next day at the campsite saw The Stig change the headgasket, and then find cylinder 3 fill up with water very quickly, which was terminal for the engine really. Roll on the ADAC recovery truck, and the Mercedes A180 rental car!
The rest of the week was spent seeing The Stig thrash the A180 around the Ring, getting 10-11 minutes laps, and leaving vast chunks of the tyres at various scenic places around the track.
you make it sound like you did not have fun
its all part of the mini adventre

#67
mini93
-
- Members
-
- 8,615 posts
He's just too casual!
- Location: Warwick
- Local Club: Medievil minis of Warwickshire
Posted 13 September 2007 - 04:41 PM
good luck for the test tomorrow jammy, hope to see this at some mini shows then, is castle combe too far?
surly if its about finished u can get the paint done so we can see the plan lol
surly if its about finished u can get the paint done so we can see the plan lol
#68
Jammy
-
- Members
-
- 25,397 posts
Moved Into The Garage
Posted 14 September 2007 - 12:32 PM
Well it passed!! 
#69
The Matt
-

- Admin
-
- 17,232 posts
You don't escape that easily.....
- Name: Matt
- Location: Overton, North Wales
- Local Club: Welsh Border Minis
Posted 14 September 2007 - 12:37 PM
Well it passed!!
Good lad! You must be over the moon mate!
#70
Jammy
-
- Members
-
- 25,397 posts
Moved Into The Garage
Posted 14 September 2007 - 12:42 PM
Ha ha, only joking! You didn't think it would be that easy did you! 
You didn't think it would be that easy did you!
#71
CharlieBrown
-

- Members
-
- 6,587 posts
Crazy About Mini's
- Location: Chester
- Local Club: TMF
Posted 14 September 2007 - 01:00 PM
So it didn't pass?
We need to know!!!! Annoying man
We need to know!!!! Annoying man
#72
Jammy
-
- Members
-
- 25,397 posts
Moved Into The Garage
Posted 14 September 2007 - 01:02 PM
Well as I said above, this was the list of things I had to do to get it ready for an MOT:
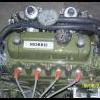
Next I started the engine up, so to remind me what it sounded like! The vacuum pipe had snapped in two, so I replaced this whilst the engine was warming up. It instantly sounded a lot smoother! Then I noticed a drip of murky brown water from the end of the heater tap! Upon giving the engine some revs it turned into a spurt, oh dear. It was also at this 'rev giving' time I noticed the engine steady was still allowing the engine to rock a fair bit! Right, so I removed the heater tap, something I was reluctant to do since I was sure one of the heater tap studs had screwed itself up last time I bolted it in, however on inspection it seemed ok. I replaced the heater tap with a spare, and also used a gasket this time! All bolted down and started up the engine again once the lost water had been replaced. Ten minutes went by with the new heater tap not showing any signs of crying again before the radiator decided to be sick all over my drive. Picked up the rachet I'd just put down. Took the thermostat off, was in the correct way up (I had wondered_, so I drilled some holes around the periphery of the 'stat and put it back in. Started it up, again, no problems with water leaks so far!
Moved on to the bonnet. Now I had envisaged using a Mk1 bonnet I'd got for free off Smudger, however I then found out why it was free. It looked like someone had layed it up right off a standard bonnet, rather than a mould, since it was about 2-3mm too wide! The reason for the free bonnet is because I was going to cut some holes in it for a later development I have planned, hence I didn't want to pay out for a bonnet I was going to cut up. However, I decided to go back to the bulgy Minus bonnet I got with the shell, and cut the lip off enabling me to fit it with my Mk1 grille. The grille I had since re-fitted with bolts instead of string! The bonnet fitted well, I redrilled holes for a second pair of bonnet pins at the back; the first pair being too small for the bonnet to clear the carb, and having rusted to the shell thus proving almost impossible to remove. Then it was a relatively simple job of drilling holes for the two bonnet straps at the front and jobs a guddun!
- Wire up the dash and bolt in place
- Fit arches
- Set up the front suspension
- Fit bonnet, bonnet pins and buckles
- Fit seat and harness
Next I started the engine up, so to remind me what it sounded like! The vacuum pipe had snapped in two, so I replaced this whilst the engine was warming up. It instantly sounded a lot smoother! Then I noticed a drip of murky brown water from the end of the heater tap! Upon giving the engine some revs it turned into a spurt, oh dear. It was also at this 'rev giving' time I noticed the engine steady was still allowing the engine to rock a fair bit! Right, so I removed the heater tap, something I was reluctant to do since I was sure one of the heater tap studs had screwed itself up last time I bolted it in, however on inspection it seemed ok. I replaced the heater tap with a spare, and also used a gasket this time!
All bolted down and started up the engine again once the lost water had been replaced. Ten minutes went by with the new heater tap not showing any signs of crying again before the radiator decided to be sick all over my drive. Picked up the rachet I'd just put down. Took the thermostat off, was in the correct way up (I had wondered_, so I drilled some holes around the periphery of the 'stat and put it back in. Started it up, again, no problems with water leaks so far!Moved on to the bonnet. Now I had envisaged using a Mk1 bonnet I'd got for free off Smudger, however I then found out why it was free. It looked like someone had layed it up right off a standard bonnet, rather than a mould, since it was about 2-3mm too wide! The reason for the free bonnet is because I was going to cut some holes in it for a later development I have planned, hence I didn't want to pay out for a bonnet I was going to cut up. However, I decided to go back to the bulgy Minus bonnet I got with the shell, and cut the lip off enabling me to fit it with my Mk1 grille. The grille I had since re-fitted with bolts instead of string!
The bonnet fitted well, I redrilled holes for a second pair of bonnet pins at the back; the first pair being too small for the bonnet to clear the carb, and having rusted to the shell thus proving almost impossible to remove. Then it was a relatively simple job of drilling holes for the two bonnet straps at the front and jobs a guddun!
~~~~~~~~~~~~EDIT~~~~~~~~~~~~
I mentioned the rocking engine! Well the reason it was rocking was because the two brackets that clamp the steady at the bulkhead are too close together for me to use both the spacers that KAD supply with the steady. Therefore I had used just one, and a bolt, that was 1-2mm smaller than the diameter of the rose joint, meaning the engine could rock on this 1-2mm. So, I managed to find a different bolt, that matched the diameter of the rose joint. I still haven't been able to use both spacers, but the steady is a lot more 'steady' now!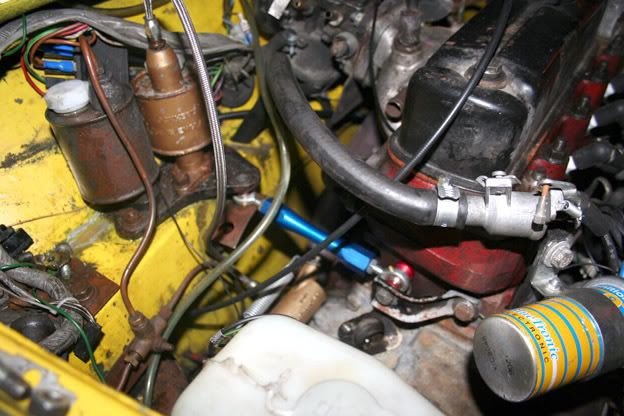
#73
The Matt
-
- Admin
-
- 17,232 posts
You don't escape that easily.....
- Name: Matt
- Location: Overton, North Wales
- Local Club: Welsh Border Minis
Posted 14 September 2007 - 01:03 PM
Ha ha, only joking!
Yeah, well, it would be for me anyway!

#74
Jammy
-
- Members
-
- 25,397 posts
Moved Into The Garage
Posted 14 September 2007 - 01:11 PM
That was last night, at about 9.30pm. So this left me with the seat to bolt in, arches to fit, mirrors to fit (something I'd forgot on my previous list), and front suspension to set up.
Next I decided to fit the lovely Fluke Motorsport carbon fibre seat complimented with a side order of Sparco harness. I'd already made up the brackets/subframes - basically a rectangular frame of 2.5mmx 25mm square tubing, that bolted to the seat rails (not side mounted). I just had to drill a few more holes to allow me to bolt through the floor; during which I broke my 8mm drill bit, then had to use the 7.5mm and then the broken 8mm to enlarge! Once positioned in the car I realised i'd made a bit of a spoonage with the rectangular frames! I wanted them to be about 5cm tall, but instead I had made the side peices of the frame 5cm, then welded the top and bottom pieces either side of this, so they are probably about 4-5cm taller than I had wanted them! :doh: However I may have time this weekend to chop them down. To be honest I'm not happy with bolted the harnesses and seats through the fibreglass, I'd much rather bolt to a roll cage, and that will be one of my priority jobs to do once I have the MOT!
That was it for last night, didn't get a pic of the seat sorry. Needless to say it looks a bit silly at the moment, on stilts, the top just touching the roof. This left me with the mirrors, arches and front suspension to do early this morning before the MOT. My plan was to awake at about 5.30am and be out on the drive for 6am, phone work about 8.15am and tell them I was going to be late in and then take it to MOT about mid-morning then drop into work.
Next I decided to fit the lovely Fluke Motorsport carbon fibre seat complimented with a side order of Sparco harness. I'd already made up the brackets/subframes - basically a rectangular frame of 2.5mmx 25mm square tubing, that bolted to the seat rails (not side mounted). I just had to drill a few more holes to allow me to bolt through the floor; during which I broke my 8mm drill bit, then had to use the 7.5mm and then the broken 8mm to enlarge! Once positioned in the car I realised i'd made a bit of a spoonage with the rectangular frames! I wanted them to be about 5cm tall, but instead I had made the side peices of the frame 5cm, then welded the top and bottom pieces either side of this, so they are probably about 4-5cm taller than I had wanted them! :doh: However I may have time this weekend to chop them down. To be honest I'm not happy with bolted the harnesses and seats through the fibreglass, I'd much rather bolt to a roll cage, and that will be one of my priority jobs to do once I have the MOT!
That was it for last night, didn't get a pic of the seat sorry. Needless to say it looks a bit silly at the moment, on stilts, the top just touching the roof.
This left me with the mirrors, arches and front suspension to do early this morning before the MOT. My plan was to awake at about 5.30am and be out on the drive for 6am, phone work about 8.15am and tell them I was going to be late in and then take it to MOT about mid-morning then drop into work.
#75
Jammy
-
- Members
-
- 25,397 posts
Moved Into The Garage
Posted 14 September 2007 - 01:21 PM
5.50 the alarm goes off. 6.30am I awake again. Eventually struggle out of bed about 6.45, still out on the drive by 7am! Start working on the front suspension. I bought the tracking 'guage' from Minispares a few weeks back, and had another chance to use it again this morning. Its basically a big G clamp. You set in place half way up the wheel at the front and measure the distance, then do the same for the rear of the wheel, using the two measurements you can then work out if you have toe-in or toe-out. To be honest I wouldn't recommend it, yes it tells you if you have toe-in or out, but you don't know which wheel you have to alter to get your desired geometry! For what garages charge to set up the tracking you might as well just let them do it on their fancy lazer stuff.
Anyway, I checked the front geometry using the spare 10x5 Wellers I bought from BRR, simply because they didn't have any tyres on them, so it meant taking measurements would be easier. Also found out that these 10x5s would have fitted over my 8.4" KADs with the 1" spacer I have on them. Then decided to check the camber with the Minispares camber/castor guage, which i would recommend! Was very easy to check the camber at least (haven't checked the castor yet). Found out I had about +3 degrees on the pass wheel at full droop and about +0.5 on the drivers side. Change it so now I have about 0 camber at normal ride height. Still about 1.5 away from what I want, but at least it won't nacker my tyres in the next few days!
8.45 arrives, decide to phone work to let them know whats happened to me. Can't remember the extension number for my supervisor so I put the phone down (it had a limp anyway, and it would have been cruel to let it live) and txt him instead - (we have each other numbers, as well as a very good relationship - sleep your way to the top, its the only way I can afford all this!). I tell him I'll be in work in about two hours.
Anyway, I checked the front geometry using the spare 10x5 Wellers I bought from BRR, simply because they didn't have any tyres on them, so it meant taking measurements would be easier. Also found out that these 10x5s would have fitted over my 8.4" KADs with the 1" spacer I have on them. Then decided to check the camber with the Minispares camber/castor guage, which i would recommend! Was very easy to check the camber at least (haven't checked the castor yet). Found out I had about +3 degrees on the pass wheel at full droop and about +0.5 on the drivers side. Change it so now I have about 0 camber at normal ride height. Still about 1.5 away from what I want, but at least it won't nacker my tyres in the next few days!
8.45 arrives, decide to phone work to let them know whats happened to me. Can't remember the extension number for my supervisor so I put the phone down (it had a limp anyway, and it would have been cruel to let it live) and txt him instead - (we have each other numbers, as well as a very good relationship - sleep your way to the top, its the only way I can afford all this!
). I tell him I'll be in work in about two hours.


0 user(s) are reading this topic
0 members, 0 guests, 0 anonymous users


