Jump to content


Photo

Interesting Idea


  • Please log in to reply
13 replies to this topic

#1 YellowPeril

YellowPeril

    Mini Mad

  • Noobies
  • PipPipPipPip
  • 104 posts
  • Local Club: National Mini Owners

Posted 27 February 2008 - 08:24 PM

Sorry about the topic title - just so that people would look at it and not dismiss as another rust problem!

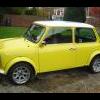
Have searched and got some ideas, but also some worries! Have just been round my car getting some pics identifying all the rusty parts.

The main ones are below the headlights on both sides, a bit on the drivers side door edge and rear (pics explain)

I am planning to remove surface rust (which i believe most of it is) with wire brush,
coat with jenolite (shop said better than kurust)
wash chemical rubbish left over off
spray with white primer (can)
spray with canary yellow (can)

this is first time i have done this, so not sure on the no. of coats and best way to blend in the colour - should i mask off the small rusty area, rub down, then spray, and after try and blend??

have heard that as the rust is in the panel seams, it will return soon as wont be able to stop it all - true? exaggerated?

regarding the pics with silver showing - that is the original colour so does it need rubbing down to bare metal and then spraying or can it just be keyed/roughed up?

further apologies for yet another rust topic!!

cheers

matt

Attached Files


#2 panelbeaterpeter

panelbeaterpeter

    Crazy About Mini's

  • Members
  • PipPipPipPipPipPipPipPipPipPip
  • 5,606 posts
  • Location: Scotland
  • Local Club: n/a

Posted 27 February 2008 - 09:11 PM

No need to apologise, it's what the forum is here for! Agreed jenolite is excellent stuff, but you should try and remove as much rust as possible prior to treatment. A wire brush isn't the best way really, bare metal the area, and if you've not got access to air tools the best way is 80 grit sandpaper, get it right into the seams as much as possible, and remove as much rust as you can. Treat whatever is remaining with Jenolite. After the 80 grit, flat the area with 180, then 240 then 500, and etch prime, then prime. Flat the primer with 800 wet&dry, trying to keep the abraded area as small as possible. clean up the paint around the area with G3, this is so you don't topcoat over dirty paint, which makes losing a blend more difficult. Scotch brite about 2 inches around the area, and mask off around it, making a flap edge with the tape, basically you fold quarter of the width of the tape against the sticky side of itself, and apply it around the area. This creates a softer edge to paint to, as the paint creeps under it so as not to create a hard line. Saying that, you shouldn't go up to the tape with the paint anyway, but if you do it makes it easier to make an unnoticeable blend. Apply colour to the area up to where you abraded with the 800 paper, and then lacquer to the edge of the scotched area. If you're using a solid colour which requires no lacquer, put the paint right to the edge of the scotched area. When it's dry, rub the edge of the lacquer slightly with G3, to smooth it out and blend it in with the existing paintwork. This is made easier if you have an electric buffer, it is possible by hand but not ideal.
Unfortunately once rust has started there is virtually no way of getting rid of it permanently, it'll come back soon, but how soon depends much on how well you repair it and whether it's kept outside, driven in the rain etc etc. The seams on the front panel are especially difficult to fix, as the rust starts right in the seam and creeps out, therefore by the time you can see it, it's well established.

Edited by panelbeaterpeter, 27 February 2008 - 09:14 PM.


#3 YellowPeril

YellowPeril

    Mini Mad

  • Noobies
  • PipPipPipPip
  • 104 posts
  • Local Club: National Mini Owners

Posted 27 February 2008 - 09:26 PM

cheers mate - very descriptive post eh! (just been reading your latest project, looks awesome)

have got air tools at work but wont fit the car through the door!!

will be using paper then - can i skip using the 180 as cant find any in the garage? also G3 is a type of polish is it?
and what is etch priming and is it necasery? - i have a can of white hi-build primer (CarPlan)

will try doing the small bit at the back first and see what happens on saturday before trying the front on sunday (and further into the week probably!!)

#4 YellowPeril

YellowPeril

    Mini Mad

  • Noobies
  • PipPipPipPip
  • 104 posts
  • Local Club: National Mini Owners

Posted 27 February 2008 - 09:28 PM

The seams on the front panel are especially difficult to fix, as the rust starts right in the seam and creeps out, therefore by the time you can see it, it's well established.


What i was worried about!!

#5 panelbeaterpeter

panelbeaterpeter

    Crazy About Mini's

  • Members
  • PipPipPipPipPipPipPipPipPipPip
  • 5,606 posts
  • Location: Scotland
  • Local Club: n/a

Posted 27 February 2008 - 09:40 PM

Yep you could skip the 180 so long as you completely remove the 80 grit scratches with the 240. Don't prime over any scratches, even if you do and it looks ok, it will sink in time and look dodgy. Etch primer is vital when painting over bare metal. It's an acid which chemically etches the surface, in other words it grips like a b*gger to bare metal, thus making further coats of material stick nicely and not peel or flake in the future. It also helps holding back rust.

#6 YellowPeril

YellowPeril

    Mini Mad

  • Noobies
  • PipPipPipPip
  • 104 posts
  • Local Club: National Mini Owners

Posted 27 February 2008 - 09:44 PM

sounds like a trip to town is needed before i start then! halfrauds should do i guess for the etch primer.

single coat of etch primer, primer and 2 coats of yellow? or more?

#7 panelbeaterpeter

panelbeaterpeter

    Crazy About Mini's

  • Members
  • PipPipPipPipPipPipPipPipPipPip
  • 5,606 posts
  • Location: Scotland
  • Local Club: n/a

Posted 27 February 2008 - 09:52 PM

Yeah Halfrauds do aerosol etch, but don't buy David's, it's cr@p. Apply one dusty coat, don't cover it entirely as you would normal primer. as for the yellow, apply as many coats as is required to cover. Yellow has poor covering power, sometimes it needs white ground coat, but if your primer is white that'll do fine.

#8 YellowPeril

YellowPeril

    Mini Mad

  • Noobies
  • PipPipPipPip
  • 104 posts
  • Local Club: National Mini Owners

Posted 27 February 2008 - 09:56 PM

brilliant!

cheers mate, you've been a great help - just had a feel of the can of paint, and think i might need another!! bad planning eh!

will have a try at the back this weekend and see what happens (at least the little scratch if time runs away as usual!)

#9 YellowPeril

YellowPeril

    Mini Mad

  • Noobies
  • PipPipPipPip
  • 104 posts
  • Local Club: National Mini Owners

Posted 05 April 2008 - 03:31 PM

sorry for bringing this old topic up again, but as i now have some time, i can sort out the mess i made earlier.

i've attached pictures of the rubbish job i did before -
basically, the i didnt realise the primer was so thick and sprayed on so heavy as i dripped and ran down so my masking off didnt work too well.
when i saw the runs, i quickly wiped the primer off, but this took off the yellow paint underneath!

i managed to rub it down nicely not to find too much rust, treated it as best i could.

you can see from the pic how rubbish it looks, and the join line looks even worse in the flesh.
can this be sorted out with g3 and a paintbrush or is it rub down again?

cheers

Edit:just seen how different the colour looks comparing my compact digital with my dslr (final pick with little powershot)

Attached Files


Edited by YellowPeril, 05 April 2008 - 03:33 PM.


#10 panelbeaterpeter

panelbeaterpeter

    Crazy About Mini's

  • Members
  • PipPipPipPipPipPipPipPipPipPip
  • 5,606 posts
  • Location: Scotland
  • Local Club: n/a

Posted 05 April 2008 - 05:28 PM

Crikes! you won't be able to sort that out with G3 I'm afraid. Are you going to try aerosols next time? you won't get a very good finish with a brush.

#11 YellowPeril

YellowPeril

    Mini Mad

  • Noobies
  • PipPipPipPip
  • 104 posts
  • Local Club: National Mini Owners

Posted 05 April 2008 - 05:32 PM

yeah, i looks rubbish doesnt it!

the primer was aerosol, it was so much thicker than the paint. ive used aerosol paint before doing grafitti art (legally!), but this primer was so thick. the nozzle was rubbish aswell so maybe i could find a new one hanging around.

was thinking just rubbing down edges and trying to feather it out.

are primers normally really thick? brand new can, shook for coupla mins

#12 panelbeaterpeter

panelbeaterpeter

    Crazy About Mini's

  • Members
  • PipPipPipPipPipPipPipPipPipPip
  • 5,606 posts
  • Location: Scotland
  • Local Club: n/a

Posted 05 April 2008 - 05:35 PM

If it's high build primer then it's normal for it to be thick. You could try sanding it down, but you're likely to go through to the primer around the edge, which would look "interesting". I'd flat it down with a bit of 800 wet, then re do it with aerosols.

#13 YellowPeril

YellowPeril

    Mini Mad

  • Noobies
  • PipPipPipPip
  • 104 posts
  • Local Club: National Mini Owners

Posted 05 April 2008 - 05:47 PM

great, cheers

i'll try that tomorrow if its not snowing!

and yes it is high build

#14 midridge2

midridge2

    Camshaft & Stage Two Head

  • Members
  • PipPipPipPipPipPipPipPip
  • 1,794 posts
  • Location: north east england

Posted 05 April 2008 - 05:48 PM

when i first started posting on mini forums, i use to tell people to use etch and to g3 the panel before touch ups and i got slammed all the time. no need for etch etc, never heard of cleaning the panel with g3 etc, use to tell me it was all *man danglies*. even using g3 for hand buffing, told it was no good etc.

nice to see people giving the same advice and for it to be accepted.


0 user(s) are reading this topic

0 members, 0 guests, 0 anonymous users