That picture of the crate could quite possibly be the coolest package I have ever seen!


Diesel Zcars Mini
Started by
CoenZ
, Dec 11 2012 03:28 PM
63 replies to this topic
#16

Alex_B
-

- TMF+ Member
-

- 4,573 posts
Doesn't put foot in mouth enough!
- Location: Eastbourne
Posted 13 December 2012 - 07:19 PM
#17
drayton min man
-
- Noobies
-
- 66 posts
Stage One Kit Fitted
Posted 13 December 2012 - 10:17 PM
Hi Coen,
Ed is quite wright, they are tapered bearings but are NOT like a conventional tapered bearing and DO require torquing up as the tolerance is pre calculated by the spacer that sits between the two races, the torque setting is 155lbs, or too the next split pin hole, there are two types of CV joints, some with one and the other with two holes the majority are one hole.
Also make sure the tapered washer that sits behind the nut is in good condition and that the gap does not close up prematurely before being fully tightened or else the castle nut torque will relax.

Hope this helps,
Geoff
Ed is quite wright, they are tapered bearings but are NOT like a conventional tapered bearing and DO require torquing up as the tolerance is pre calculated by the spacer that sits between the two races, the torque setting is 155lbs, or too the next split pin hole, there are two types of CV joints, some with one and the other with two holes the majority are one hole.
Also make sure the tapered washer that sits behind the nut is in good condition and that the gap does not close up prematurely before being fully tightened or else the castle nut torque will relax.
Hope this helps,
Geoff
Edited by drayton min man, 13 December 2012 - 10:20 PM.
#18
Birdman
-
- Members
-
- 400 posts
Speeding Along Now
- Location: Central Oregon
Posted 14 December 2012 - 03:13 AM
Looks like Santa came early. Happy Holidays.
#19
CoenZ
-
- Noobies
-
- 39 posts
On The Road
- Location: Netherlands
Posted 14 December 2012 - 07:35 AM
Spending Christmas under the car instead of under the tree...
Thanks Geoff, after you torqued it all up did is all still running freely?
Thanks Geoff, after you torqued it all up did is all still running freely?
#20
cptkirk
-
- Members
-
- 1,799 posts
Camshaft & Stage Two Head
- Location: West Sussex
- Local Club: B.M.C. + Chiminiclub
Posted 14 December 2012 - 08:17 AM
Plus diesel engines are more thermally efficient and thus run cooler which is good for a rear engined kit like your mini as it wont be such a pain keeping her cool.
Cooling is not a major issue if you install the piping correctly. If you dont plan to run a heater matrix then make sure all unnecessary piping is blocked off. I found that by feeding from the expansion tank to both sides of the thermostat I was able to get all of the air out of the system really quickly. You will also need to make a bleed point at the radiator, I literally tapped into the rad and have an M6 bolt in there (not the most elegant of solutions but it works).
#21
drayton min man
-
- Noobies
-
- 66 posts
Stage One Kit Fitted
Posted 14 December 2012 - 09:18 PM
Coen
When assembled the hub should turn freely with little resistance and certainly not rough, if you carefully remove the dust seals the bearings should fall out and the races should stay put the fore mentioned spacer sits between the two in the hub, keep the bearings and races as a matched pair and inspect for grit etc, when reassembling apply a quality bearing grease and before putting the rear seal in there should be a further spacer between the bearing and seal.
Remember, take your time building and ask as many question as you like, silly mistakes can be expensive!! dont be presured into rushing, its taken me seven years to finish mine and im in the trade!!

Geoff
When assembled the hub should turn freely with little resistance and certainly not rough, if you carefully remove the dust seals the bearings should fall out and the races should stay put the fore mentioned spacer sits between the two in the hub, keep the bearings and races as a matched pair and inspect for grit etc, when reassembling apply a quality bearing grease and before putting the rear seal in there should be a further spacer between the bearing and seal.
Remember, take your time building and ask as many question as you like, silly mistakes can be expensive!! dont be presured into rushing, its taken me seven years to finish mine and im in the trade!!
Geoff
#22
CoenZ
-
- Noobies
-
- 39 posts
On The Road
- Location: Netherlands
Posted 16 December 2012 - 03:44 PM
Little update, put the frame in yesterday... that was good fun...
 IMG_20121215_173330.jpg 86.81K
104 downloads
IMG_20121215_173330.jpg 86.81K
104 downloads
Just wondering, where did you guys put your battery?
IMG_20121215_173330.jpg 86.81K
104 downloadsJust wondering, where did you guys put your battery?
#23
brum,brum,mike
-

- Just Joined
-
- 554 posts
Super Mini Mad
- Location: Gloucestershire
Posted 16 December 2012 - 05:37 PM
Looking good,
I believe most people but their battery behind the passenger seat. I don't know the exhaust route for your engine, but the exhaust route of the vtec, and bike enine's allows you to put the battey here :)
Hope this helps...
I believe most people but their battery behind the passenger seat. I don't know the exhaust route for your engine, but the exhaust route of the vtec, and bike enine's allows you to put the battey here :)
Hope this helps...
#24
Mini Type R
-

- Noobies
-
- 107 posts
Mini Mad
Posted 17 December 2012 - 08:14 PM
I put mine under the passenger seat, i couldn't get the seat back far enough with the battery behind the seat, it also gave more space to attach the wiring to the bulkhead with the battery out of the way.
#25
mini-man-dan
-
- Traders
-
- 2,684 posts
Up Into Fourth
- Location: Bristol
- Local Club: J19 Mini Owners Club
Posted 17 December 2012 - 10:47 PM
Very cool. I have a Polo with this engine in, running 220bhp and 400+ Nm torque with a hybrid turbo etc but stock internals. Superb engine, pulls amazingly in the front wheel drive Polo (wheels spins in 1st, 2nd and 3rd - and sometime 4th if the weather is bad) so should be an absolute animal in a Mini.
#26
OfMini&Men
-

- Members
-
- 284 posts
Mini Mad
- Location: Kettering
Posted 18 December 2012 - 03:24 PM
Just seen this on facebook I had to take a double look! choose best engine for it can't wait to see it done
#27
joewf10
-

- Members
-
- 382 posts
Speeding Along Now
- Location: shropshire
- Local Club: on lookout
Posted 08 January 2013 - 07:35 PM
hello all,
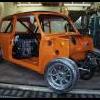
The kit arrived yesterday in a big crate from Z-Cars. Looks good and now it's time to start building.
After unpacking and checking stuff started work today on the brakes. First question coming up right away....
I have a Z-Cars big brake kit which assembles with the front hubs as one big assembly. After I tighten the castle-nut all of it gets really tight and it is very hard to spin the disk (even with the caliper off). Is this a problem with the bearings or does this just have to wear in?
Thx, Coen
Awsome!!
#28
CoenZ
-
- Noobies
-
- 39 posts
On The Road
- Location: Netherlands
Posted 11 January 2013 - 12:37 PM
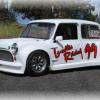
Little update after the holidays.
Body is now completed, bodykit fitted yesterday (http://www.stealthmini.com):
IMG_20130111_131707_1.jpg 131.51K
59 downloads
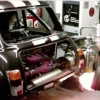
Also made a box in the bulkhead to fit the battery, thought is is best to add weight to the front:
IMG_20130111_131858_1.jpg 77.89K
34 downloads
Also figured out how the cabling will work... more will follow in due time...
Rgds, Coen
Body is now completed, bodykit fitted yesterday (http://www.stealthmini.com):
IMG_20130111_131707_1.jpg 131.51K
59 downloadsAlso made a box in the bulkhead to fit the battery, thought is is best to add weight to the front:
IMG_20130111_131858_1.jpg 77.89K
34 downloadsAlso figured out how the cabling will work... more will follow in due time...
Rgds, Coen
#29
ZCars Steve
-

- Traders
-
- 141 posts
Z Cars
- Location: East Yorkshire
Posted 11 January 2013 - 04:32 PM
Little update after the holidays.
Body is now completed, bodykit fitted yesterday (http://www.stealthmini.com):
Also made a box in the bulkhead to fit the battery, thought is is best to add weight to the front:
Also figured out how the cabling will work... more will follow in due time...
Rgds, Coen
be careful how far you go with fitting the bodykit before the wheel alignment those arches will need raising further than you think to achieve the ideal ride hight and driveshaft alignment
#30
Artful Dodger
-

- Members
-
- 4,435 posts
" I AM THE SPECIAL ONE"
- Local Club: aint no body got time fo dat
Posted 11 January 2013 - 05:37 PM
Aaaw body kit:(


0 user(s) are reading this topic
0 members, 0 guests, 0 anonymous users


