Chris we need updates pal! Excellent work so far!

73 fast road mini
Started by
Chris C
, Aug 09 2007 06:03 PM
305 replies to this topic
#272

BigRed8
-
- Noobies
-

- 28 posts
Passed Test
- Local Club: N/A
Posted 17 February 2013 - 08:57 PM
Chris's dad here again,
Have no fear this project is very much alive!
If you've read through this whole post you know that this project started the summer of 2007 when Chris was 16 years old. Over the past six years Chris (and I) learned a lot working on this project. If fact he now earns his living using many of the fabrication skills he first learned working on the Mini. The 16 year old kid that started this project is now a 22 year old young man living on his own with a full time job, girlfriend, other interests, you know.... a LIFE!
It became clear about a year ago that although the car was probably at least 80% done, there was no way that last 20% would ever get done without some serious help. Chris was just too busy and lived too far way to make any significant progress. On the other hand not finishing the car after all the blood, sweat, and tears that had been invested would be a crime.
Fortunately we live in Southern California where there is an auto restoration/modification shop on practically every block. The problem was finding one that 1) did quality work, 2) wasn't going to rob us, and 3) knew how to build something other than monster engined american muscle cars. After talking with a lot of shops we found one that met our needs.
So as of now the 73 fast road mini is in the hands of some very capable professionals. I hope to post some updated photos within a few weeks. Maybe even a video of it RUNNING!
Regards, John
#273
colinu
-
- Members
-
- 523 posts
Super Mini Mad
- Location: Santa Rosa, California USA
- Local Club: MOASF
Posted 17 February 2013 - 11:20 PM
John, Chris,
Greeting from NorCal :) This project is a real inspiration... I just wish my fabrication skills were as good. Where abouts in SoCal are you guys? One of these days (when my own 3-year project is finished) I must take a trip down south to meet up with the MOALA etc clubs.
Cheers,
Colin.
Greeting from NorCal :) This project is a real inspiration... I just wish my fabrication skills were as good. Where abouts in SoCal are you guys? One of these days (when my own 3-year project is finished) I must take a trip down south to meet up with the MOALA etc clubs.
Cheers,
Colin.
#274
BronkoMini
-

- Members
-
- 1,485 posts
One Carb Or Two?
- Location: Wiltshire
- Local Club: Mini Fixers
Posted 18 February 2013 - 09:32 PM
Just read it all great build would love to see a video of it running 
#275
MiniCooper
-
- Noobies
-
- 80 posts
Stage One Kit Fitted
- Location: Newcastle-Upon-Tyne
Posted 12 March 2013 - 02:42 PM
I must say, what a great thread to read through, looking forward in the coming weeks/months to see this project finished.
-Alex
-Alex
#276
zuluaga63
-

- Noobies
-
- 113 posts
Mini Mad
- Location: Florida / USA
Posted 16 March 2013 - 03:01 PM
I must say damn !
What a built .. You are a great welder by the way . I will use this thread when i do my swap .
Update !!
What a built .. You are a great welder by the way . I will use this thread when i do my swap .
Update !!
#277
dougie1142
-
- Members
-
- 500 posts
Super Mini Mad
- Location: Inverness/Elgin
- Local Club: I.M.O.G
Posted 13 June 2013 - 09:54 AM
Great work, a truly inspiring build thread. Now to decide whether to go B or D series.. Hmmmm
#278
DanParsons
-

- Noobies
-
- 135 posts
Mini Mad
Posted 13 June 2013 - 10:19 AM
Update before I go insane please?
#279
BigRed8
-
- Noobies
-
- 28 posts
Passed Test
- Local Club: N/A
Posted 09 July 2013 - 05:41 AM
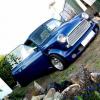
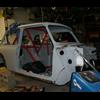
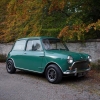
John here again. Sorry to be so slow with the updates. With the mini over at the custom shop I can't just walk out to the garage and snap some pics. However progress is being made, although slowly. There will be a major update forthcoming with the next few weeks. The big news is that all of the body work was completed and the painting is done! The body and interior are British Racing Green and the roof is white. The painters did a first class job and as soon as I can get over to the shop with my camera I'll post a bunch of photos - I promise! The other step that was completed prior to the painting was to fabricate extensions to to the roll cage to the top of each shock mount. This essentially creates a tube frame within the body and should significantly stiffen the chassis.
More coming....
#280
domdee
-

- Members
-
- 1,183 posts
Formally known as dominicdee
- Location: hull
- Local Club: hull clubs on FB
Posted 09 July 2013 - 06:13 AM
What a nice machine! gutted ive only just forund the thread!
Love the centre console and wiring and cross member and load of little trick bits you've done
Edited by domdee, 01 October 2013 - 02:14 PM.
#281
BigRed8
-
- Noobies
-
- 28 posts
Passed Test
- Local Club: N/A
Posted 17 July 2013 - 04:37 PM
Thanks for the complements. We've received a lot of positive feedback on the dash / center console. I'd like to claim credit for coming up with the design at the beginning, however in reality we kind of stumbled into it. It's a perfect example of how a project like this can grow on you: Chris is a tall guy at 6'6". This forced us use a fairly raked seat back to allow enough headroom and move the drivers seat rearward about 7 inches to allow enough leg room. Repositioning the seat required a whole new steering column with two universal joints d That was all fine and good except when we installed the seat and 5 point harness and test fit Chris we realized with a racing harness the driver couldn't move their body forward AT ALL... As a result none of the switches or buttons on the dash could be reached when the driver was buckled in. Now this is obvious to anyone who has ever driven a car with a racing harness, but neither Chris nor I had.
Sooo... the only thing to do was to move the dash and center console back closer to the seat. All in all it was probably a 4 month detour, but I think the end result was worth it.
John
Edited by BigRed8, 17 July 2013 - 08:54 PM.
#282
BigRed8
-
- Noobies
-
- 28 posts
Passed Test
- Local Club: N/A
Posted 17 July 2013 - 04:37 PM
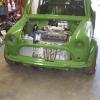
OK.... at long last I have some progress to report and some new photos as well. As I reported in my July 8th post the bodywork has been completed and the interior and exterior painting is done. For some undetermined reason the paint color looks somewhat lighter than the one we had chosen. We're going t
Edited by BigRed8, 20 July 2013 - 09:11 PM.
#283
MINI MAD RKH
-

- Noobies
-
- 308 posts
Speeding Along Now
- Location: Online
- Local Club: DCMOC
Posted 01 October 2013 - 01:03 PM
Stunning build & a great read but alas -
OK.... at long last I have some progress to report and some new photos as well. As I reported in my July 8th post the bodywork has been completed and the interior and exterior painting is done. For some undetermined reason the paint color looks somewhat lighter than the one we had chosen. We're going t
We're going to... what?? & you said you have some new photos? 
#284
BigRed8
-
- Noobies
-
- 28 posts
Passed Test
- Local Club: N/A
Posted 01 October 2013 - 07:30 PM
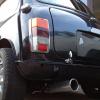
 Mini build log 1 - 01.jpg 56.25K
101 downloads
Mini build log 1 - 28.jpg 50.04K
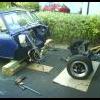
47 downloadsOK... a thousand apologies for my screwed up post and subsequent delays. The following shots are from last week. Painting is done and the final assembly has begun.
Mini build log 1 - 01.jpg 56.25K
101 downloads
Mini build log 1 - 28.jpg 50.04K
47 downloadsOK... a thousand apologies for my screwed up post and subsequent delays. The following shots are from last week. Painting is done and the final assembly has begun.
Fiirst a couple of overall shots. The doors, boot, and engine cover will be installed last to avoid damaging them while working on the interior, engine, etc.
Attached Files
-
Mini build log 1 - 29.jpg 35.69K
70 downloads
-
Mini build log 1 - 29.jpg 35.69K
29 downloads
-
Mini build log 1 - 31.jpg 28.32K
33 downloads
-
Mini build log 1 - 33.jpg 62.86K
46 downloads
-
Mini build log 1 - 34.jpg 50.78K
40 downloads
-
Mini build log 1 - 35.jpg 56.1K
28 downloads
-
Mini build log 1 - 21.jpg 59.96K
61 downloads
-
Mini build log 1 - 22.jpg 33.01K
33 downloads
-
Mini build log 1 - 23.jpg 30.44K
38 downloads
-
Mini build log 1 - 24.jpg 34.79K
47 downloads
-
Mini build log 1 - 25.jpg 36.15K
33 downloads
-
Mini build log 1 - 17.jpg 40.14K
38 downloads
-
Mini build log 1 - 13.jpg 42.81K
40 downloads
-
Mini build log 1 - 16.jpg 42.78K
43 downloads
-
Mini build log 1 - 14.jpg 29.28K
56 downloads
-
Mini build log 1 - 02.jpg 56.71K
103 downloads
-
Mini build log 1 - 03.jpg 58.2K
55 downloads
-
Mini build log 1 - 05.jpg 43.91K
55 downloads
-
Mini build log 1 - 27.jpg 53.51K
80 downloads
Edited by BigRed8, 02 October 2013 - 01:17 PM.
#285
BigRed8
-
- Noobies
-
- 28 posts
Passed Test
- Local Club: N/A
Posted 01 October 2013 - 10:10 PM
We decided to go with a "micro raised diamond pattern aluminum sheet metal rather than the plain flat plate. I fabricated the floor from the same material. An improvement don't you thinlk? guages and switches are as follows: Directly in front of the driver - Speedometer on left, tachometer on the right.
Center console un descending order - Oil pressure, oil temp, amp meter, fuel pressure, fuel level.
Turning the ignition key turns on the fuel pump but does not engage the starter motor. That will happen when you press the red start button in the center!
Attached Files
-
Mini build log 1 - 33.jpg 62.86K
52 downloads


0 user(s) are reading this topic
0 members, 0 guests, 0 anonymous users


