WHATS UP DAWWWG...
The model is looking good. Keep up the good work.

Little Less Conversation A Little More........
Started by
SukiDawg
, Sep 23 2008 11:10 PM
246 replies to this topic
#31

cptkirk
-
- Members
-

- 1,799 posts
Camshaft & Stage Two Head
- Location: West Sussex
- Local Club: B.M.C. + Chiminiclub
Posted 24 June 2009 - 10:05 AM
#32
sotiris
-

- Noobies
-
- 127 posts
Mini Mad
Posted 24 June 2009 - 12:52 PM
i saw the turbo.....lol
this will be tire eater.......................lollol
this will be tire eater.......................lollol
#33
captainjack15
-

- Banned
-
- 3,925 posts
Up Into Fourth
- Local Club: Somerset Rusteez
Posted 17 July 2009 - 10:37 AM
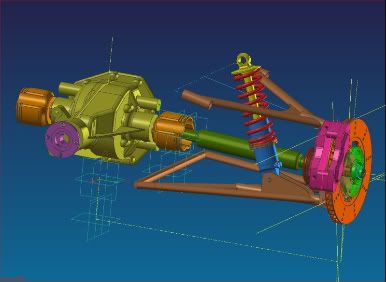
Those CAD drawings are amazing!!
What's the progress at the moment then??
What's the progress at the moment then??
#34
cosi
-

- Noobies
-
- 78 posts
Stage One Kit Fitted
Posted 19 July 2009 - 12:22 PM
WOW, wish I had those skills.
I like the fact that you seem not to mess with the original subframe yet.
by the way first thing I saw was the turbo LOL
awesome mate, cant wait to see more progress.
I like the fact that you seem not to mess with the original subframe yet.
by the way first thing I saw was the turbo LOL
awesome mate, cant wait to see more progress.
#35
SukiDawg
-
- Members
-
- 304 posts
Speeding Along Now
Posted 19 July 2009 - 01:27 PM
Hey, Thanks.
I've been quite busy with another job recently, but have spent a bit of time in the workshop.
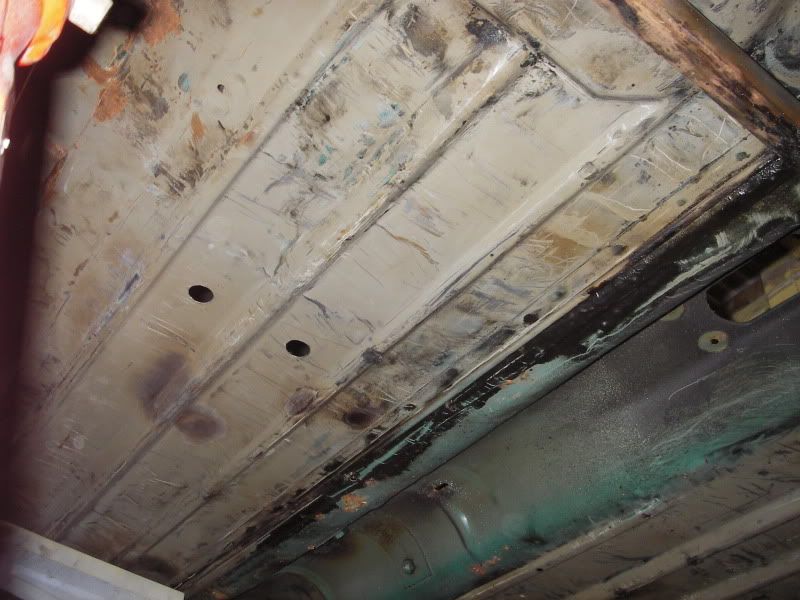
Finally got all the bitumen etc off the shell inside and out. Been all over the floor pan underneath with a wire cup brush too. I was originally going to clean the shell to bare metal, but actually its in pretty good shape, and the original electrostic primer resisted the brush pretty well so I'm going to leave it.
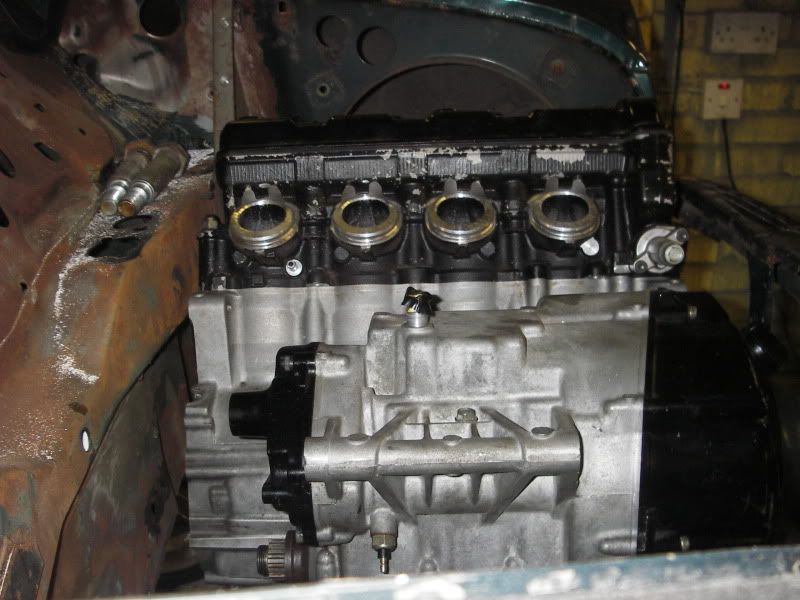
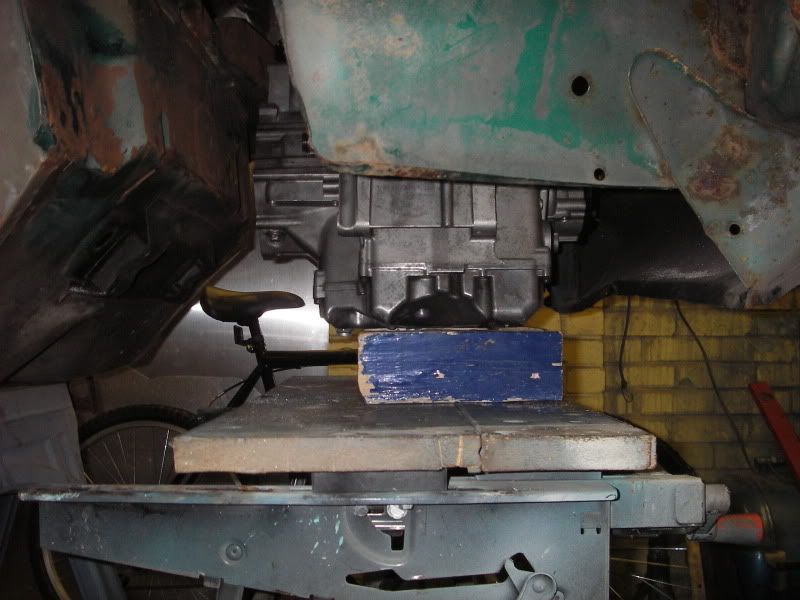
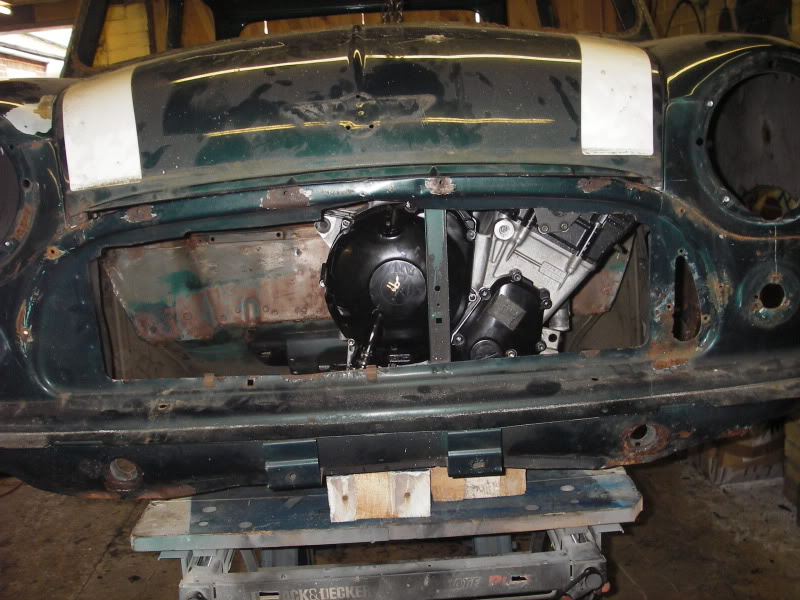
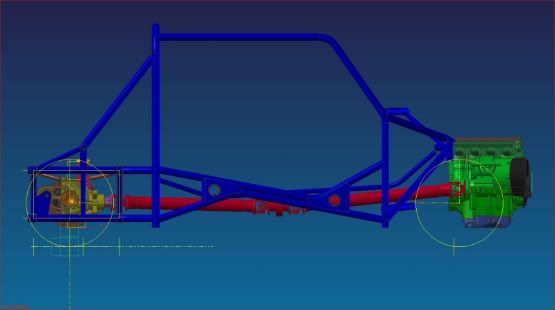
To help with the final engine positioning (I thought I was there but I'm not), I built up the engine without any internals and had another trial fit in the new shell. It does fit like a glove, although the rear mountings on the head might have to be long bolts through from the cabin. The generator will hit the bulkhead, so that will have to be cut between steering rack and the main subframe mounting beam - got to have a hole for the prop anyway.
As regards subframe, the rear exhaust port, and especially the rear exhaust stud on that port are very close to the front subframe tower. I intend on using coilovers on the front naturally, it may be that I remove the tower altogether (at which point it might as well be a fully new subframe altogether) or perhaps modify it to give clearance.
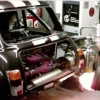
A few snaps, nothing too exciting...
Under side where we blowlamped all the crap off...
Engine mock up
I've been quite busy with another job recently, but have spent a bit of time in the workshop.
Finally got all the bitumen etc off the shell inside and out. Been all over the floor pan underneath with a wire cup brush too. I was originally going to clean the shell to bare metal, but actually its in pretty good shape, and the original electrostic primer resisted the brush pretty well so I'm going to leave it.
To help with the final engine positioning (I thought I was there but I'm not), I built up the engine without any internals and had another trial fit in the new shell. It does fit like a glove, although the rear mountings on the head might have to be long bolts through from the cabin. The generator will hit the bulkhead, so that will have to be cut between steering rack and the main subframe mounting beam - got to have a hole for the prop anyway.
As regards subframe, the rear exhaust port, and especially the rear exhaust stud on that port are very close to the front subframe tower. I intend on using coilovers on the front naturally, it may be that I remove the tower altogether (at which point it might as well be a fully new subframe altogether) or perhaps modify it to give clearance.
A few snaps, nothing too exciting...
Under side where we blowlamped all the crap off...
Engine mock up
Edited by SukiDawg, 19 July 2009 - 02:55 PM.
#36
sotiris
-
- Noobies
-
- 127 posts
Mini Mad
Posted 21 July 2009 - 06:25 PM
so the game start................
good luck.......
good luck.......
#37
SukiDawg
-
- Members
-
- 304 posts
Speeding Along Now
Posted 30 July 2009 - 10:49 PM
Been continuing with the back end....
#38
The_R1_Kid
-

- Noobies
-
- 11 posts
Learner Driver
- Location: Oregon, USA
Posted 19 August 2009 - 12:48 AM
Good work so far! I'll be following this one 
#39
captainjack15
-
- Banned
-
- 3,925 posts
Up Into Fourth
- Local Club: Somerset Rusteez
Posted 19 August 2009 - 10:19 PM
Still looking good mate 
Glad to see there is some progress, although very little jokes
jokes  More than me
Glad to see there is some progress, although very little
jokes More than me
#40
brightsparkz
-

- Noobies
-
- 70 posts
Stage One Kit Fitted
Posted 20 August 2009 - 08:35 PM
Hi, have you thought about using Haynes Roadster parts? go here:
http://www.3gecompon...i...116&site=63
you can use similar wishbones/uprights.
I am making a rwd mini too, but am using a sierra diff and making a swing arm rear suspension. I thought about wishbones but decided that it was too much work. Hopefully i will have the swing arms done this weekend.
I did start drawing things up on cad (Autodesk Inventor) but would have taken me years to get as far as you have. good job.
#41
ferrox_666
-

- Noobies
-
- 126 posts
Mini Mad
- Local Club: you tell me !
Posted 30 August 2009 - 11:54 AM
Sweet project, I start uni next month will be using these projects, cant wait.
Several years ago Skoda IIRC entered some rally cars all using induction under the wheel arch. And all of them died at the first puddle! major embarrassment!
Also wheelarches are low pressure areas hence air exits the radiator there.
Keep it up dude
Several years ago Skoda IIRC entered some rally cars all using induction under the wheel arch. And all of them died at the first puddle! major embarrassment!
Also wheelarches are low pressure areas hence air exits the radiator there.
Keep it up dude
#43
SukiDawg
-
- Members
-
- 304 posts
Speeding Along Now
Posted 22 September 2009 - 02:59 PM
hey,
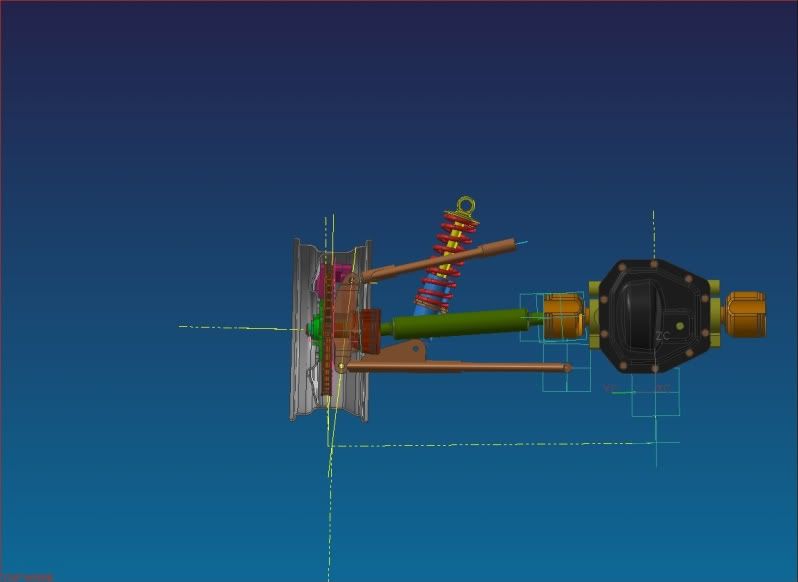
Still a little busy with other things, but I have worked out the diff mounting arrangement recently, and have altered the rear of the roll structure to accept the top suspension mounting (spring top). I've also removed stuff from the tunnel as it was overkill. Total cage weight is currently 77kg, according to the confuser. I've also been playing with the upright a little. I'll be using an Audi A4 quattro rear wheel bearing as it has a big enough ID to use with my shafts and is nice and compact.
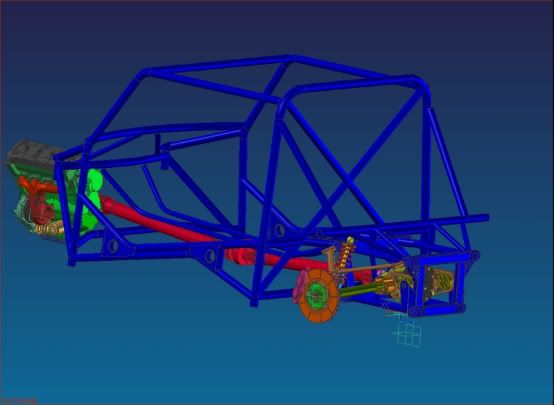
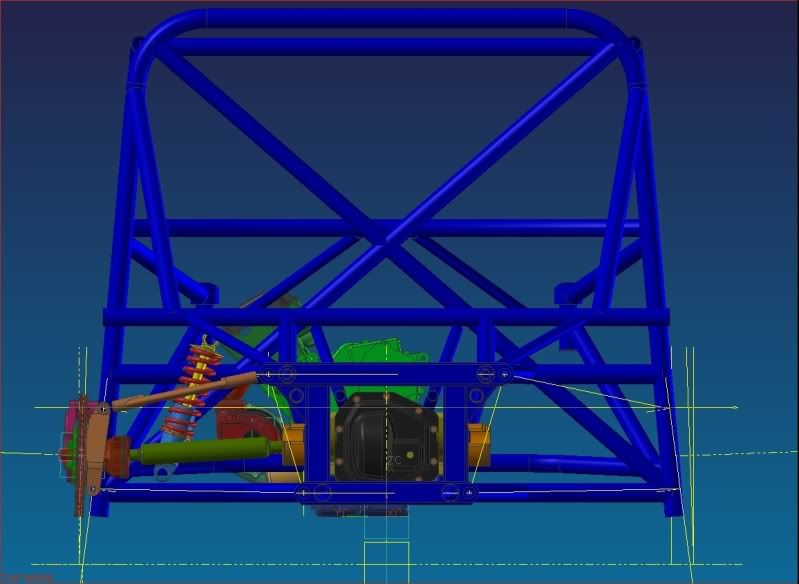
I could use someone else's parts (like the Haynes thing), but as the enjoyment comes from making it from raw materials it would defeat the object somewhat. Having total freedom with the geometry is also a nice side benefit. I am a little torn at the moment though, over the choice of full rose jointed suspension, or a mixture of spherical joints at the upright end and rubber on the chassis end. It affects my design quite a lot because of the design of the chassis pick ups. At present I am using box section across the rear, with a rose joint fitting into the end of the box (which is reinforced with a washer welded on etc). If I decide to use rubber this box will have to be significantly wider - and that makes it unpopular from a structural viewpoint. Hmmm - What experience do people have with rose jointed suspension running occasional road use?
Still a little busy with other things, but I have worked out the diff mounting arrangement recently, and have altered the rear of the roll structure to accept the top suspension mounting (spring top). I've also removed stuff from the tunnel as it was overkill. Total cage weight is currently 77kg, according to the confuser. I've also been playing with the upright a little. I'll be using an Audi A4 quattro rear wheel bearing as it has a big enough ID to use with my shafts and is nice and compact.
I could use someone else's parts (like the Haynes thing), but as the enjoyment comes from making it from raw materials it would defeat the object somewhat. Having total freedom with the geometry is also a nice side benefit. I am a little torn at the moment though, over the choice of full rose jointed suspension, or a mixture of spherical joints at the upright end and rubber on the chassis end. It affects my design quite a lot because of the design of the chassis pick ups. At present I am using box section across the rear, with a rose joint fitting into the end of the box (which is reinforced with a washer welded on etc). If I decide to use rubber this box will have to be significantly wider - and that makes it unpopular from a structural viewpoint. Hmmm - What experience do people have with rose jointed suspension running occasional road use?
#44
captainjack15
-
- Banned
-
- 3,925 posts
Up Into Fourth
- Local Club: Somerset Rusteez
Posted 22 September 2009 - 03:28 PM
Looking good Dawg 
Keep it up!!
Keep it up!!
#45
Sean12
-
- Noobies
-
- 124 posts
Mini Mad
Posted 22 September 2009 - 11:19 PM
Sukidawg, this is looking fantastic mate it is all looking brill, i have also subscribed.
i have just returned to Uni and i have been planning to do a BEC mini for a while now myself and tie it into my dissertation. I have luckily been able to aquire a free mini shell an a free honda fireblade engine (1998). i have yet been able to decide whether to make it FWD or RWD, i just cant make up my mind. i would love to do it RWD but i just cant ignore the fact that it is goin to cost more, but how much more ??? does anyone have any experience at this ? oh i must add i wont be buyin a kit such as zcars or promotive i will have to make it all myself. sorry got carried away there, what i started the reply to say was, the CAD work looks fantastic, i also do CAD as a job to an plan to begin a model soon, did you model the engine your self or download it from somewhere ? been tryin to find a scale model of a honda fireblade engine but cant find one anywhere ! have you heard about these 3d scanners ? was thinkin of poss trying to get this done on the shell of my mini to get a 3d model of the shell to begin the design, i also wanted to ask about the turbo plans as have been think about this myself. have you done much research on it yet an if so have you found many companys that turbo bike engines or were you planning on doing all the work youself ?
all the work you have done so far mate looks fantastic, cant wait to watch it progress, good work with the sand blasting to, looks awsome !!!


1 user(s) are reading this topic
0 members, 1 guests, 0 anonymous users


