Jump to content


Photo
- - - - -

Fern...


  • Please log in to reply
217 replies to this topic

#1 Brams96

Brams96

    Up Into Fourth

  • Members
  • PipPipPipPipPipPipPipPipPip
  • 2,308 posts
  • Local Club: Kentish Mini Club

Posted 09 August 2009 - 09:49 AM

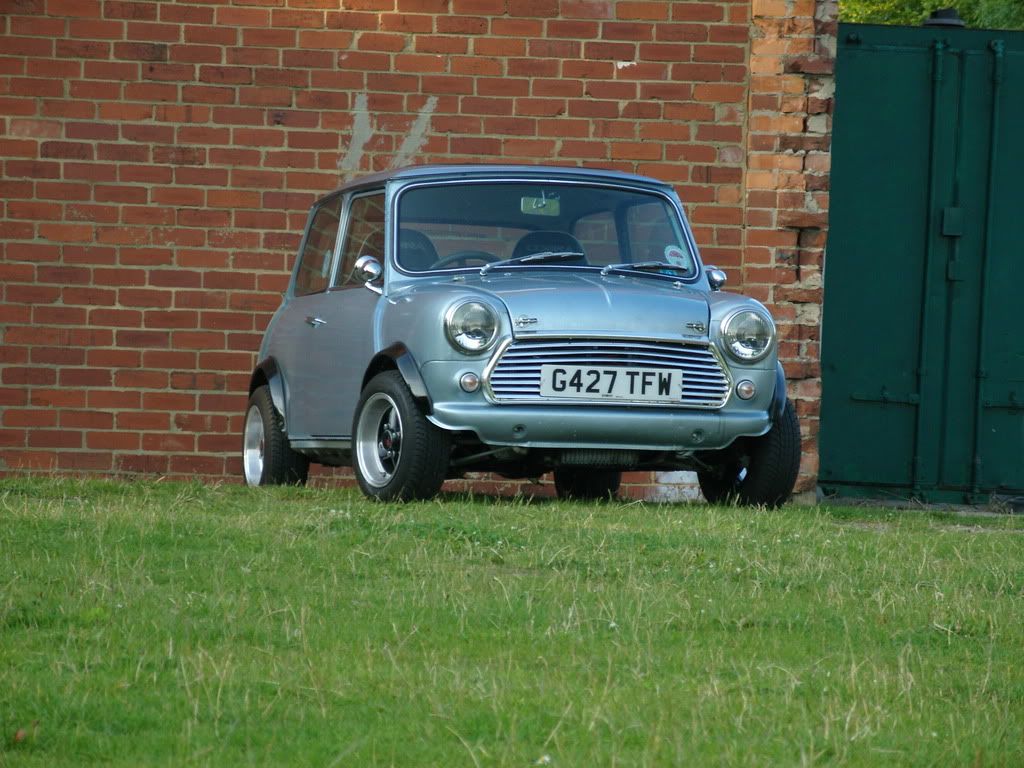
Here is our new baby.
This will be a rolling project that I will do mods to as we drive her around.
She is a standard 1991 998 Mayfair that has only had a little professional welding done not that long agoand is rust free.
I'm driving 2 hours to pick her up tonight and then back to the garage where she will live.

Plans are to:
- change the wheels to 12" 5 spoke revolutions
- fit stage 1 kit with stainless exhaust & K&N
- upgrade the suspension to a fully adjustable setup
- change the interior to something more appealing (probably black & silver trim)
- add some new shiny bits including grill
- add a new bespoke fibreglass dash
- tidy the engine bay up and polish/paint/upgrade most bits

and enjoy driving her!!

Attached Files


Edited by Brams96, 09 August 2009 - 09:51 AM.


#2 Brams96

Brams96

    Up Into Fourth

  • Members
  • PipPipPipPipPipPipPipPipPip
  • 2,308 posts
  • Local Club: Kentish Mini Club

Posted 18 August 2009 - 02:03 PM

Just been tarting up some of the ancillaries like master & slave cylinders. I've also changed the Upper support steady bushes to Poly ones and did a bit of a clean up in the engine bay. Just have to bleed the clutch system then on to sort out that damn carb...

#3 Mini-Mad-Craig

Mini-Mad-Craig

    Crazy About Metro's

  • Members
  • PipPipPipPipPipPipPipPipPipPip
  • 9,298 posts
  • Location: Travelling in a fried out Kombi

Posted 18 August 2009 - 02:49 PM

:dontgetit: :) Sounds cool! keep it coming.

#4 Brams96

Brams96

    Up Into Fourth

  • Members
  • PipPipPipPipPipPipPipPipPip
  • 2,308 posts
  • Local Club: Kentish Mini Club

Posted 22 August 2009 - 07:20 PM

Clutch bled and dash pot oil level checked. Just need to take her for a spin to check everything now.

#5 Brams96

Brams96

    Up Into Fourth

  • Members
  • PipPipPipPipPipPipPipPipPip
  • 2,308 posts
  • Local Club: Kentish Mini Club

Posted 30 August 2009 - 08:29 AM

Clutch working all good now but the car still waso't performing well under acceleration so I took it to my mechanic friend who fiddled with the mixture at the carb and made it a little richer. Things are sorted now. Only problem is the indicators have stopped working. Things done so far:

- Replaced the fuse box for a cleaned up one.
- Changed the rocker cover for a newly painted one & gasket.
- Put on the tread plate radiator bracket.
- Changed the air filter for a K&N version
- Put on Stainless seat extension brackets
- Put on the stainless arch covers
- Changed the hazard flasher unit to a variable load unit
- Cleaned up and painted some spare parts ready for swapping over

I've also got the donor car on blocks ready to take the wheels and rear subframe off so they can go and be sandblasted before painting them all shinny! I can then start stripping all the other bits off that I need.

Next in line are:

- Install new Stage 1 exhaust, manifold & flowed carb.
- Change over the wheel studs and spacers
- Put the freshly painted rims on (Revo 5 spoke, painted black with a silver border)
- Install the new wiring loom & fusebox & rewire things.

Busy, Busy!!

(Note to self: take some pics!!)

Edited by Brams96, 30 August 2009 - 08:31 AM.


#6 tuktuk

tuktuk

    One Carb Or Two?

  • Members
  • PipPipPipPipPipPipPip
  • 1,231 posts
  • Local Club: Tynemouth Mini Club

Posted 30 August 2009 - 09:23 AM

gawd that brings back memories of when i got my first mini home !

it ended up like this

Posted Image

good luck with the project :D love the colour by the way :)

#7 Brams96

Brams96

    Up Into Fourth

  • Members
  • PipPipPipPipPipPipPipPipPip
  • 2,308 posts
  • Local Club: Kentish Mini Club

Posted 30 August 2009 - 11:54 AM

Thanks Tuktuk. Thats kind of the look I'm going for but with same colour arches and I'll keep the bumber. I've got a few other little trick bits I want to modify and add but more on those as they happen :D

Edited by Brams96, 30 August 2009 - 11:55 AM.


#8 Brams96

Brams96

    Up Into Fourth

  • Members
  • PipPipPipPipPipPipPipPipPip
  • 2,308 posts
  • Local Club: Kentish Mini Club

Posted 01 September 2009 - 10:58 PM

Took a couple of pics today so thought I'd add them.

Attached Files


Edited by Brams96, 16 September 2009 - 08:02 PM.


#9 Brams96

Brams96

    Up Into Fourth

  • Members
  • PipPipPipPipPipPipPipPipPip
  • 2,308 posts
  • Local Club: Kentish Mini Club

Posted 01 September 2009 - 10:59 PM

Spot the best looking silver car ;D

Attached Files


#10 Brams96

Brams96

    Up Into Fourth

  • Members
  • PipPipPipPipPipPipPipPipPip
  • 2,308 posts
  • Local Club: Kentish Mini Club

Posted 04 September 2009 - 06:40 PM

Waahey, got the indicators going today. Dont ask me how but after removing and replacing things, testing and rechecking everything it seems to have worked. Yay we can go for a drive now!!

#11 Teapot

Teapot

    TMF Legend

  • Members
  • PipPipPipPipPipPipPipPipPipPip
  • 5,010 posts
  • Location: Seaton, East Devon

Posted 04 September 2009 - 10:09 PM

Good drive? >_<

#12 Brams96

Brams96

    Up Into Fourth

  • Members
  • PipPipPipPipPipPipPipPipPip
  • 2,308 posts
  • Local Club: Kentish Mini Club

Posted 16 September 2009 - 06:00 PM

Yes thanks. I still have the slight accelleration problem but I will change the dashpot oil soon and hopefully that will sort it. I think the accelerator pedal needs a bit of grease too as it is slightly sticky when you first depress it, will see what happens with that.

I added an internal bonnet release to Fern the other day so it will be a bit safer, it was a bit fiddly getting it through the bulkhead and the three grommets they supplied didn't seal around cable very well so I added a blob of sealant, should be a bit better. I also got the radio working!! It's only factory but at least I have some sounds.

Here are a couple of 'IDEA' pics I have for the future. One for the boot area with different lights and boot lid and the others for the subs to fit in the rear door bins (cardboard mock-up). With stripping out the old donor shell and house renovations these might take a while :thumbsup:

Attached Files


Edited by Brams96, 16 September 2009 - 07:57 PM.


#13 Brams96

Brams96

    Up Into Fourth

  • Members
  • PipPipPipPipPipPipPipPipPip
  • 2,308 posts
  • Local Club: Kentish Mini Club

Posted 06 October 2009 - 02:16 PM

So, I've started the prep-work for the new sounds install. First thing to take care of is the horrible tinny roof. As the roof lining wasn't there when I bought Fern it makes things a lot easier. I'm going to start putting a step by step guide on what I do so hopefully anyone else interested can see how I've done things and learn from my trial and error mistakes I may make along the way (hopefully none!).

1. I started off buying 4 x 2'x4' sheets of 3mm MDF and some spray-on contact adhesive.
2. Remove all the old adhesive from the roof. (after 3-4 hours and very sore fingers!). Cellulose thinners removes the thin stuff pretty well.
3. Test fit a sheet of corrugated cardboard to get the correct measurements and make sure the roof liner bars clear the wood (see pic 2)
4. Cut the MDF sheet to length (I went for 1000mm x 2')
5. The tricky bit next is to measure the supports you'll need, I did this by pushing the mdf up as tight as it could go and measuring the distance between the wood and the gap between the tunnel and the seat floor bar then subrtacting the thickness of the pads either end. This will depend on the thickness of pad you use, I had some old pallet wood laying around so used that. The pad on the roof should run the length of the mdf. I also put in a support in the middle on top of the tunnel. (SEE PICS)
6. Trial fit everything before you glue anything to make sure everything fits properly because once you've sprayed the glue there's no turning back. Mark the roof with a pencil/permanent marker at the edge nearest the middle of the car for a reference line when you come to glue it in.
7. Get everything ready to go by the car.
8. Wipe the whole roof down to make sure all traces of the old glue are gone (pic 1) . I used Cellulose thinners. (careful you dont rub too hard as the paint can be thin)
9. Key the side of the mdf you're going to spray with some sandpaper, removing all dust, and spray a layer of glue over the whole surface. Make sure the edges are sprayed well.
10. Wait 1-2 mins & spray a 2nd layer
11. CAREFULLY manouver the mdf inside the car and into position (it's quite tricky to not stick to anything when getting into position). Put the edge closest the interior light up first and stick it to the roof from that side to the other.
12. Put the supports in the passenger side first, then the middle and, after you get out of the car (critical or you'll be stuck!), put in the drivers side supports. Make sure there is enough pressure on the mdf to push it up into the arch of the roof (not too much to cause dents). I slid the bottom pads under each other as a kind of wedge to force it up more.
13. Depending on temperature, leave it to dry. I was actually on holiday for 4 days so I had no worries.
14. Once dry remove the supports and continue with the rest of the roof. :P

When I removed the supports the mdf was stuck fast with no movement. Even with 1/4 of the process done the difference in sound when you tap the roof is huge. Cant wait to have the whole thing done!

All thats left to do now is to measure and fit the rear piece and then laminate the second layer over top. For the second layer I'll be putting 1 piece over the middle then 2 smaller ones at either end. Then finally I can fit the roof liner and hey presto sound deadend roof that looks the same.

Attached Files


Edited by Brams96, 07 October 2009 - 05:26 AM.


#14 Brams96

Brams96

    Up Into Fourth

  • Members
  • PipPipPipPipPipPipPipPipPip
  • 2,308 posts
  • Local Club: Kentish Mini Club

Posted 06 October 2009 - 10:05 PM

I will add more pics of the finished product as I go. Bad weather is stopping me do any more at the moment as the garage is taken up with the donor shell and parts, Doh!

#15 Brams96

Brams96

    Up Into Fourth

  • Members
  • PipPipPipPipPipPipPipPipPip
  • 2,308 posts
  • Local Club: Kentish Mini Club

Posted 10 October 2009 - 05:28 PM

Finally had some good weather and managed to get out and do the rear bit of mdf on the roof. It was 20mm shorter than the front bit and a bit trickier to get in. I needed to use more supports as I think the roof is a different shape so the mdf didn't quite conform to the roof the same. Anyway the process was still the same as the front. Cardboard template first, cut the mdf trial fit and make up all the supports then glue spray the mdf, carefully put it in place and put in the supports starting from the middle out. There is a slight gap between the pieces of about 3-4mm but it wont be a problem once the second layer is on. Here are a couple of pics too.

Attached Files


1 user(s) are reading this topic

0 members, 1 guests, 0 anonymous users