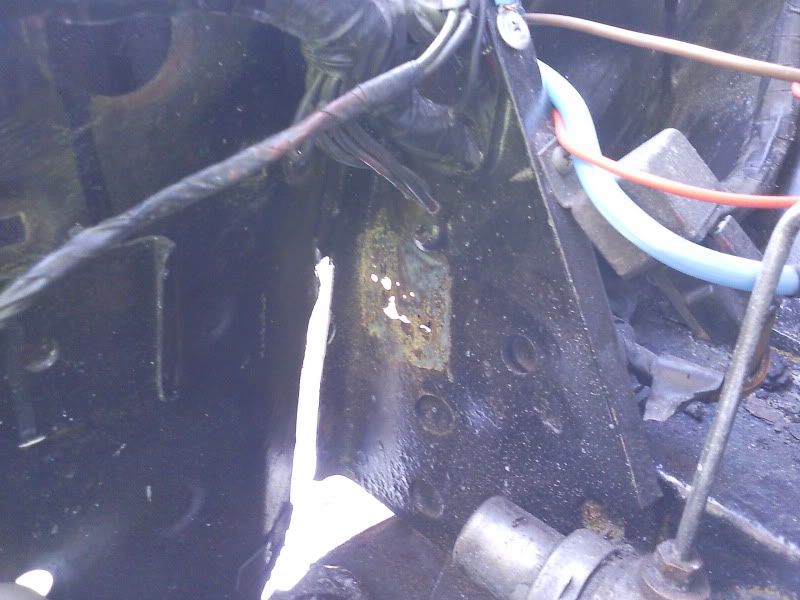
Ok i've just been out and had a proper look at the triangle piece. Its all solid apart from one area which is at the end of box section, to the left of where the subframe bolt goes through.
On the photo of your car you posted there, have you remove 2 layers to get to that stage? One square out of the triangle piece and another out of the box section behind it?

Shock Absorber Mount Repair
Started by
mike.
, Sep 14 2010 01:43 PM
61 replies to this topic
#47

sonikk4
-

- Admin
-

- 16,175 posts
Twisted Paint Polisher!!!
- Name: Neil
- Location: Cotwolds.
Posted 04 October 2010 - 11:03 AM
Ok i've just been out and had a proper look at the triangle piece. Its all solid apart from one area which is at the end of box section, to the left of where the subframe bolt goes through.
On the photo of your car you posted there, have you remove 2 layers to get to that stage? One square out of the triangle piece and another out of the box section behind it?
Yes i did as the triangular plate lower section was bulging due to rust behind it in the box section. I had to do that on both sides, unfortunately on the r/h side i had made it more difficult for myself by fitting the inner wing first oops but i still managed to cut it out and repair both pieces without too much hassle.
If your's is solid then you could very carefully cut down the flange side where it joins to the inner wing and drill out the lower section spot welds. This way you will be able to get in to repair the damaged section of the box and then weld back in the triangular piece. A lot of messing around but with care you should be able to reweld the triangular piece back in place. Use a 1mm cutting disc.
Hope this helps.
#48
mike.
-
- Members
-
- 6,176 posts
Crazy About Mini's
Posted 04 October 2010 - 11:29 AM
I see thanks.
What i'm going to try and do is repair the top of the box section with the triangle piece in place. Because the wiring loom goes through it which I really don't want to remove unless I have to because my new ignition system wiring has plugs on it that are too big to fit through the hole. Also, the brake pressure regulator is bolted on pretty much on top of the triangle piece, so that'd be in the way aswell and I'm definitely not removing that because it took me so long to get my brakes bled - it'd kill me to have to do it all again.
I can't get my grinder or drill into the engine bay anyway really, so i've bought a dremel with a flexible attachment that really small and manoeuvrable. So although i'll probably take me a while and i'll go through a fair amount of cutting discs, i'm pretty sure i'll be able to get the small patch of rust cut out of the triangle piece and also cut the top of the box section out from inside the box section end. Then I can just make a right angled repair piece to weld into the end of the box section.
I'll see how I get on, but if this dremel doesn't work I won't be very happy because its going to mean alot more work if I have to remove the wiring and things to get at the rust.
#49
mike.
-
- Members
-
- 6,176 posts
Crazy About Mini's
Posted 04 October 2010 - 12:20 PM
Ok here we go.
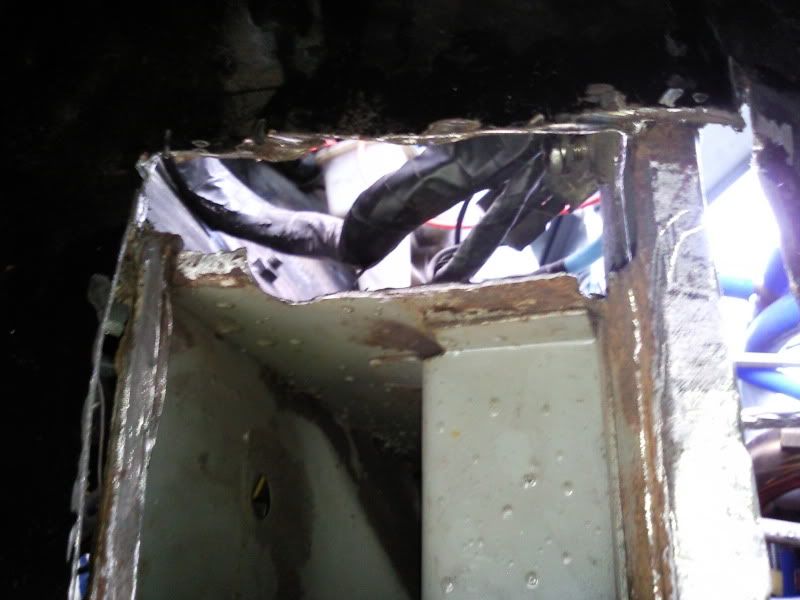
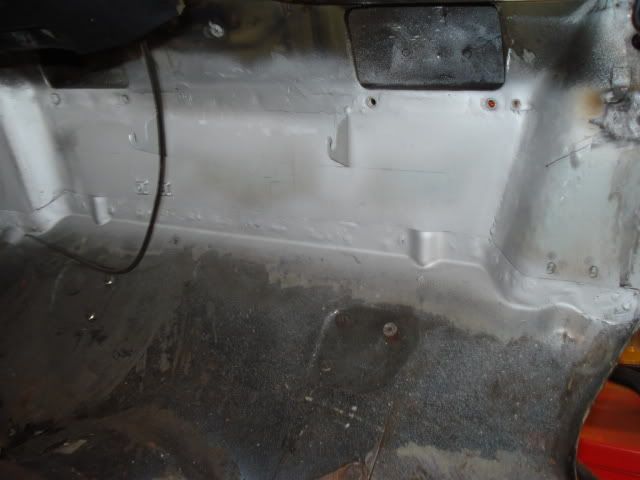
I've just been out and cut the rusty top of the box section out along with the threaded block complete with broken studs.
The dremel worked really well, didn't take me too long at all and only took 3 mini cutting discs which was pretty good I thought considering they're only an inch across and less than 1mm thick.
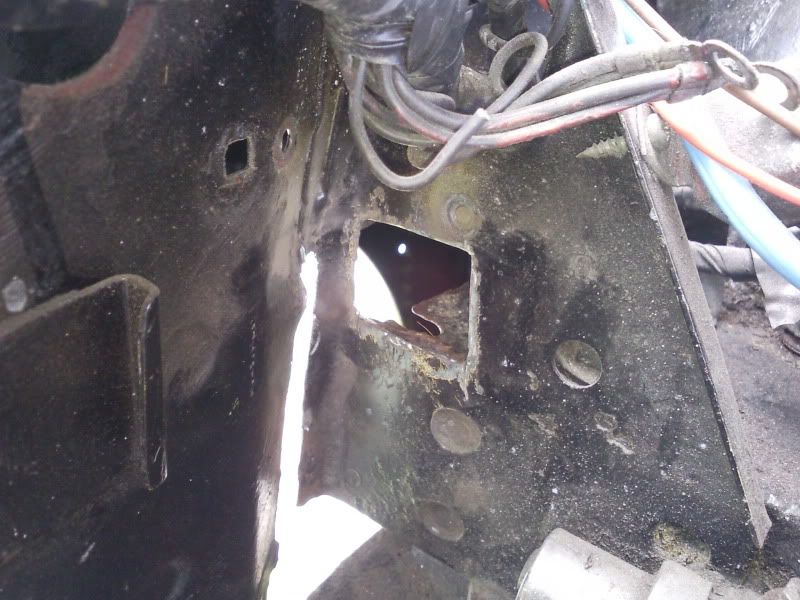
I've just wire brushed the rust on the triangle piece. Its really not that bad at all and its all above the box section. So i'm hoping I can get the dremel in there and cut that out and the patch for that only needs to be a little over an inch square:
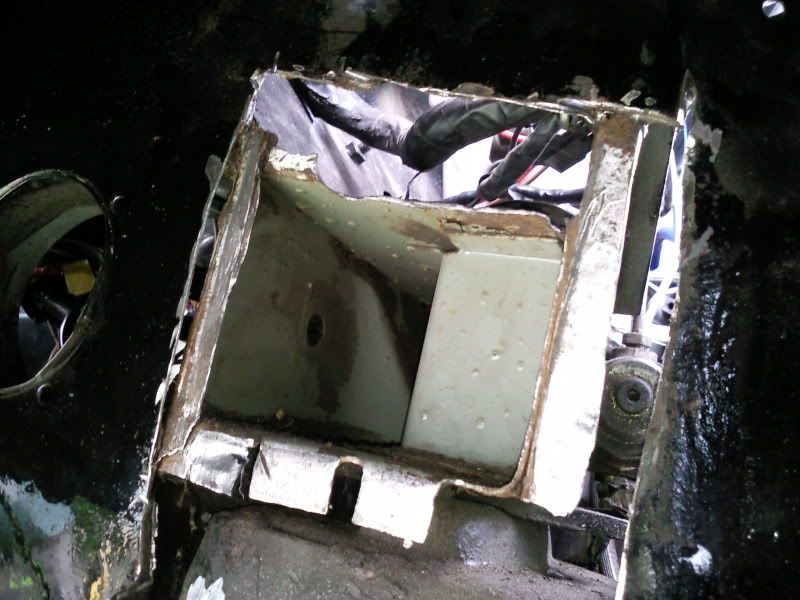
And here what the box sections looking like. The inside of the box section behind the triangle piece is also solid with abit of surface rust so thats all ok. So now what i'm planning is to make a small right angled piece - only about 10x10mm. Then i'll drill 2 holes in that and get some new threaded blocks made and have them welded onto the back of it.
Then hopefully that can just be welded from underneath the wing into the top of the box section to replace the bit i've just removed. That'll then give a flat end to the box section all the way round for a stiffening piece to be plug welded to.
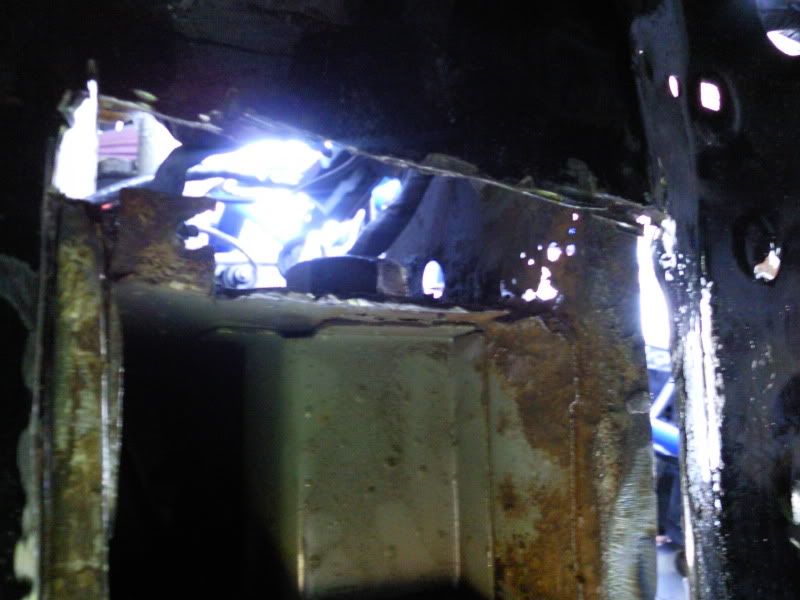
I've just been out and cut the rusty top of the box section out along with the threaded block complete with broken studs.
The dremel worked really well, didn't take me too long at all and only took 3 mini cutting discs which was pretty good I thought considering they're only an inch across and less than 1mm thick.
I've just wire brushed the rust on the triangle piece. Its really not that bad at all and its all above the box section. So i'm hoping I can get the dremel in there and cut that out and the patch for that only needs to be a little over an inch square:
And here what the box sections looking like. The inside of the box section behind the triangle piece is also solid with abit of surface rust so thats all ok. So now what i'm planning is to make a small right angled piece - only about 10x10mm. Then i'll drill 2 holes in that and get some new threaded blocks made and have them welded onto the back of it.
Then hopefully that can just be welded from underneath the wing into the top of the box section to replace the bit i've just removed. That'll then give a flat end to the box section all the way round for a stiffening piece to be plug welded to.
#50
mike.
-
- Members
-
- 6,176 posts
Crazy About Mini's
Posted 09 October 2010 - 12:16 PM
Progress with this is slow as I only have one day a week really to work on the car now with going back to uni.
Heres where i'm at now:
Cut the small bit of rot out of the triangular brace section:
Got the end of the box section pretty much prepped for welding onto although the flat end of the left side of the box seems quite thin:
Only thing left to do is to decide what to do with the top of the box section:
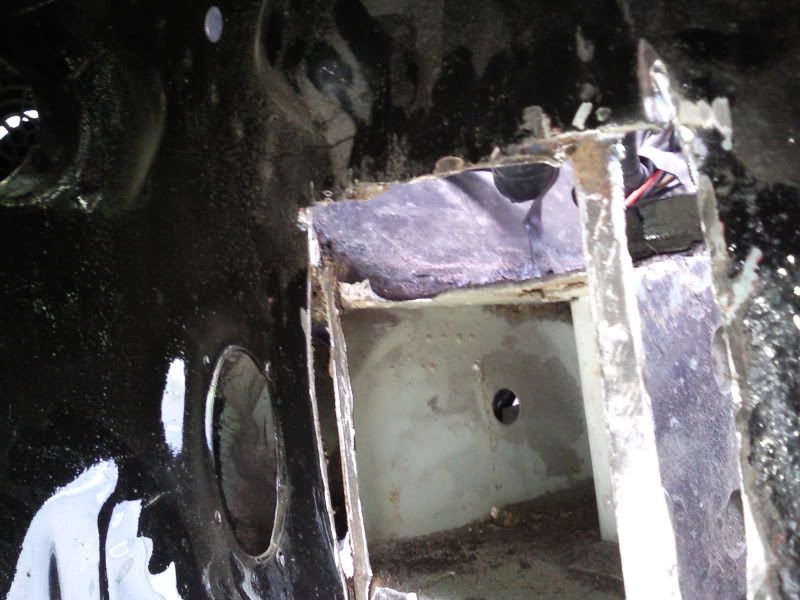
I think what i'm going to do is cut the rest of the top of the box off and make a small right angled piece to replace it, with some small tabs on the ends of it folded down so they meet the insides of the box section so they can be welded to the top of the box section as well as the tabs being plug welded to the inside of the box. I'm going to have a go at making a template out of card board to see if it'll work and i'll post a pic up to show what i'm thinking.
The only other thing is what to do about the bottom mounting threads. I can't imagine how the guy is going to be able to weld them into the bottom of the box section, even if it is only a couple of tacks, as theres going to be no access really. Would getting studs welded into my repair piece be a good idea or not in terms of strength?
Heres where i'm at now:
Cut the small bit of rot out of the triangular brace section:
Got the end of the box section pretty much prepped for welding onto although the flat end of the left side of the box seems quite thin:
Only thing left to do is to decide what to do with the top of the box section:
I think what i'm going to do is cut the rest of the top of the box off and make a small right angled piece to replace it, with some small tabs on the ends of it folded down so they meet the insides of the box section so they can be welded to the top of the box section as well as the tabs being plug welded to the inside of the box. I'm going to have a go at making a template out of card board to see if it'll work and i'll post a pic up to show what i'm thinking.
The only other thing is what to do about the bottom mounting threads. I can't imagine how the guy is going to be able to weld them into the bottom of the box section, even if it is only a couple of tacks, as theres going to be no access really. Would getting studs welded into my repair piece be a good idea or not in terms of strength?
#51
mike.
-
- Members
-
- 6,176 posts
Crazy About Mini's
Posted 09 October 2010 - 12:50 PM
Heres a couple of pics of how i'm thinking of repairing the top of the box section. I'd be using the 1.2mm steel i've got for this repair piece:
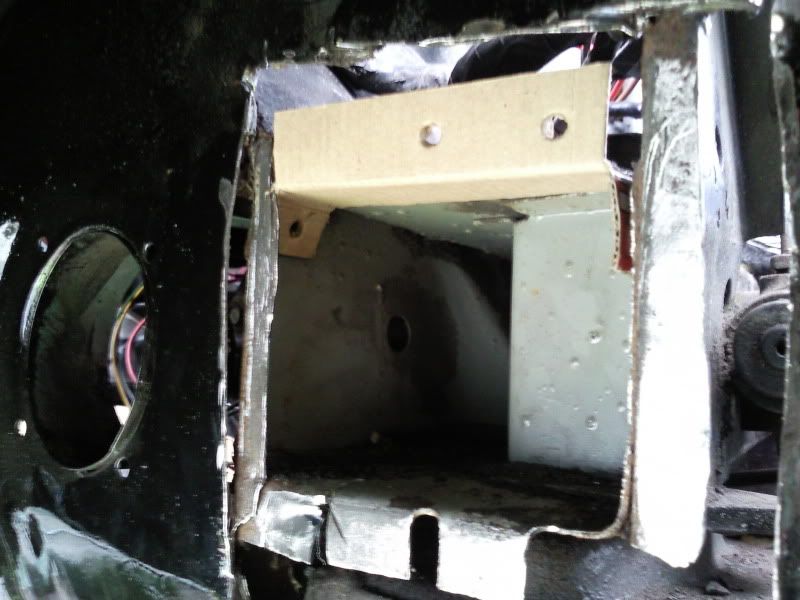
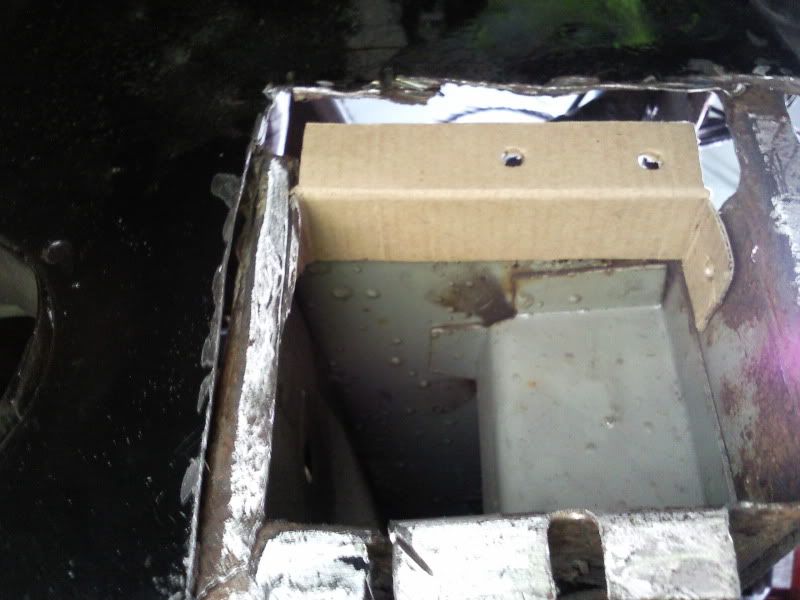
Hopefully the welder will be able to plug weld the 2 tabs onto the inside of the box section and then get his welder in to seam weld the rest of it into the top of the box section.
What do people think of that?
Is this the best way of going about it?
Hopefully the welder will be able to plug weld the 2 tabs onto the inside of the box section and then get his welder in to seam weld the rest of it into the top of the box section.
What do people think of that?
Is this the best way of going about it?
#52
sonikk4
-
- Admin
-
- 16,175 posts
Twisted Paint Polisher!!!
- Name: Neil
- Location: Cotwolds.
Posted 09 October 2010 - 01:55 PM
What you are suggesting will work and your welder should be able to weld that in no problem at all. The fact you have got a Dremmel now will make your life much easier to get into those tight corners. By seam welding along the top of the box section will enable you to seal that area up and then use the Dremmel to grind it down. 
#53
mike.
-
- Members
-
- 6,176 posts
Crazy About Mini's
Posted 09 October 2010 - 02:08 PM
Alrite then thanks again.
I'll see how it goes making that piece out of steel... Since this is the first bit of patch making i'll be doing. Once i've made an accurate template, i'll cut it out in steel and then for bending it - Will putting the steel in a vice on the fold line and just hammering the steel over to a right angle work ok?
Also what would you do for the bottom mounting? I'm just unsure how the welder will be able to weld a mounting block on at the bottom. Only thing I can think of is trying to fit a drill under the wing and drilling a hole inbetween where the mounting holes will be and getting a single plug weld through into the centre of threaded block, but if i can't get a drill in i'm stuck for ideas really.
#54
sonikk4
-
- Admin
-
- 16,175 posts
Twisted Paint Polisher!!!
- Name: Neil
- Location: Cotwolds.
Posted 09 October 2010 - 03:06 PM
For folding, yes the vice will work well as it is a small piece you are doing. For the bottom shock mount block a couple of options here. Drill a couple of 1/4" holes through the repair plate one either side of the main bolt holes and one in the middle then using a high power setting plug weld (this is what i did) or if you can get access to the back then a large tack weld either side. For me option A is the way to go here.
As you have not made your main repair plates yet i would sort out the top box section repair first, then once you have refitted the top shock mount block manufacture your repair plates to fit properly. Mark out your top holes first and drill them. Fit your shock absorber mount and then drill the lower mount holes.
Drill the plug weld holes through your repair plates as per option A, put your lower mount block in position put your bolts through to hold the block in place and then plug weld.
Looking at what you have left you could just plug weld the mount in place to the box section lip before welding on the repair section but you will have to fit the mount to get the position right. Once thats done then mark off on the repair plates the lower bolt holes before welding the repair plates on and drill the holes larger than the bolts (do this for all four bolt holes) By doing this you can then use the shock mount bolts to hold the repair plates in place.
Hopefully this makes sense.
Neil
#55
mike.
-
- Members
-
- 6,176 posts
Crazy About Mini's
Posted 09 October 2010 - 03:30 PM
Yeah the way I was thinking of doing it was just getting the block plug welded to the lip of the box section. Then like you say, drilling my repair plates and holding them in place with the shock mount bolts.
If I did it the other way you describe, i'd be drilling my repair piece for the plug welds then getting the welds put through the repair piece, the box section lip and into the mounting block - So its all held together. Is that what your saying? In this case the blocks would basically be welded in with the repair piece into the end of the box section right?
Either way would work just aswell as each other really. A single plug weld would most likely be more than up to the job as the standard mounting is a couple of tiny tack welds looking at the old mounting blocks.
I'll have a think about the best way of doing it, as I think what i'll be looking at doing is getting both sides ready for the welder to come in and repair the ends of the box section, then once thats done I can get my repair plates made and drilled ready for welding another time.
#56
sonikk4
-
- Admin
-
- 16,175 posts
Twisted Paint Polisher!!!
- Name: Neil
- Location: Cotwolds.
Posted 09 October 2010 - 03:38 PM
If I did it the other way you describe, i'd be drilling my repair piece for the plug welds then getting the welds put through the repair piece, the box section lip and into the mounting block - So its all held together. Is that what your saying? In this case the blocks would basically be welded in with the repair piece into the end of the box section right?
That what's i mean and that would make it very strong as well. I would go for more than on one plug weld though, personal preference.
That what's i mean and that would make it very strong as well. I would go for more than on one plug weld though, personal preference.
#57
mike.
-
- Members
-
- 6,176 posts
Crazy About Mini's
Posted 09 October 2010 - 03:50 PM
Ok yeah I understand. I'm going to get some new mounting blocks made up for both sides and give both sides the same treatment (even though the passenger side doesn't look as bad) I'm going to get them made with metric threads probably M6 or M-8 and i'll get them made wide enough for a decent plug weld either side of the threads. Only thing will be trying to get a drill in under the wing to drill the box section lip for the plug weld, but i'll see how I go, I may be able to drill it at abit of an angle.
One last thing for now. How would you recommend protecting the inside of the box section and insides of repair plates? At the moment my plan is to wire brush as much as I can and treat the rust inside the box section. Should I then spray it with some of the weld through primer you can get in tins? Could this primer also be used on and between the repair plates since painting isn't an option? Just to get some protection on them so there's not a load of bare metal repair pieceswelded together with a coat of paint on the outside...
One last thing for now. How would you recommend protecting the inside of the box section and insides of repair plates? At the moment my plan is to wire brush as much as I can and treat the rust inside the box section. Should I then spray it with some of the weld through primer you can get in tins? Could this primer also be used on and between the repair plates since painting isn't an option? Just to get some protection on them so there's not a load of bare metal repair pieceswelded together with a coat of paint on the outside...
Edited by mike., 09 October 2010 - 03:53 PM.
#58
mike.
-
- Members
-
- 6,176 posts
Crazy About Mini's
Posted 09 October 2010 - 03:53 PM
Also i've just realised that the forum automatically types mate when your trying to type M-8. Who came up with that idea?!
#59
jayare
-

- TMF+ Member
-
- 2,093 posts
Up Into Fourth
Posted 10 October 2010 - 05:58 PM
Sounds like you've got your head round the repair pretty well now Mike. Just a couple of things though - do yourself (and any future owner of your Mini) a big favour - please make the mounting blocks with 1/4" UNF threads as per original - there would be nothing more frustrating at a later date than to strip the threads by trying to put the correct imperial bolt into it! Also from reading through it sounds like you aren't quite 100% on the position of the lower mounting block - it fits just under the cross-member not inside it - pretty much the same as the top one fits just above the cross-member,
JR
JR
#60
sonikk4
-
- Admin
-
- 16,175 posts
Twisted Paint Polisher!!!
- Name: Neil
- Location: Cotwolds.
Posted 10 October 2010 - 06:28 PM
Ok yeah I understand. I'm going to get some new mounting blocks made up for both sides and give both sides the same treatment (even though the passenger side doesn't look as bad) I'm going to get them made with metric threads probably M6 or M-8 and i'll get them made wide enough for a decent plug weld either side of the threads. Only thing will be trying to get a drill in under the wing to drill the box section lip for the plug weld, but i'll see how I go, I may be able to drill it at abit of an angle.
One last thing for now. How would you recommend protecting the inside of the box section and insides of repair plates? At the moment my plan is to wire brush as much as I can and treat the rust inside the box section. Should I then spray it with some of the weld through primer you can get in tins? Could this primer also be used on and between the repair plates since painting isn't an option? Just to get some protection on them so there's not a load of bare metal repair pieceswelded together with a coat of paint on the outside...
I used loads of Zinc rich primer especially on the areas where i was welding and the rest of the box section areas i used a straight pneumatic drill with a grinding bit to remove any loose rust, Kurust and then etch primer, primer and topcoat.
When you have finished all your welding you can pump in waxoyl from inside the car as there are two access areas as you can see from the picture.


1 user(s) are reading this topic
0 members, 1 guests, 0 anonymous users


