There are some spot welds in there as well as the seam welds unfortunately so you will have trouble prising it out.

Shock Absorber Mount Repair
Started by
mike.
, Sep 14 2010 01:43 PM
61 replies to this topic
#31

sonikk4
-

- Admin
-

- 16,058 posts
Twisted Paint Polisher!!!
- Name: Neil
- Location: Oxfordshire
Posted 18 September 2010 - 01:43 PM
#32
mike.
-
- Members
-
- 6,176 posts
Crazy About Mini's
Posted 18 September 2010 - 05:52 PM
So what should I do then?
All i'm worried about is removing too much and then the welder saying theres nothing to weld 2 new skins onto.
If I cut all of the remaining metal out by cutting those seam welds off and getting rid of all the spot welds, I should be left with just the hole i've cut and the end of the box section right?
So if thats the case, how would the new inner strengthening plate be welded in? Because to the right of the hole i've cut is just the single skin of the inner wing and the metal of the box section doesn't really look like its suitable to be welded to.
To the left of the hole i've cut I'm pretty sure I can see the 2 skins and should be able to prise them apart and cut the top skin slightly bigger to allow for a repair similar to original spec as you've said before.
#33
sonikk4
-
- Admin
-
- 16,058 posts
Twisted Paint Polisher!!!
- Name: Neil
- Location: Oxfordshire
Posted 19 September 2010 - 02:48 PM
If you have a look at my boys rebuild Project Erm you will see where the panel finish's/starts etc and you will also see where the spot welds are when i attached the new inner wing to the reinforcement panel.
You could remove the complete section of metal covering the reinforcement plate, fabricate the new section attach that to the inner body structure then weld in the new piece of inner wing/repair section.
You could remove the complete section of metal covering the reinforcement plate, fabricate the new section attach that to the inner body structure then weld in the new piece of inner wing/repair section.
#34
Deathrow
-

- TMF IT Specialist
-
- 5,734 posts
Have you tried turning it off and on again?
- Name: Adam
- Location: Manchester, UK
Posted 19 September 2010 - 05:02 PM
Mike, try not to panic.
Aside from grinding up the whole car, there's no such thing as running out of metal to weld too, unless it's all rust!
I remember when I was doing my first repairs, I was terrified. I removed the boot floor and thought "Oh dear, how do I put that back?!" but now it's more of a cut things up and ask questions later attitude. You just get used to it .
.
What sonikk says is correct, the back section of that panel only goes so far back before its just the inner wings single skin. If you look under the bonnet on the other side, behind the triangular stiffener from the wing to the crossmember, you'll be able to see where the second skin finishes. If this doesn't make any sense, I'll try and find you a picture to show you what I mean. You can easily take a card template from that I think.
The other thing I'd say that will improve your work, get yourself some thin cutting discs, 1mm preferably. At the moment it looks like you're using a 3 or 4mm disc, the problem there is as they cut, they heat the metal alot and cause alot of flashing around the cut, they can make it very difficult to cut through 1 skin of metal without damaging the one beneath. The 1mm cutting discs are brilliant, it's like precision surgery.
Aside from grinding up the whole car, there's no such thing as running out of metal to weld too, unless it's all rust!
I remember when I was doing my first repairs, I was terrified. I removed the boot floor and thought "Oh dear, how do I put that back?!" but now it's more of a cut things up and ask questions later attitude. You just get used to it
.What sonikk says is correct, the back section of that panel only goes so far back before its just the inner wings single skin. If you look under the bonnet on the other side, behind the triangular stiffener from the wing to the crossmember, you'll be able to see where the second skin finishes. If this doesn't make any sense, I'll try and find you a picture to show you what I mean. You can easily take a card template from that I think.
The other thing I'd say that will improve your work, get yourself some thin cutting discs, 1mm preferably. At the moment it looks like you're using a 3 or 4mm disc, the problem there is as they cut, they heat the metal alot and cause alot of flashing around the cut, they can make it very difficult to cut through 1 skin of metal without damaging the one beneath. The 1mm cutting discs are brilliant, it's like precision surgery.
#35
mike.
-
- Members
-
- 6,176 posts
Crazy About Mini's
Posted 19 September 2010 - 05:55 PM
Alrite cheers guys.
Your right about the grinding discs, the ones i've got are about 3-4mm so do leave quite a big cut - They're from halfords and its the only thickness they sell. Where can I get thinner ones? Machine marts thinnest are 3mm and just had a look on the B&Q website and they don't list the thickness, only the diameter. I'l find some anyway.
The thing is getting that last bit of double skinned metal off the box section, theres alot of spotwelds judging by photos of other repairs, but I think they just hold the 2 layers of metal together. Its just going to be awkward getting the grinder in behind the inner wing close enough to cut through the welds - The wiring looms pretty close aswell if I slip...
I'll see how I go anyway, aslong as people don't think i've done it wrong so far it makes me feel abit better.
Think i'll try and get the grinder in to remove the inner seam welds and once i've got that off I can see what state the end of the box sections in - Because from what I can see of it so far, its not suitable for welding to.
#36
mike.
-
- Members
-
- 6,176 posts
Crazy About Mini's
Posted 19 September 2010 - 06:00 PM
Infact i've just found a pack of 10 x 1mm cutting discs on ebay for £5. Even if these don't last as long its better than paying £7 for one at B&Q!
#37
jayare
-

- TMF+ Member
-
- 2,093 posts
Up Into Fourth
Posted 19 September 2010 - 07:56 PM
If you have a Screwfix trade counter nearby that will probably be the cheapest place to get the 1mm cutting discs. The difference is amazing - you can make extremely accurate cuts with them even down to going through one of two layers,
JR
JR
#38
Deathrow
-
- TMF IT Specialist
-
- 5,734 posts
Have you tried turning it off and on again?
- Name: Adam
- Location: Manchester, UK
Posted 19 September 2010 - 08:16 PM
Are you using grinding discs all the time? There are two different type of discs, cutting and grinding and they do work differently. Just in case you weren't aware.
Oh I remember the days of B&Q, how they justify that cost, I have no idea! I found out that my local motorfactors sold 1mm cutting discs in packs of 10 for about £4.25.
Hunt around your local motorfactors or give them a call, I was shocked that my local one sold cutting and grinding discs, but glad I found out.
My friends dad gets me cutting discs from his work now which are amazing, I'll get a picture tomorrow for you so you know the brand and stuff, they're really good but they're not made of the regular material of a cutting disc, it lasts so much longer and they go through steel sheet like it's butter.
Do you have any cold chisels? If you can't get a drill under the wing to drill the spot welds out, the best bet is to grind the spot welds, but not so miuch you go through to the panel underneath, then use the cold chisel to split the 2 sheets, go easy though, it's easy to make a mess and tear the sheet you want to remain intacked.
As for that wiring, I know you're going to hate me for saying it but I'd be considering trying to get it out of the way anyway. If you do manage not to damage it with the grinder, do you want to risk damding it from the heat of the welding? I can't tell how close it is to the area being repaired, but is it a risk worth taking?
#39
mike.
-
- Members
-
- 6,176 posts
Crazy About Mini's
Posted 19 September 2010 - 09:20 PM
Yeah, sorry it is cutting discs i'm using. I did have a grinding one somewhere aswell, but that was about 6mm thick and came with my grinder. Will have to try and dig it out in my state of a garage.
I've ordered some ebay 1mm cutting discs. £4.85 for 10, so should last me. The cutting i've done so far hasn't really done any harm to the thicker halfords disc i'm using, so even if these last half as long I should have plenty.
I have got a small sharp chisel i've been using it abit to split some of the rot away after i'd cut around it, so i'll give it a go.
As for the wiring i'll have to have a think about that. I really don't think moving it would be an option, it'd take alot of time and effort - Although the possible time and effort it'd take if it did get damaged is worth keeping in mind.
I think i'll have a proper look at it and see how close it really is.An idea i've got is - I could get abit of sheet metal and hammer it into a half cylinder sort of shape around abit of scaffold pole i've got. Then I could slide that in around the loom, through the hole in the bulkhead cross member - That'd protect it alrite wouldn't it?
What do people reckon about the state of the end of the end of the box section? Looking at it so far it doesn't look like its in good enough condition to be welded to - Even if it is just spot/plug welds. I'll have to get the grinding disc or maybe wire brush attachment out and see how it cleans up I suppose.
I'll let you know how I get on, although it probably won't be until next week because im off back to uni tomorrow!
#40
Deathrow
-
- TMF IT Specialist
-
- 5,734 posts
Have you tried turning it off and on again?
- Name: Adam
- Location: Manchester, UK
Posted 19 September 2010 - 10:56 PM
If you wrap something around the wiring it should be alright I guess. You need ot insulate it from any metalwork as thats where the heat is going to come from if it does.
The end of the crossmember is pretty thick metal, I think what you have there will clean up just fine with a wire brush attachment on a drill, then kurust it for good measure.
The end of the crossmember is pretty thick metal, I think what you have there will clean up just fine with a wire brush attachment on a drill, then kurust it for good measure
.
#41
morley
-

- Members
-
- 903 posts
One Carb Or Two?
- Location: Devon
Posted 21 September 2010 - 05:50 PM
I have a similar problem, but my shock mount bolts are fine and removed, would it be best if i were to cut out the rot and just weld in 2 thin plates as stated? and also with cutting away at the shock mount damage the inner wings on the engine bay side at all [worried about ruining my paint job]
sorry for slight hi-jack :]
sorry for slight hi-jack :]
#42
mk3cortina
-

- Members
-
- 677 posts
Super Mini Mad
Posted 21 September 2010 - 08:01 PM
bah! just wled on one thick plate rather than faffing around with two thin ones, causing yourself too much work and only making another rust trap to rot between two thin plates, like whats already happened.
#43
mike.
-
- Members
-
- 6,176 posts
Crazy About Mini's
Posted 27 September 2010 - 03:16 PM
Ok i've done abit more today with my day off at uni.
Basically I removed the last bit of metal from the right hand side - The bit thats seam welded on the inside of the inner wing. I used these new thin cutting discs i've got to make a pretty accurate cut through the welds in the engine bay from under the wing. Then ground over the metal until the tops of the spot welds were revealed, gave them abit of a grind and then chiselled the remaining metal off.
On the left side of where i'd cut, I tried to cut carefully through just the one layer of the inner wing, but it just didn't happen and I ended up cutting through both again and in the end ran out of metal to cut inside the box section. Basically the inner stiffening plate on the end of the box section was just rusty and generally gone thin and no good to weld a repair piece into. I don't really want to keep trying to split the 2 layers apart, because i'm just cutting into solid metal that doesn't really need any work and just making the repair patches i'll need to maker bigger and more complicated.
So heres what i've got at the mo and what i'm planning is making a a thicker plate out of the thick metal i've got (its actually about 1.8mm thick now i've looked at it properly not 2-3mm) and drilled plenty of holes in that so it can be welded to the end of the box section with plug welds like i've marked on the photo. Then i've got some thinner 1.2mm steel which I'll put aload of holes in aswell and get that welded all the way round to the inner wing and then welded to the thicker piece behind with aload of plug welds.

I'm pretty confident that what I propose will make a good strong repair, providing I clean up the end of the box section up and get a good amount of plug welds into the first thicker plate. But the top of the box section is in a pretty bad way really and i've made more of a mess of it by hammering a punch through the broken studs at the top. As you can see the top of the box section and where it meets the triangle piece of the bulkhead aren't very healthy and are pretty holey and not going to provide much support if i could even clean it up enough to weld to and the way it is at the moment, theres no real flat end of the box section to weld to anyway. So any suggestions on the next step with that?
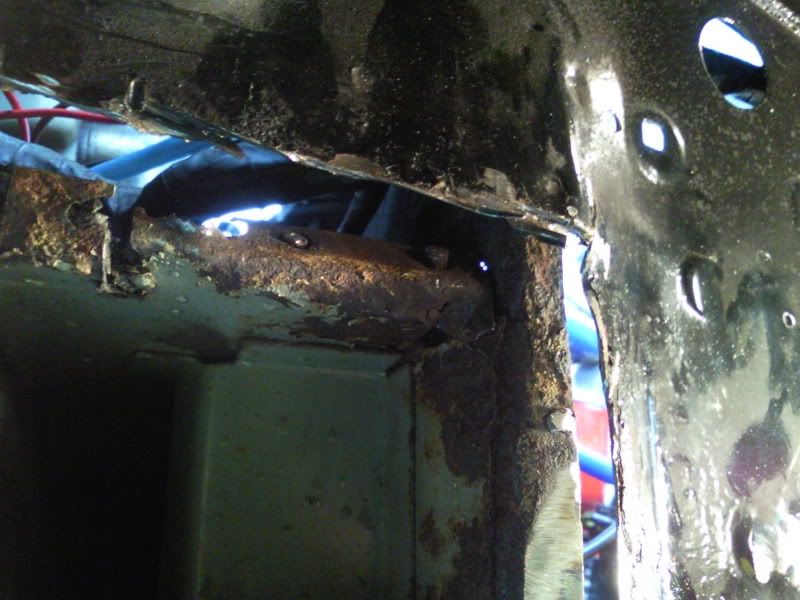
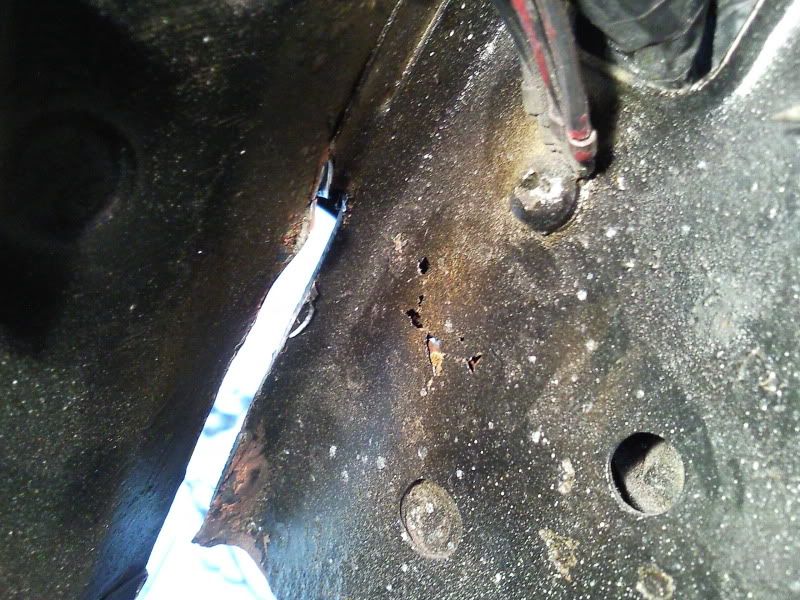
Here you can see how the rust has gone into the triangle piece of the bulkhead:
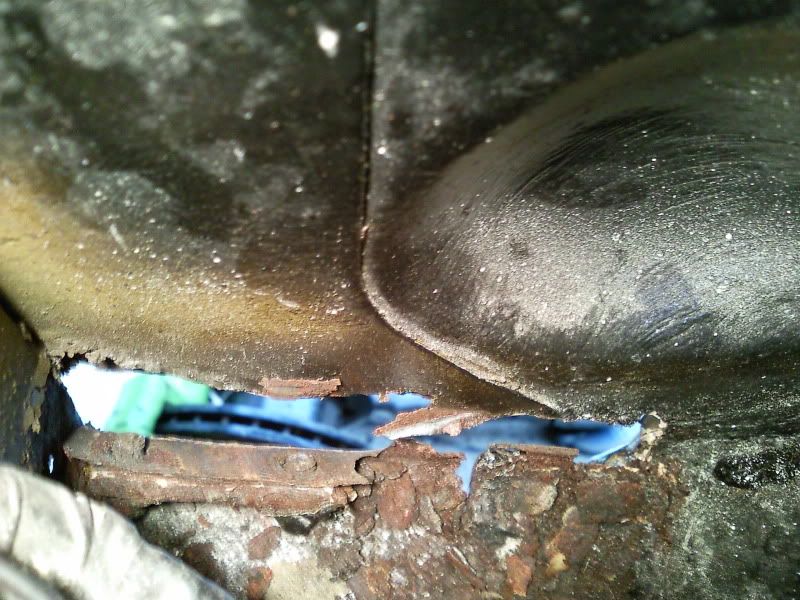
And heres a pic from above of whats happening in the engine bay after my cuts and the hammering of the punch into the broken studs:
So any suggestions on the next stage of progression for the top of the box section as i'm not really sure. I spent a good 30 mins or so just examining the area and trying to think of how it could be repaired. The only thing I came up with was a complex repair piece to go in and replace the top part of the box section, with a right angled piece to give a flat surface to plug weld the inner plate to like the rest of the box section, as well as a 1x1" square piece on the end of it to go into the triangle bulkhead piece, but i'm really not sure about that and its hard to explain without making a full on 3D CAD drawing of what i'm imagining in my head
So yeah - help please....

Basically I removed the last bit of metal from the right hand side - The bit thats seam welded on the inside of the inner wing. I used these new thin cutting discs i've got to make a pretty accurate cut through the welds in the engine bay from under the wing. Then ground over the metal until the tops of the spot welds were revealed, gave them abit of a grind and then chiselled the remaining metal off.
On the left side of where i'd cut, I tried to cut carefully through just the one layer of the inner wing, but it just didn't happen and I ended up cutting through both again and in the end ran out of metal to cut inside the box section. Basically the inner stiffening plate on the end of the box section was just rusty and generally gone thin and no good to weld a repair piece into. I don't really want to keep trying to split the 2 layers apart, because i'm just cutting into solid metal that doesn't really need any work and just making the repair patches i'll need to maker bigger and more complicated.
So heres what i've got at the mo and what i'm planning is making a a thicker plate out of the thick metal i've got (its actually about 1.8mm thick now i've looked at it properly not 2-3mm) and drilled plenty of holes in that so it can be welded to the end of the box section with plug welds like i've marked on the photo. Then i've got some thinner 1.2mm steel which I'll put aload of holes in aswell and get that welded all the way round to the inner wing and then welded to the thicker piece behind with aload of plug welds.
I'm pretty confident that what I propose will make a good strong repair, providing I clean up the end of the box section up and get a good amount of plug welds into the first thicker plate. But the top of the box section is in a pretty bad way really and i've made more of a mess of it by hammering a punch through the broken studs at the top. As you can see the top of the box section and where it meets the triangle piece of the bulkhead aren't very healthy and are pretty holey and not going to provide much support if i could even clean it up enough to weld to and the way it is at the moment, theres no real flat end of the box section to weld to anyway. So any suggestions on the next step with that?
Here you can see how the rust has gone into the triangle piece of the bulkhead:
And heres a pic from above of whats happening in the engine bay after my cuts and the hammering of the punch into the broken studs:
So any suggestions on the next stage of progression for the top of the box section as i'm not really sure. I spent a good 30 mins or so just examining the area and trying to think of how it could be repaired. The only thing I came up with was a complex repair piece to go in and replace the top part of the box section, with a right angled piece to give a flat surface to plug weld the inner plate to like the rest of the box section, as well as a 1x1" square piece on the end of it to go into the triangle bulkhead piece, but i'm really not sure about that and its hard to explain without making a full on 3D CAD drawing of what i'm imagining in my head
So yeah - help please....
#44
sonikk4
-
- Admin
-
- 16,058 posts
Twisted Paint Polisher!!!
- Name: Neil
- Location: Oxfordshire
Posted 30 September 2010 - 05:05 PM
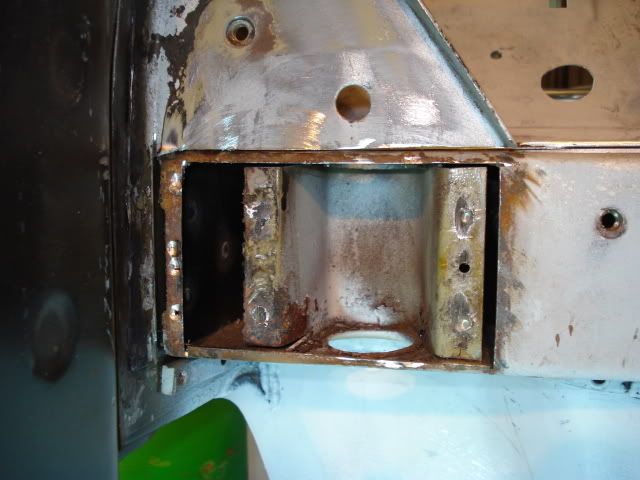
Ok Mike i think the way forward for you here is to carefully drill out the spot welds on the triangular panel where it attaches to the box section, then carefully cut along the edge of the triangular panel where it attaches to the inner wing and drill out the other spot welds on the flange to inner wing. Use the 1mm cutting discs mentioned earlier in your thread.
You will then have plenty of access to repair the end of the box section. Make your repair pieces out of 1.2mm thick steel as this is the same as the box section.
You may have to replace the triangular panel if its shot or like me repair it like this
You can buy a replacement section from Somerfords pt no AHP36001 RH Brkt XMember to Dash Assy or AHP36007 LH Brkt XMember to Dash Assy £21.20 ea.
Hope this helps.
#45
mike.
-
- Members
-
- 6,176 posts
Crazy About Mini's
Posted 03 October 2010 - 06:23 PM
Thanks, i'll see how I get on.
If i'm going to be drilling out spot welds, i'll get a proper spot weld drill bit. Theres some 6mm cobalt ones on ebay that are listed as made in england quality so think i'll get a couple of those and i'll see how I go - Link
Also for the new threads I think i'm going to get some little threaded blocks made and get them welded onto the back of my repair panels as standard, but either way i'm going to get them made quite a bit bigger. I think i'll probably get the made to M6 size, as mate will probably just be a waste of time.
Thanks for the help. I'll update again soon - Depending on the weather
Edited by mike., 04 October 2010 - 08:29 AM.


0 user(s) are reading this topic
0 members, 0 guests, 0 anonymous users


